Well that is just ridiculous…ly cheap. Thanks! Looking forward to a bunch of build nights.
2 Likes
still in for 5
2 Likes
Okay, my bodge works. I ran it for a few hours tonight and had absolutely no heat I could detect. One nice part about those aluminum boards is they are amazing heatsinks (but it can make hand-soldering a bit more difficult).
I’ll start working on the solder paste template.
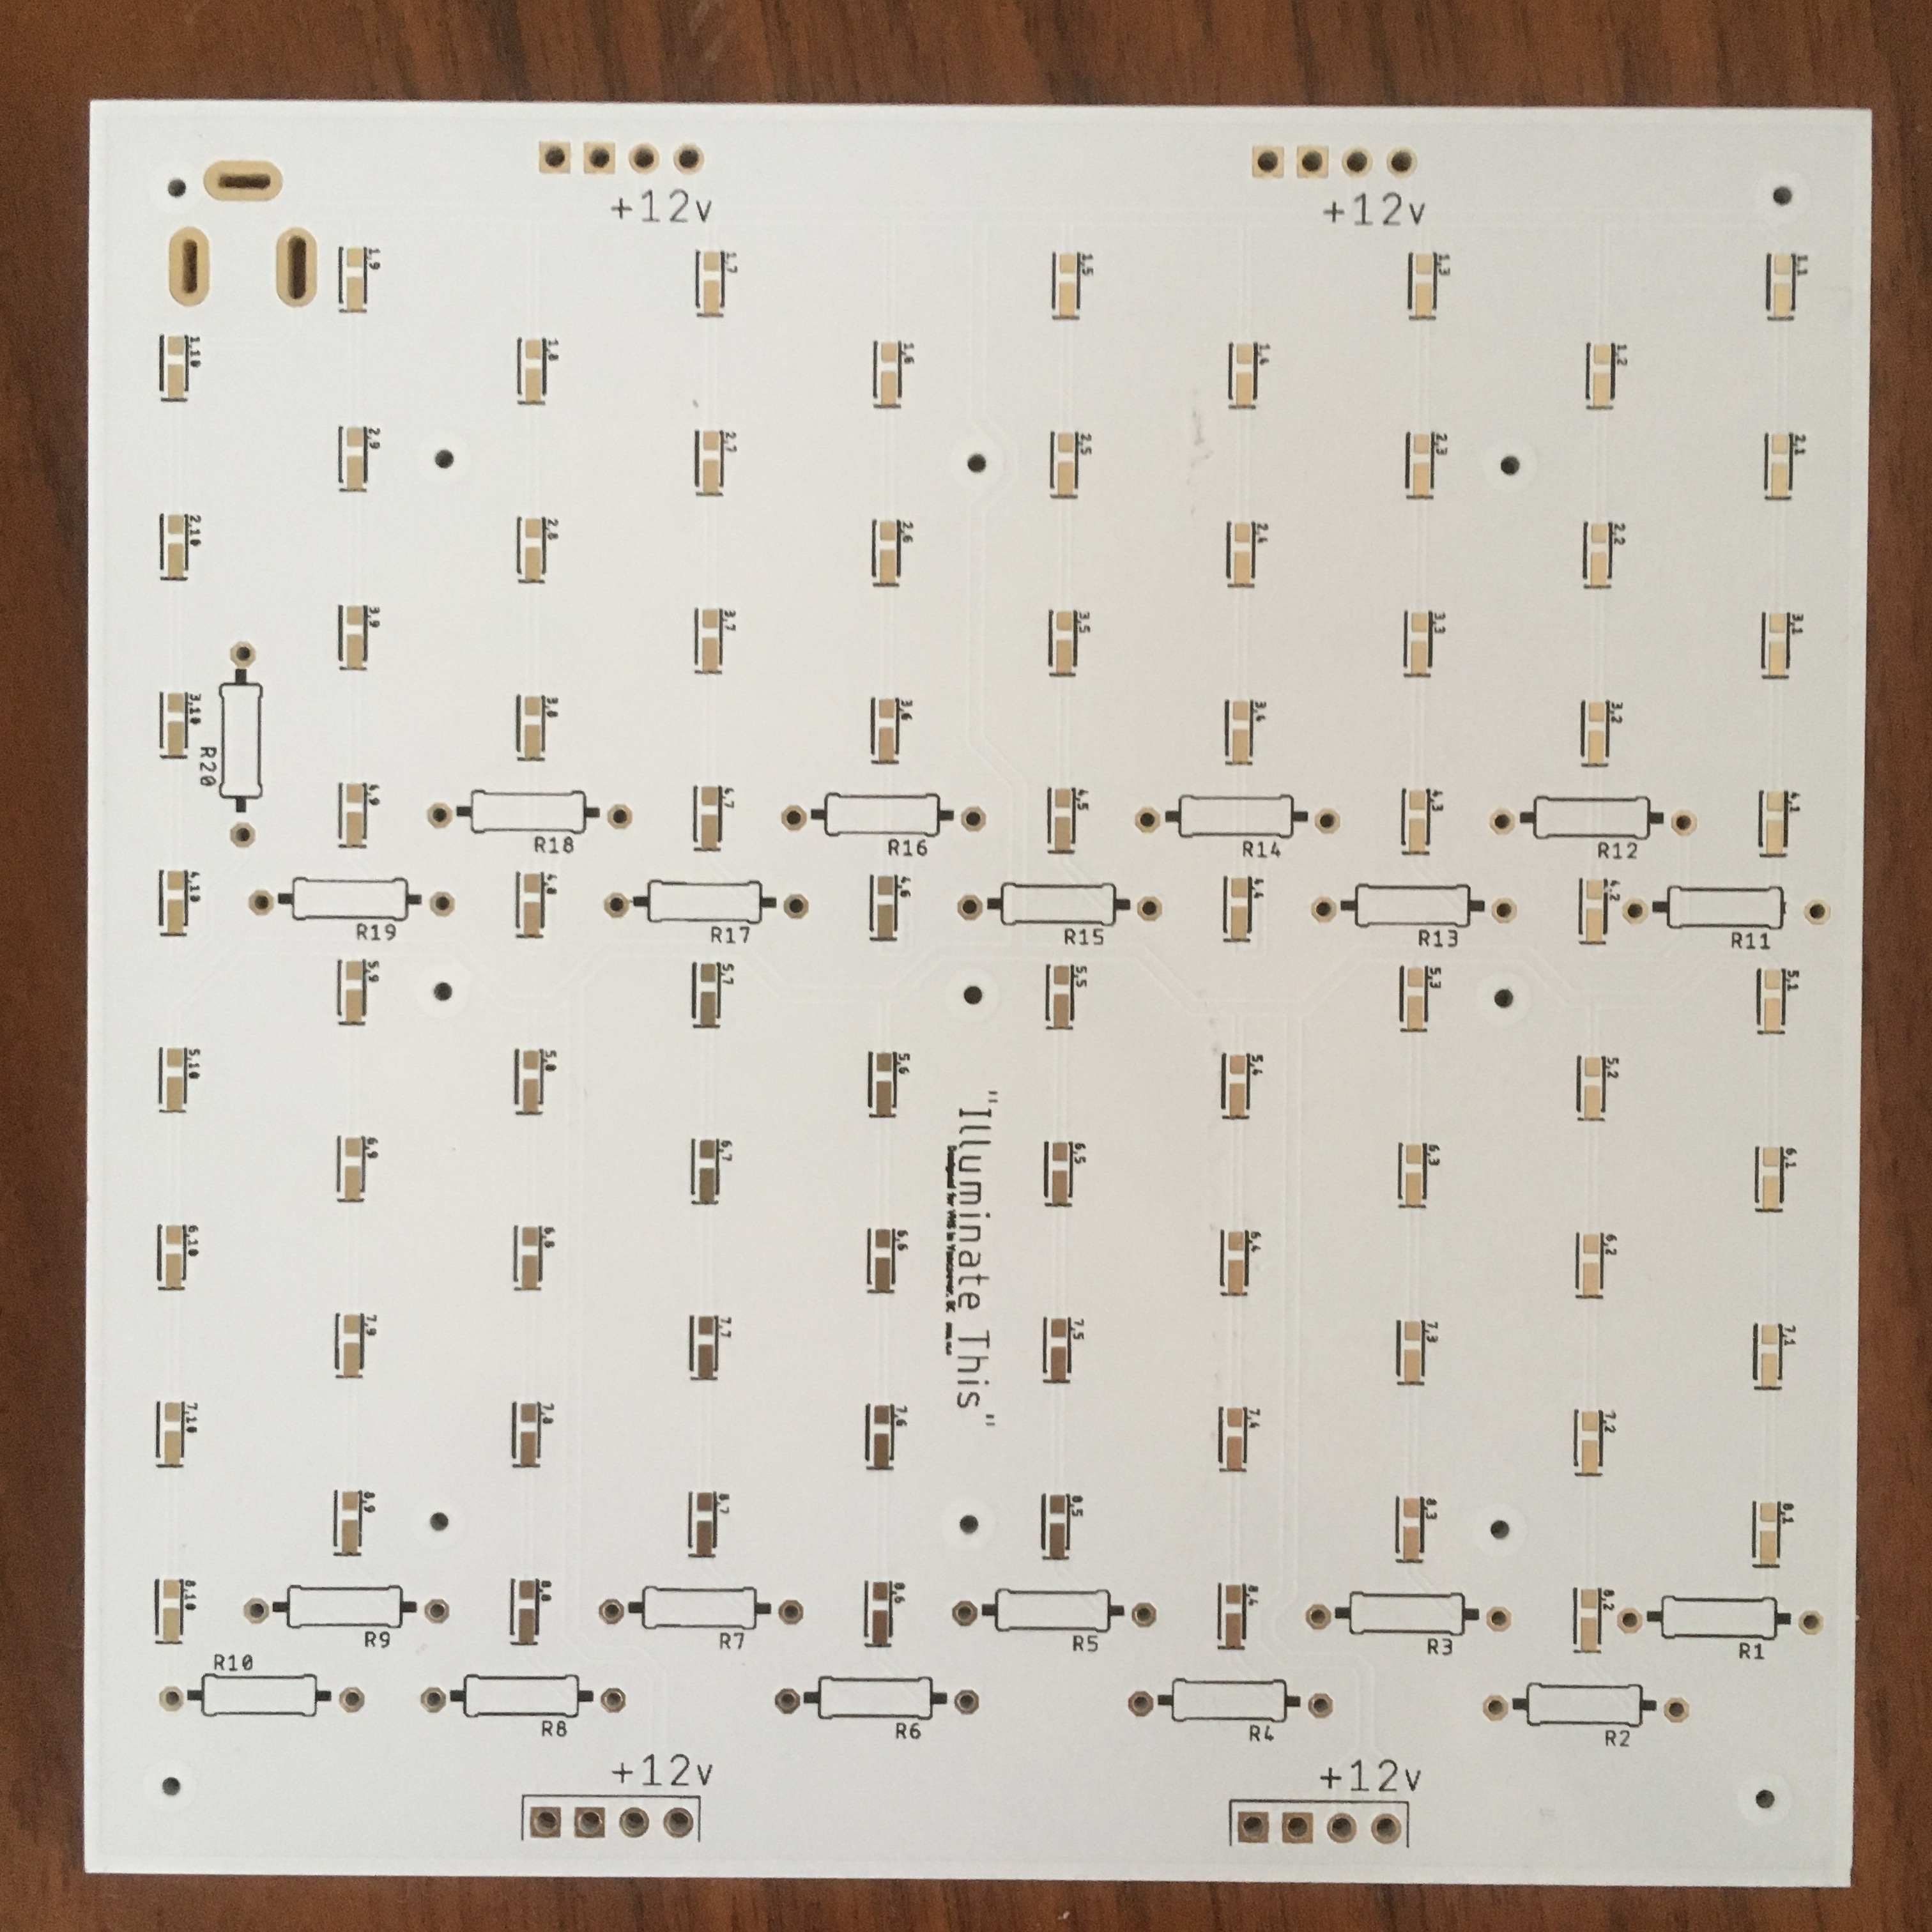
Just in case it affects anyone’s purchasing decision, I got my +V rail by sacrificing a half row of LEDs and soldering to the input of one of the rows. On a full board, I’d probably have at least 2 of these. If you are handy with an iron, you probably don’ have to sacrifices a half row.
I put the night on the Calendar for the night of the 25th. I’ll reply here with an Eventbrite for pre-purchasing boards.
2 Likes
My goal is to produce an evenly lit panel something around 2’*3’ to make an artificial window for a friend who lives in a basement suite. Will these still do the job with these changes? If so, I’m still in.
1 Like
Yeah, for that size I recommend not populating every half-row. These are pretty bright (you don’t want to look at them directly without having them diffused).
There are 10 rows and two columns, each cell has 4 spots, 3 are LEDs and 1 is a resistor.
I’ve got pilot holes drilled for your mounting, since it is aluminum I figured you can clamp these down and drill out your own holes on the drill press, that way you get the hole size you want (assuming it doesn’t interfere with a trace).
For something so large, if you populated maybe every 3rd or 4th cell, you’d still have something pretty bright, but if you over-populate the boards, you can always drive it with an external PWM driver (LED dimmer) to reduce the brightness.
I’ve put up the Eventbrite event for Wednesday the 25th. If you want boards and can’t make it, feel free to still grab your tickets, as I’ll just package up your kits and have them available in my bin at the space.
Because of the way the V+ has to mount to a surface pad, the main thing I wouldn’t recommend with this board is to mount it into anything with vibration. I know some people wanted to use this as a bike light. A future version will address that, or you can try to use epoxy to help hold the leads there (in fact, I’d recommend epoxy for all builds).
I hope to see a bunch of you there. If you’ve never done surface mount work, this is a board with plenty of opportunity to learn (haha, IE, there’s a ton of little LEDs to place). Note that all parts are either sourced by me, or we have plenty at the hackspace and really should use them up. This board was sort of designed to use up the LEDs at the space, but in reality we will barely make a dent if we build out all the boards I ordered.
If you want to buy a bunch of boards (10+), please DM me and I’ll make sure to give you a bit of an extra discount.
Thanks all, and I look forward to seeing many of you on the 25th!
Do you have pictures of the boards?
1 Like
@miststlkr and others are probably curious about how these look diffused. The LEDs are quite close together (the scale of this board is 10cm by 10cm). I’ll grab some diffusing material and show that off.
Okay, here’s a quick test of 6 LEDs.
How well they diffuse depends on your diffuser material and how far away it is. I used this thin material with 2 sheets:

Here’s a quick video of me varying the height above the LEDs.
I brought the exposure down far enough that you might be able to see the individual LEDs at the lowest point where the sheets are basically resting on the LEDs. With your eyes you can clearly see separation at this point, but after about 1 cm, I don’t see individual beams anymore.

2 Likes
ordered
1 Like
PS, for those not intending to go to the build night, or just wanting their boards early, I’ll drop off some kits as soon as they are bagged up this week. I’ll have to find a time to make the stencil though; so you might be using a toothpick or syringe if you go that option (I do not recommend a soldering iron for these, but as I’ve proven, it is totally possible).
One of the makers at Maker Faire was using Optix Cracked Ice Clear Acrylic Lighting Panel from Home Depot to diffuse LEDs pretty effectively. Apparently laserable and cheap (~$16 for a 2’x4’ sheet):
https://www.homedepot.ca/product/optix-cracked-ice-clear-acrylic-lighting-panel-23-75-inch-x-47-75-inch/1000143373
1 Like
Oh, I forgot to mention one other thing (Yeah, another one other thing), 50% of my proceeds on this batch will go towards VHS (either as a direct contribution, or buying VHS something I think it needs).
3 Likes
Oh it’s on - off to buy ma ticket.
1 Like
It’s been a while since I’ve done SMD work so I’m re-watching @tomkeddie’s videos.
2 Likes
ty for this.
2 Likes
Is anyone gonna oven it? Still doable without a stencil. I think we still have toothpicks. I prefer the hand soldering. I guess this will finally teach me to remember how smd led polarity is indicated.
1 Like
Maybe not… these LEDs are really obvious since the pads match the layout (one long pad, one short pad).
I expect most people will oven these boards, but you are free to solder as you please. ![]()
1 Like
Amazing! That makes things easier. Super excited for this. I’ll bring a visor so we have another one around and all my reading glasses. ![]()
1 Like
It was asked on Slack if a PartyCat can control one of these (the PWM for dimming, they aren’t programmable LEDs).
Can someone bring a party cat to the build night so we can check it out?
Bonus points if someone brings a completed Bikeshed board.
1 Like