Workshop: Lighting With Arduino, Sunday November 15, Noon - 5PM

Have you been interested in Arduino micro-controllers? Don’t know where to start?

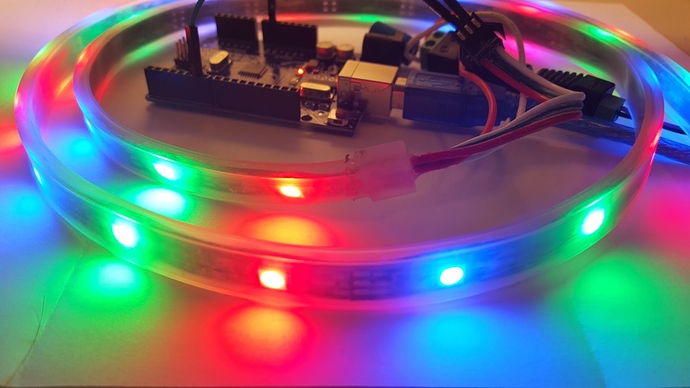
This workshop will teach you all the basics while you build a small project. At the end of this workshop you will go home with an Arduino controlling a color changing LED strip. Included in the workshops fees is a full Arduino starter kit. This includes an Arduino, color changing LED strip, knobs, buttons, and more. This is an intro course, no previous Arduino or programming experience is needed or expected.

What is an Arduino?
An Arduino board is an open-source, easy-to-use device that enables makers, students, hobbyists, artists, programmers, and professionals to make their projects come to life. If you can imagine it, you can build it with an arduino.

What makes Arduino so great?

  • Inexpensive – Arduino boards are relatively inexpensive compared to other micro controller platforms. The least expensive version of the Arduino module can be assembled by hand.
  • Cross-platform – The Arduino Software runs on Windows, Macintosh OSX, and Linux.
  • Simple, clear programming environment – The Arduino Software is easy-to-use for beginners, yet flexible enough for advanced users to take advantage of as well.

Where:
The Vancouver Hackspace,
1715 Cook Street #104, Vancouver, BC, Canada

When
Sunday, November 15, 2015,
12:00 PM – 5:00 PM

Who:
The workshop is open to non VHS member. VHS members receive a discount on the fees.

Note: If you are a minor, a parent or guardian will need to sign a liability waiver for you and accompany you while you are at the workshop.

Equipment
You must bring your own laptop.

Parts included with the workshop
These parts are included and used for the workshop, and are yours to take home:

  • Arduino Uno
  • 1 Meter of RGB LEDs Neopixel (WS2812)
  • female barrel jack with screw terminal
  • 5v 2amp power supply
  • micro breadboard
  • Breadboard jumper wires
  • 3x potentiometers
  • Arcade button
  • USB-B cable

Sign up here

Blog post: Workshop: Lighting With Arduino - Sunday, November 15, 2015, 12:00 PM - 5:00 PM - Vancouver Hack Space
Facebook Post: Workshop: Lighting With Arduino
Tweet: https://twitter.com/VHS/status/663266254640271360
5 more tickets available for this weekend

I have removed the requirement for a windows computer.
You can use a Mac computer if you like as long as you install these drivers.
http://blog.codebender.cc/2015/06/12/new-stuff-updated-mac-drivers/

1 Like

Group photo

Post Mortem coming soon

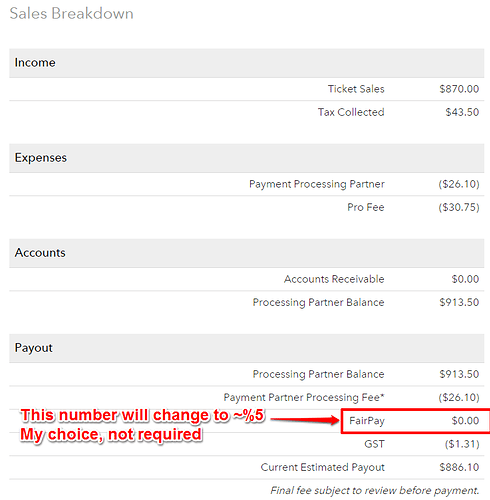
Stats from picatic.com
Note: These totals do not include component cost.


Thank you once again to @Janet and @Shane I could not have run this workshop without you. You are some of my favorite people, Thank you !

Post Mortem

  • We used picatic.com instead of EventBright this time around. Better experience overall, we paid the same amount of fees with EventBright as we did with Picatic even with the FairPay amount.
  • We only had five ticket sales the night before the event. We had five more tickets sold the day of the workshop and sold out. Much different the the last workshop.
  • I wasn’t expecting to sell out so I didn’t purchase enough power supplies for everyone. I had to scramble to rip apart anything with a 5v power supply at my house before the workshop, so everyone would have a power supply. I only was able to find nine suitable power supplies. I was one short and needed to use a desktop power supply for one person. I still owe him a power supply.
  • There was twenty two people there working on ten kits. Most people brought at lest one friend with them. This worked out well as they could help out each other but made the tables cramped.
  • One person came from the reddit post I made the two nights before the workshop. https://www.reddit.com/r/vancouver/comments/3sqnv7/workshop_lighting_with_arduino_at_the_vancouver/
  • We only had one VHS member sign up for this workshop. compared to last time where we had five VHS members.
  • The projector at the space does not have VGA (I knew this from before) I had to borrow @janets laptop again. I need to figure out this problem.
  • We originally set it as Windows Only and only had two ticket sale. @kazw took it upon himself to figure out the Mac driver issues before the workshop. I updated the post and allowed Mac computers. (Thank you @KazW)
  • Three windows computers, three Ubuntu computers, and ten Mac computers.
  • No issues with Windows or Mac computers this time.
  • All three Ubuntu computers installed the Arduino IDE from the Ubuntu app store. The app store had an out of date version of the Arduino IDE (Version 1.0). Downloading and installing the IDE from the Arduino.cc website turned out to be more challenging then expected. Thanks you @Shane we got all three Ubuntu working before the end of the workshop.
  • One person didn’t bring a computer with them. He went back home and got a laptop, and started a little behind everyone else.
  • Starting from the LED strip first and adding the button and knobs later work way better then the other way around.
  • Only one mistake in the slides. Much better then last time.
  • I copied all the example source code and the slides (both as PDF and Power Point) on to a USB stick that people could copy to their computers. This helped speed up the workshop considerably.
  • The TRY THIS slides are essential to getting the slower people caught up to the faster people. They are a must have, but I should include more things on these slides.
  • @Janet brought plastic cups for the water cooler, Appreciated by everyone.
  • The 30 min break (45 mins with the late people) in the middle helped. People got food and coffee in them and were refreshed for the second half.
  • There is always one person that needs a lot of help every workshop. Thankfully we had two volunteers helping with the workshop. When one person has to take extra special care with someone the other two can help the rest of the class.
  • The potential meters (knobs) This was a major source of problems this time. Of the ten boards that I wired up before hand three of them didn’t work. In all three cases the first knob in the series stopped functioning. We remove the knob that didn’t work then test its replacement and wire it into the pane. Then the new knob would stop working. Repeat a few times… This was very frustrating as we couldn’t figure out why it was happening. We came to the conclusion (guess) that some of the knobs must have been oxidized and when soldered there was a thin layer of rust preventing a good connection. Sanding the pins and using flux before soldering helped resolve two peoples problems but we never got the third panel working. This caused the entire class to stop and majorly disrupted the entire workshop. I had tested all the panels the night before and didn’t find any issues. Next time have spars for everything, two minimum.
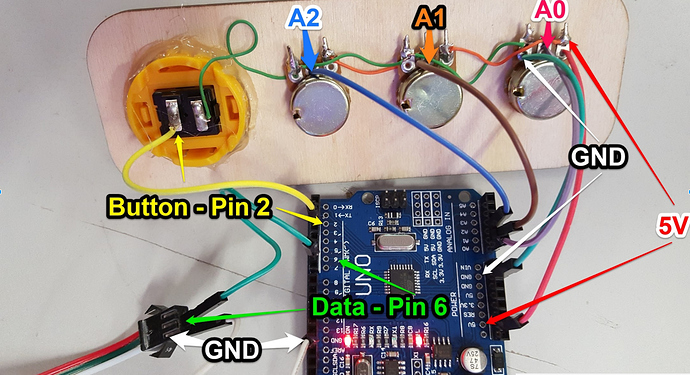
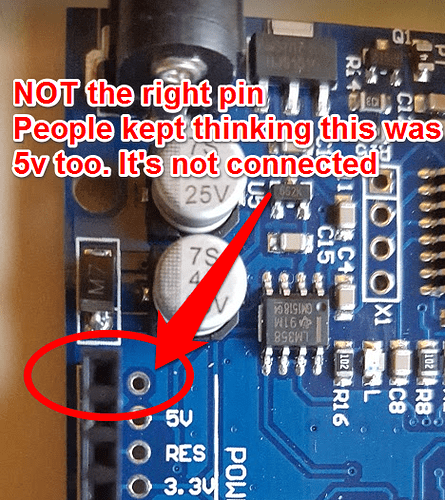
  • The clone Arduino’s that we used in this workshop have a non connected pin on the left side of the board next to the 5v pin. Many people accidentally connected the 5v wire to this not connected pin. This caused the analog pins to float and randomly work sometimes but not every time. This compounded with the intermittent potential meters (knobs) caused some very annoying to debug problems.

Over all I think this workshop worked much better.
There are still things to improve.

8 Likes

The workshop was great and I really enjoyed helping out. Lots of new faces to VHS. Well done @funvill!

It’s too bad the pots decided to be evil/oxidize. I think the whole workshop went very smoothly. Most of the other technical problems were things out of our control like:

  • someone brought a linux machine with keyboard problems (it was set up for a mac keyboard)
  • another machine was running ubuntu with a very old version of the Arduino IDE, installing the latest version caused some problems but tech-wizard @Shane was able to troubleshoot
  • the usual bits and bobs of geting people’s boards/ports set up.

some suggestions:

  • committing the code to github so it’d be easier to access rather than requiring USB
  • cutting off picatic registration the day before (avoids suprise registrations on the day of, although it was great you had 10 kits ready to go and ultimately very awesome to fill the workshop)
  • (you might also want to think about a charge for people who show up for the knowledge transfer and share one kit…although not sure if you want to go that route. We had 3 folks sharing one kit but you’re still doing the knowledge transfer. To me that is worth a charge for VHS.

Worked great:

  • solid ppt and instructions, very helpful, getting people playing with LEDs sooner worked really well.
  • break was good, helped people re-focus after getting a coffee/etc.
  • pre-packaged kits made things very organized
  • awesome to have upcoming projects we could plug like Logan’s radio intro to soldering workshop and other things
1 Like

For future reference, here are instructions for Arduino installs on Ubuntu/Linux. The reason that this process is necessary is because Ubuntu’s package manager only has Arduino 1.0, not the latest version (1.6). There’s probably a friendlier, more UI-focused way of doing this, but I couldn’t find a solution without using the command line:

Note to those new to the command line:
- Don’t type the $ sign as it’s written; the $ sign is already there.
- any sudo commands may ask you for Authentication. Enter your password if it prompts you to.

  1. Open a Terminal window. (Ctrl+Alt+T)

  2. Type command to determine whether OS is 32 or 64-bit:
    $ uname -m
    If there is a 64 in the response, you have a 64-bit OS.

  3. Go to the Arduino Downdoads page and get the appropriate Linux Install (32 or 64-bit):
    https://www.arduino.cc/en/Main/Software

  4. Extract the downloaded file to the Downloads folder.

  5. In the Terminal window, type this command (make sure the Arduino folder name matches what you have):
    $ sudo cp -r ~/Downloads/arduino-1.6.6 /usr/bin
    This copies the extracted files to the /usr/bin folder, which is where most programs go.

  6. Type this to create a desktop shortcut:
    $ sudo bash /usr/bin/arduino-1.6.6/install.sh

  7. Type this to make the shortcut actually run:
    $ sudo chmod a+rwx ~/Desktop/arduino.desktop

  8. You are now free to delete the Arduino files from the Downloads folder, and copy the shortcut to the Launcher Bar.

  9. Double click on the Arduino shortcut to run it. The Arduino IDE may ask for special permissions and notify you that you must log out and back in. Choose to permit those permissions, and log out by using the gear-shaped dropdown in the top right of the screen. Sign in again.

  10. Start Arduino IDE again, plug in the Arduino, select it from Tools → Port, and try uploading the Blink sketch!

If there are any mistakes or better ways to do this, please let me know. I’m not a Linux user and I’m just working off of memory in writing this.

1 Like

@shane Does the install script automatically add you to the ‘dialout’ group for non-sudo access to the serial ports?

No, it doesn’t. All install.sh does is create a desktop shortcut. I believe that Arduino requests that access on first run. All I know for sure is that during the installation of Arduino 1.0 through the package manager, a dialog box allows you to grant that access. I’m not sure if this process will present that dialog on first run, because everyone had downloaded the old Arduino in advance, potentially masking the need for additional steps to install Arduino 1.6.

Sorry, nothing to do with the workshop, but re: shane’s instructions.

I just downloaded arduino 2.0 in anticipation of some hopefully-near-future arduino hacking… did I get the wrong one? I know there was some sort of… split, did I get some how mixed up? Or did I pick a dev branch by accident and the 1.6 is the most recent stable?

The version I installed did ask [Edit for clarity: asked upon first run, not during install] to be added to dialout and a re-login before continuing, yes @Logan_Buchy.

Thanks for sharing and for confirming about the dialog on first run. AFAIK, Arduino 1.6.6 is the current latest version, and I haven’t heard of an Arduino 2.0. Could you link us to where you found it?

See this post for info about Arduino IDE 2.0

1 Like

FYI: @Shane
I posted my reply to that new thread, to keep this one about the workshop.