Ooopsie. 8P
Only a few spots left
Sold out.
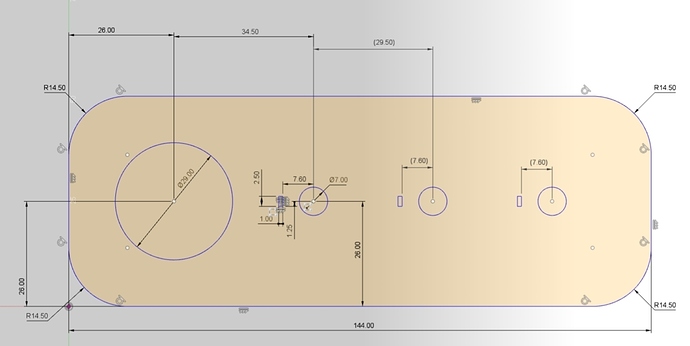
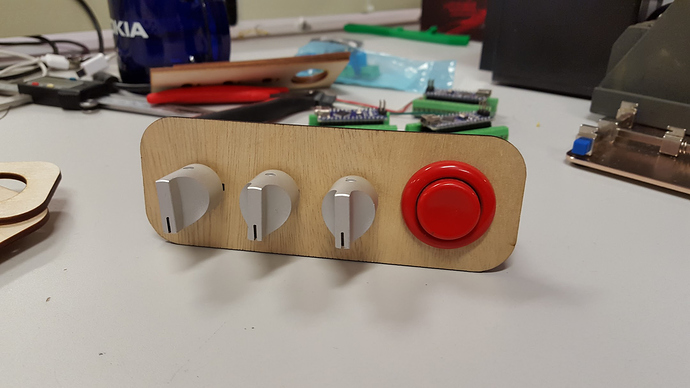
Made a plate for the buttons and knobs to fit into.
Source: ArduinoLightingWorkshop/case at master · funvill/ArduinoLightingWorkshop · GitHub
Slides
Thank you to our volunteers that donated their time to help run this workshop. You where all all a tremendous amount of help. I wouldn’t have been able to do this without you. Thank you @Janet, @Shane, @Logan_Buchy
Group photos
https://instagram.com/p/9SGMrFA5W5/?taken-by=funvill
Time lapse
I tried to do a time lapse with my phone but my phone got unplugged during the workshop and ran out of batteries. So here is a time lapse of half of the workshop.
Post Mortem
Notes from the last Arduino and LED workshop
- Even with everyone wearing name tags (thanks @Janet) I still got peoples name wrong (Even my volunteers, Sorry @Logan_Buchy), I am just not able to remember peoples name correctly. Shameful.
- I bit my tong shortly into the workshop, it make it hard to talk and for people to understand me, as it started to bleed and swell up.
- Of the ten people that showed up for this course, five of them had problems getting started with the Arduino.
- Three computers could not install the drivers for the clone Ardunos. All of the ones that had problems were older MACs. We never resolved this problem and people ended up having to buddy up with each other.
- One person brought a chrome book instead of a laptop. The Arduino IDE only supports Windows/Mac/Linux. I ended up lending him my personal laptop to use.
- Resolvable difficulies installing the drivers for the clone Ardunos on windows. @Shane was able to solve his problems and get him working.
- The price difference between a clone and genuine is substantial but so are the problems. Especially on MAC
- None of the volunteers or I are primary MAC users. This made debugging and trouble shooting MAC specific problems difficult. That combined with the three MACs that would not install the FDTI drivers really slowed us down at the start.
- Errors in the slides. The example source code found in the slides had bugs/problems. Eight major bugs were found by the people in the class. Most of them were quickly explained away but still embarrassing.
- Arduino build in examples use
const int buttonPin = 2to define constants. While my original examples used ‘#define BUTTON_PIN 2’ I noticed this halfway though making the slides and switched to using the ‘const int’ but didn’t update the previous examples. - Function names in the Arduino build in examples use lower case first letter, while my example code uses upper case first letter. The difference in case caused at lest one person problems with every example.
- Can’t copy and past code from the slides into Arduino IDE.
- Projector
- I was hoping that white text on black background with make it easier to read the text. (High contrasts) The problem was that the projector’s black aren’t black. So everything was fused out and hard to read.
- The projector at the space doesn’t support HDMI. I knew this before showing up at VHS, so I brought my own projector from home but my contract was too poor to use as it is a movie projector instead of a data projector. I ended up borrowing @Janet laptop to run the slide deck… again…
- We ended up removing the florescent from above the projector screen, to make it easier to read. They got put somewhere. I don’t where they got put.
- @Janet spent three hours cleaning the LED strips with a toothbrush before the workshop. I forgot to put the clean ones in the workshop parts bags. So everyone went home with dirty used LED strips…
- One of the slides example code didn’t include button debounce making the button useless.
- These LED strips are GRB, not RGB, Some but not all the example code had the wrong sequence.
- Get the LED strip earlier in the slides. We should get the LED strip working first then work on the buttons and the knobs.
- No one cared why the capacitor was needed for the strip. Next time attach it for them and remove this slides.
- No one cared about the power requirements or how to power large sets of strings, Remove these slides
- No one cared about why the Arduino can’t power the LEDs (browned out). Remove these slides
- Add slides about the serial debugger, even if it adds work its necessary.
- For loops cause a lot of people problems, I need to find a better way of describing them.
- People got IF and ELSE statement without too much trouble.
- The TRY THIS, slides helped a lot. They gave the people that were a head some time to play around and gave the volunteers time to get the people that had fallen behind caught up.
- People want to copy and paste code, People don’t want to type in the example code.
- Ask people what they want to make at the start of the class, it gets people to introduce them selfs to each other.
- We need plastic cups for the water cooler.
I was happy with this the way this workshop went but there is a lot of room for improvements.
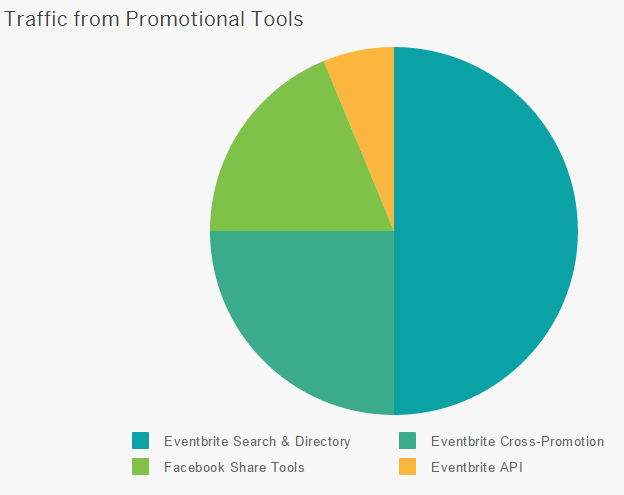
Stats from EventBright
The fluorescent lights and light cover are in the unused full-height locker. Sorry, I forgot about putting it back. I’ll try to remember next time I’m down.
I agree that the TRY THIS slides were great for keeping people busy and caught up.
Definitely try not to bite your tongue before or during the next workshop. Not a good strategy.
Great work organizing and putting this on! It went well, and was definitely in demand despite the higher. I think people really liked that it was a package deal where they’d get to take all of their new toys home. Hopefully we’ll see some of them back to learn to solder up the control panel. ![]()
Great workshop @funvill, I think people learned a lot. I hope to see some of them again, it would be great to get some feedback from them about what worked and what didn’t.
You pretty much hit most of the points of improvement which we went through after class. Something else I thought about later which might be useful is to change the time of the workshop to 1pm → 6pm. I think there were a couple people who got hungry after a while. It might also be useful to have a 15 minute break in the middle just to allow people some time to stretch their legs, get fresh air, go to the bathroom.
Let’s iterate on this and do it again!
This was great. I think people got a lot out of this session. I really enjoyed being there and helping out where I could. I’d read through the github files the night before but realize a quick dry run config beforehand would have helped get me up to speed faster and be more useful. I’ll definitely do that next time.
Another plus for having a scheduled break or spreading the session out with 2 hours, an hour meal break, followed by 2 hours. Having a few spare laptops around with a pre-configured IDE setup would proably also help. Thank you @funvill for all the time and effort you put in to this event and for loaning out your SurfacePro. The FTDI driver issue is a pain and I’d like to figure out how to fix that on a Mac.
Removing those lightbulbs was also very effective. LOL.
Let’s definitely do this again! You must wear the sombrero though.
Sounds like it went great! I always love the postmortem.
From teaching at West Point Grey Academy I’ve learned it’s easier to open a shared google doc. No need for a projector and everyone can copy/paste, as well as review the material later.
I will add BYOC for the next courses I run.
Some workshops I went to used PDFs to distribute the presentation, that way the student can view it locally while the presenter can have the slide show.
For labs, I was given a folder tree:
Labs
->Lab1
->Lab2
->Lab3
etc.
each LabX folder contained a complete project ready to go. For those labs that required the student to type in some code, it was clearly marked with comments. Labs that offered the student opportunities to “try this” indicated so in comments in the code.
You will always have issues with people’s laptops, I have seen OS and driver problems at workshops filled with EEs. You can minimize the issue by having detailed OS specific install guides for supported OS, such as Windows 7+ and MacOS X+. On the event invitation make it clear about the supported OS and provide links to the software so other OS students can come prepared.
Email sent to everyone that took the course.
Hopefully we will get some more feedback.
Hello Everybody
Thank you for attending the workshop. I hope you found it valuable.
Feedback
I would love to hear from you.
What worked, what didn’t work, what you would like to see more of, What other workshops you would like to see, What you made with your Arduino and LED strip.
More resources
- https://learn.adafruit.com/ - A great collection of tutorials on Arduno and other electronic components
- The Magic of NeoPixels | Adafruit NeoPixel Überguide | Adafruit Learning System - A great guild to everything neopixel (the LED strip)
- http://www.leeselectronic.com/ A local electronics distributor that you can buy parks at.
- https://talk.vanhack.ca This is VHS’s online community, You can ask questions about anything geeky you want here.
Other events at VHS
Every tuesday nights from 7:30pm - 10:30pm is VHS’s open house/Open hack night . Come join us!
Saturday, November 7th - Sew it again workshop
Saturday, November 21st - Sew it again workshop
Sunday November 22nd - Workshop: Leather and Lasers – Passport Wallet
Saturday December 12 - Workshop: Build a radio controlled fixed-wing airplane
To become a member of VHS see this page
Membership - Vancouver Hack Space
It was nice to meet you all, I hope to see you again soon.
I am going to run this workshop again (event to be announced shortly)
I am in the process of updating the power point slides and example code to be more LED strip specific. Starting with the LED strips and adding buttons and knobs as we go.
I am considering making the workshop WINDOWS ONLY reduce the errors we had with the Mac computers and the Arduino clones. I am not a Mac expert and I don’t want to have to struggle with them again.
I could use some volunteers to help me with this workshop again.
Please PM me.
Revamped and updated
Email sent to everyone that took the course.
Last email that I will be sending them via event bright.
Hello Everyone
Thank you again for attending the Lighting with Arduino course at the Vancouver Hackspace. I hope you have all been having fun playing with your LEDs. If you have any questions, please feel free to ask them on VHS’s forums https://talk.vanhack.ca or come down for our open house, Tuesday night from 7:30pm to 10:30 pm and we will be happy to help you.
Giant LED Wall
The VHS has repaired the giant LED wall at VHS. This LED wall is using the same LEDs that we used in the workshop. They can be programmed with the animations that you have been making. Please come down and hack the Giant LED wall!
Here is a video of it working.
Steven Smethurst on Instagram: "Working on @vhs LED wall. #neopixel #arduino #"
VHS LED Wall documentation
Another Lighting with Arduino workshop at VHS
We have taken your feedback from the first workshop, updated the slides, example code, and tried to smooth out any of the other rough spots we had.
We are ready to run it again on November 15, 2015. If you know of anyone that might be interested in attending this workshop. Please forward them this invitation. Event Organizer: Become an Event Hosting Legend | Eventbrite
Facebook: Workshop: Lighting With Arduino
Talk Post: Workshop: Lighting With Arduino, Sunday November 15, Noon - 5PM
Have a great weekend.
Sorry to dig up this old thread… Will this workshop be run again? It was super fun and I have more friends who’d like to do something with LEDs and Arduinos.
Yes, it will run again. I forget who has the supply of arduinos… this is something we should get scheduled once makerfaire.ca (this weekend) is over.
