Ukulele Build Log

Just 20 min or so of work today. Got on the bandsaw and roughed out the shape of my maple neck.

I left the bottom joint alone as that is measurement-sensitive and my drawing for the tenon is approximate.

http://imgur.com/42WRqpk

Time for wood rasps to rough out the 3d shape and the head. I haven’t committed to a head shape yet, even considering doing a horizontally laminated head, but that might be overdoing it.

3 Likes

When I got home, I was able to put more into the neck.

Here’s a roughing out of the shape, still plenty to do, and the heel is still under heavy shaping right now; had to stop half-way through one process so one side of the heel looks bigger than the other.

Here’s a progression through the night; wish I had done a timelapse.

http://imgur.com/3x3u7ru

http://imgur.com/ttWDP3O

http://imgur.com/kHp97Cm

edit Humm, looks like the images are getting cropped, click to view.

edit2 That “crack” is just the scarf joint when I glued the head back on diagonally. I’ll need to fill the opening with glue and sawdust.

7 Likes

Sanding:

The 90% of project time that youtube videos don’t show you.

3 Likes

More sanding, shaping, filling, sanding shaping… the photo progression isn’t exciting but the feel of it is.

I cut my wenge wood heel cap and fretboard, and glued my heel cap. More sanding truing, etc to go. (Fretboard is not attached in 2nd photo, just placed for rough look).

Gotta love that grain though.

4 Likes

I know it doesn’t seem like I’ve done much; but I did a lot of with a handfile, and various grit sandpaper.

I think I’ve finally come up with a neck shape I’m happy with. Now to work on the head shape; I think the heel cap is turning out great (yes, the back of it is angled a bit due to gluing slip, but that’ll but cut off before final assembly).

In retrospect, I would have made far more angled cuts before beginning with the file and moved the scarf joint further toward the head of the neck.

6 Likes

So I continue to shape and sand, the neck is just about the feel that I want. No use in posting a pic because its basically the same visually as the last state.

More interestingly; I’ve decided that I need to build yet another tool to complete this project ( I really didn’t but it will certainly make it easier, especially if I make more than one ).

A thickness sander is similar thickness planer, but instead of spinning blades, you have a spinning sanding spindle. This will be useful for getting various pieces down to very small thicknesses, such as the top and bottom, and my fretboard.

So this post details the work I’ve done so far on the thickness sander.

I bought a sheet of MDF, the thickest I could find, which was 3/4"
I lasercut some scrap baltic birch for some templates and then cut out a bunch of circles, first roughing them out with a jig saw then cleaning them up on the bandsaw, though they were intentionally left pretty rough.

Then I took a forstner bit and marked the center from the center punchout of the template (forstner bits have a little peak in the center to guide them). I used that mark to drill a pilot hole in each then used the same forstner bit to drill out a circle that matched the thickness of a metal shaft I’m using.

(Those are actually some of the nicer ones)

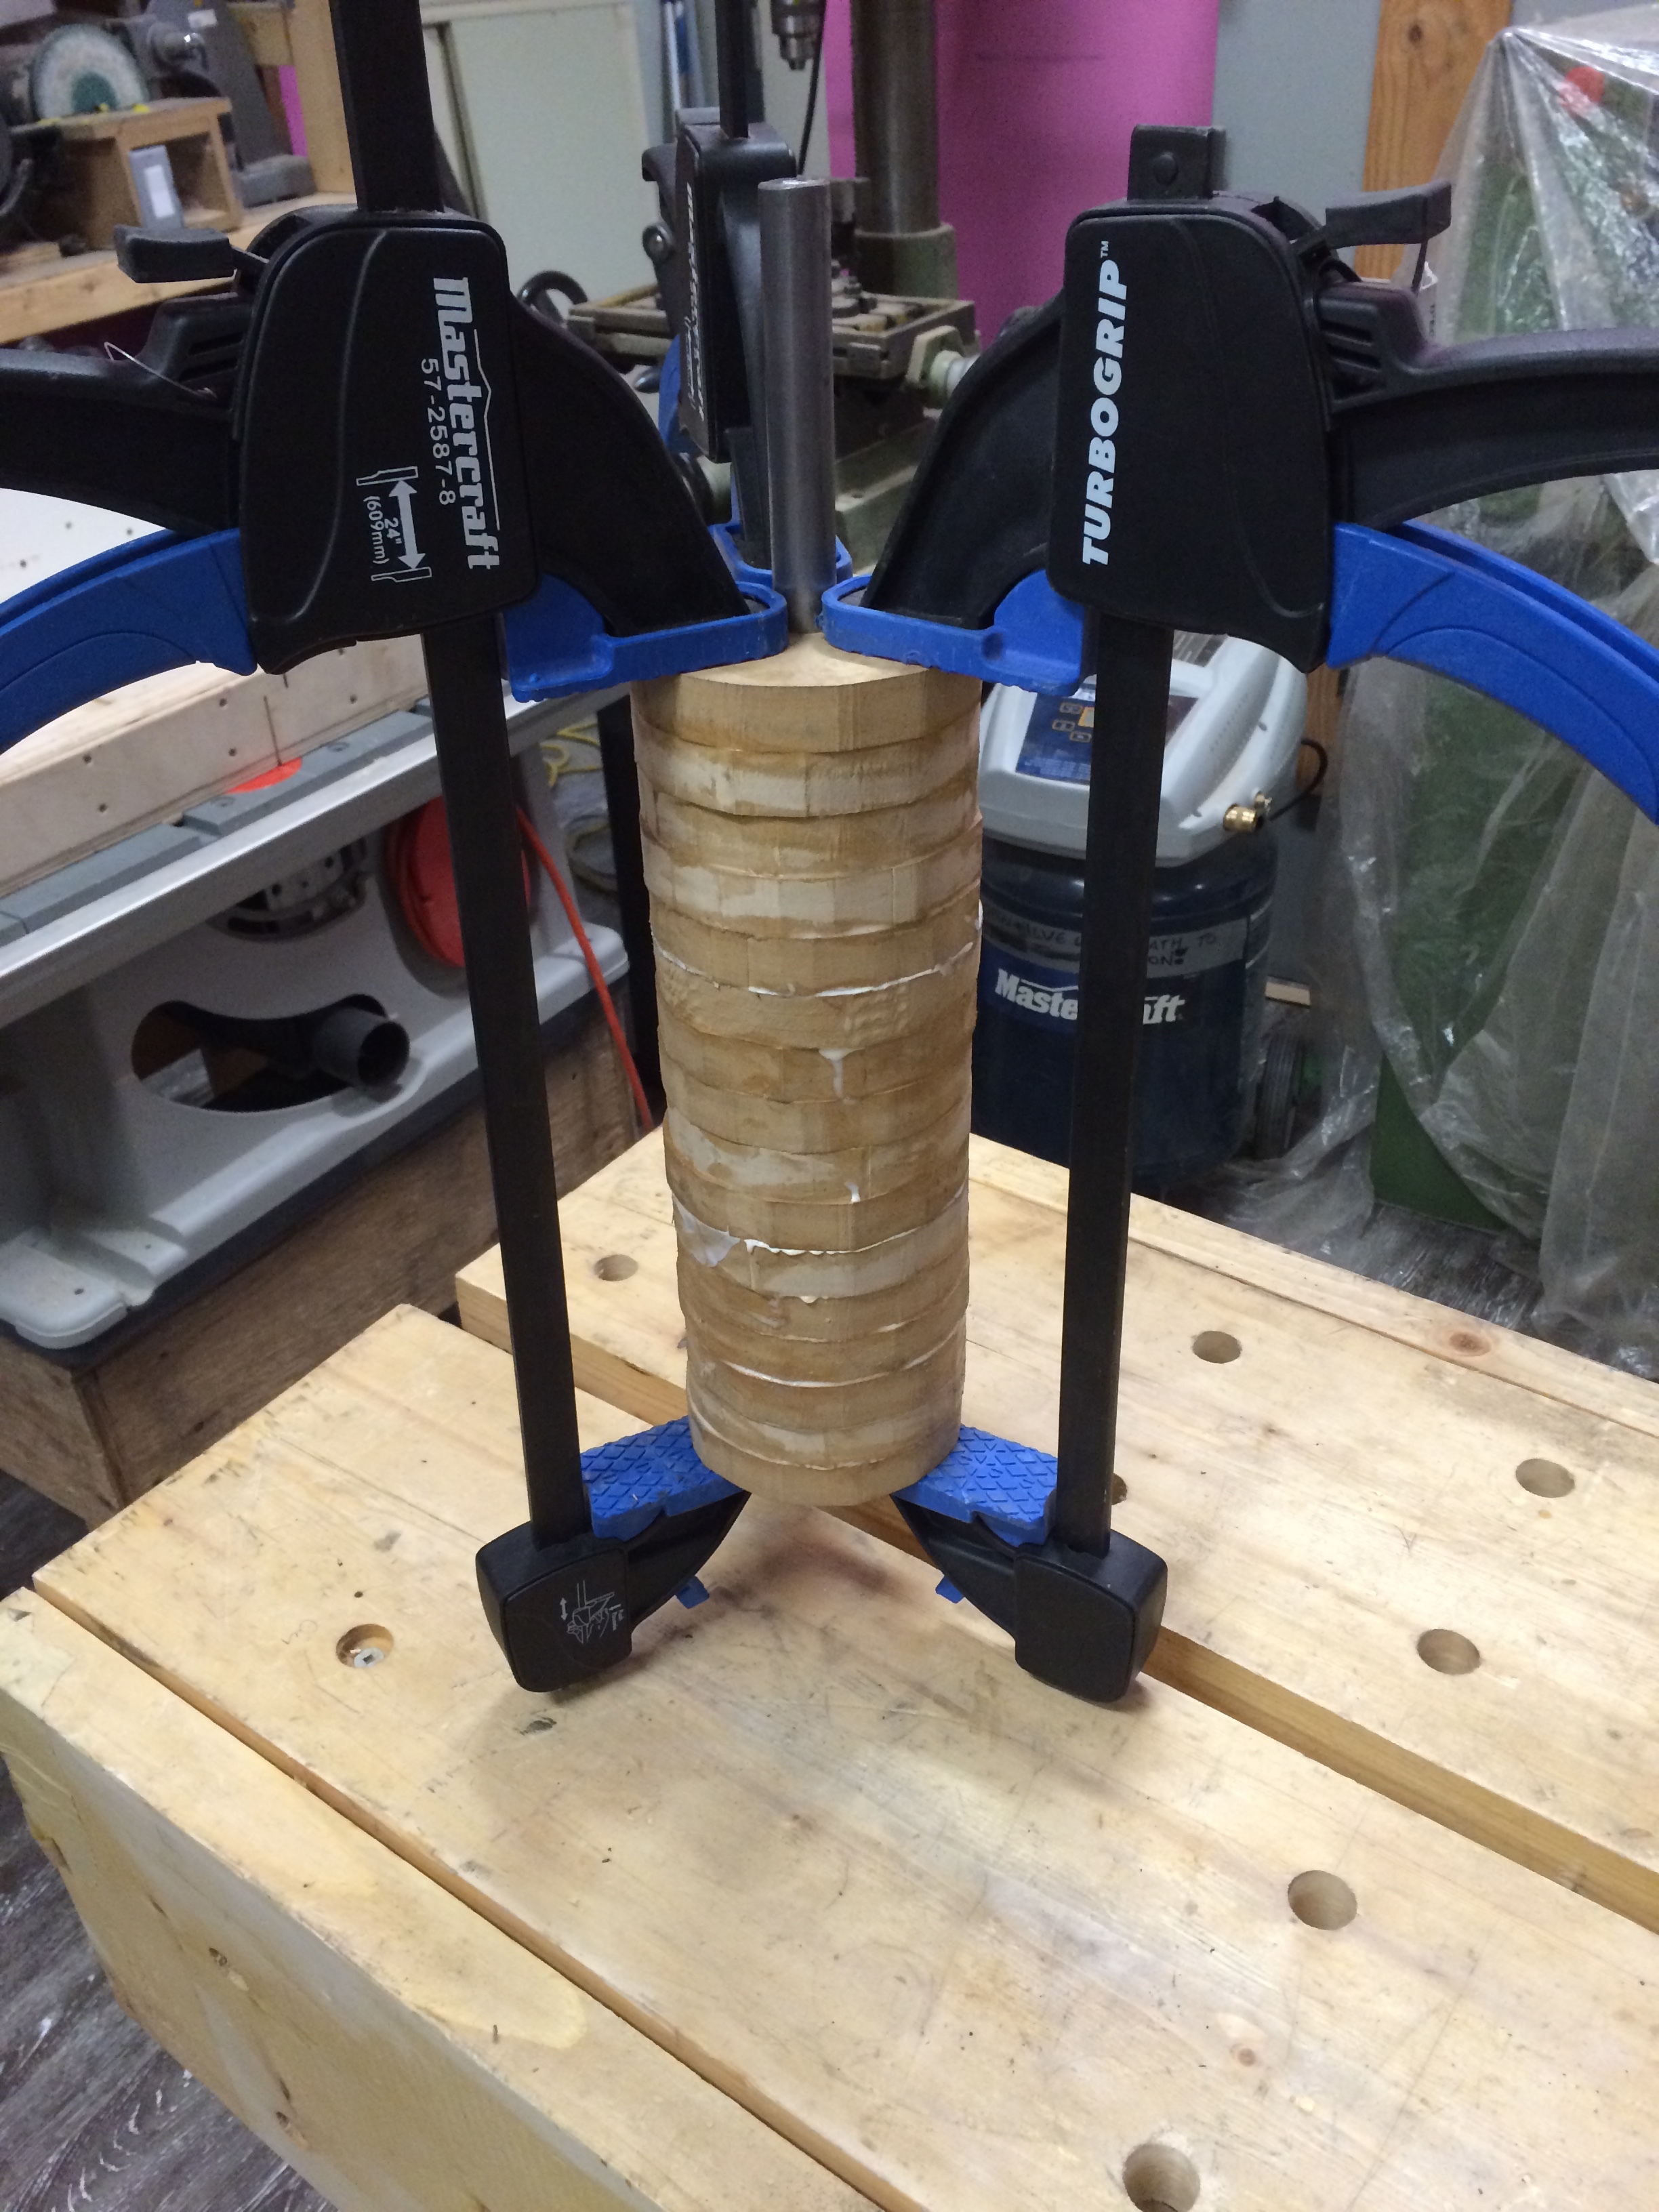
I glued sections of 5 together around the shaft. Being sure to move the shaft during drying in case leakage toward the center. I had a few close calls where I was only able to get it out with a mallet, but the dried came off easily with some high grit sandpaper.

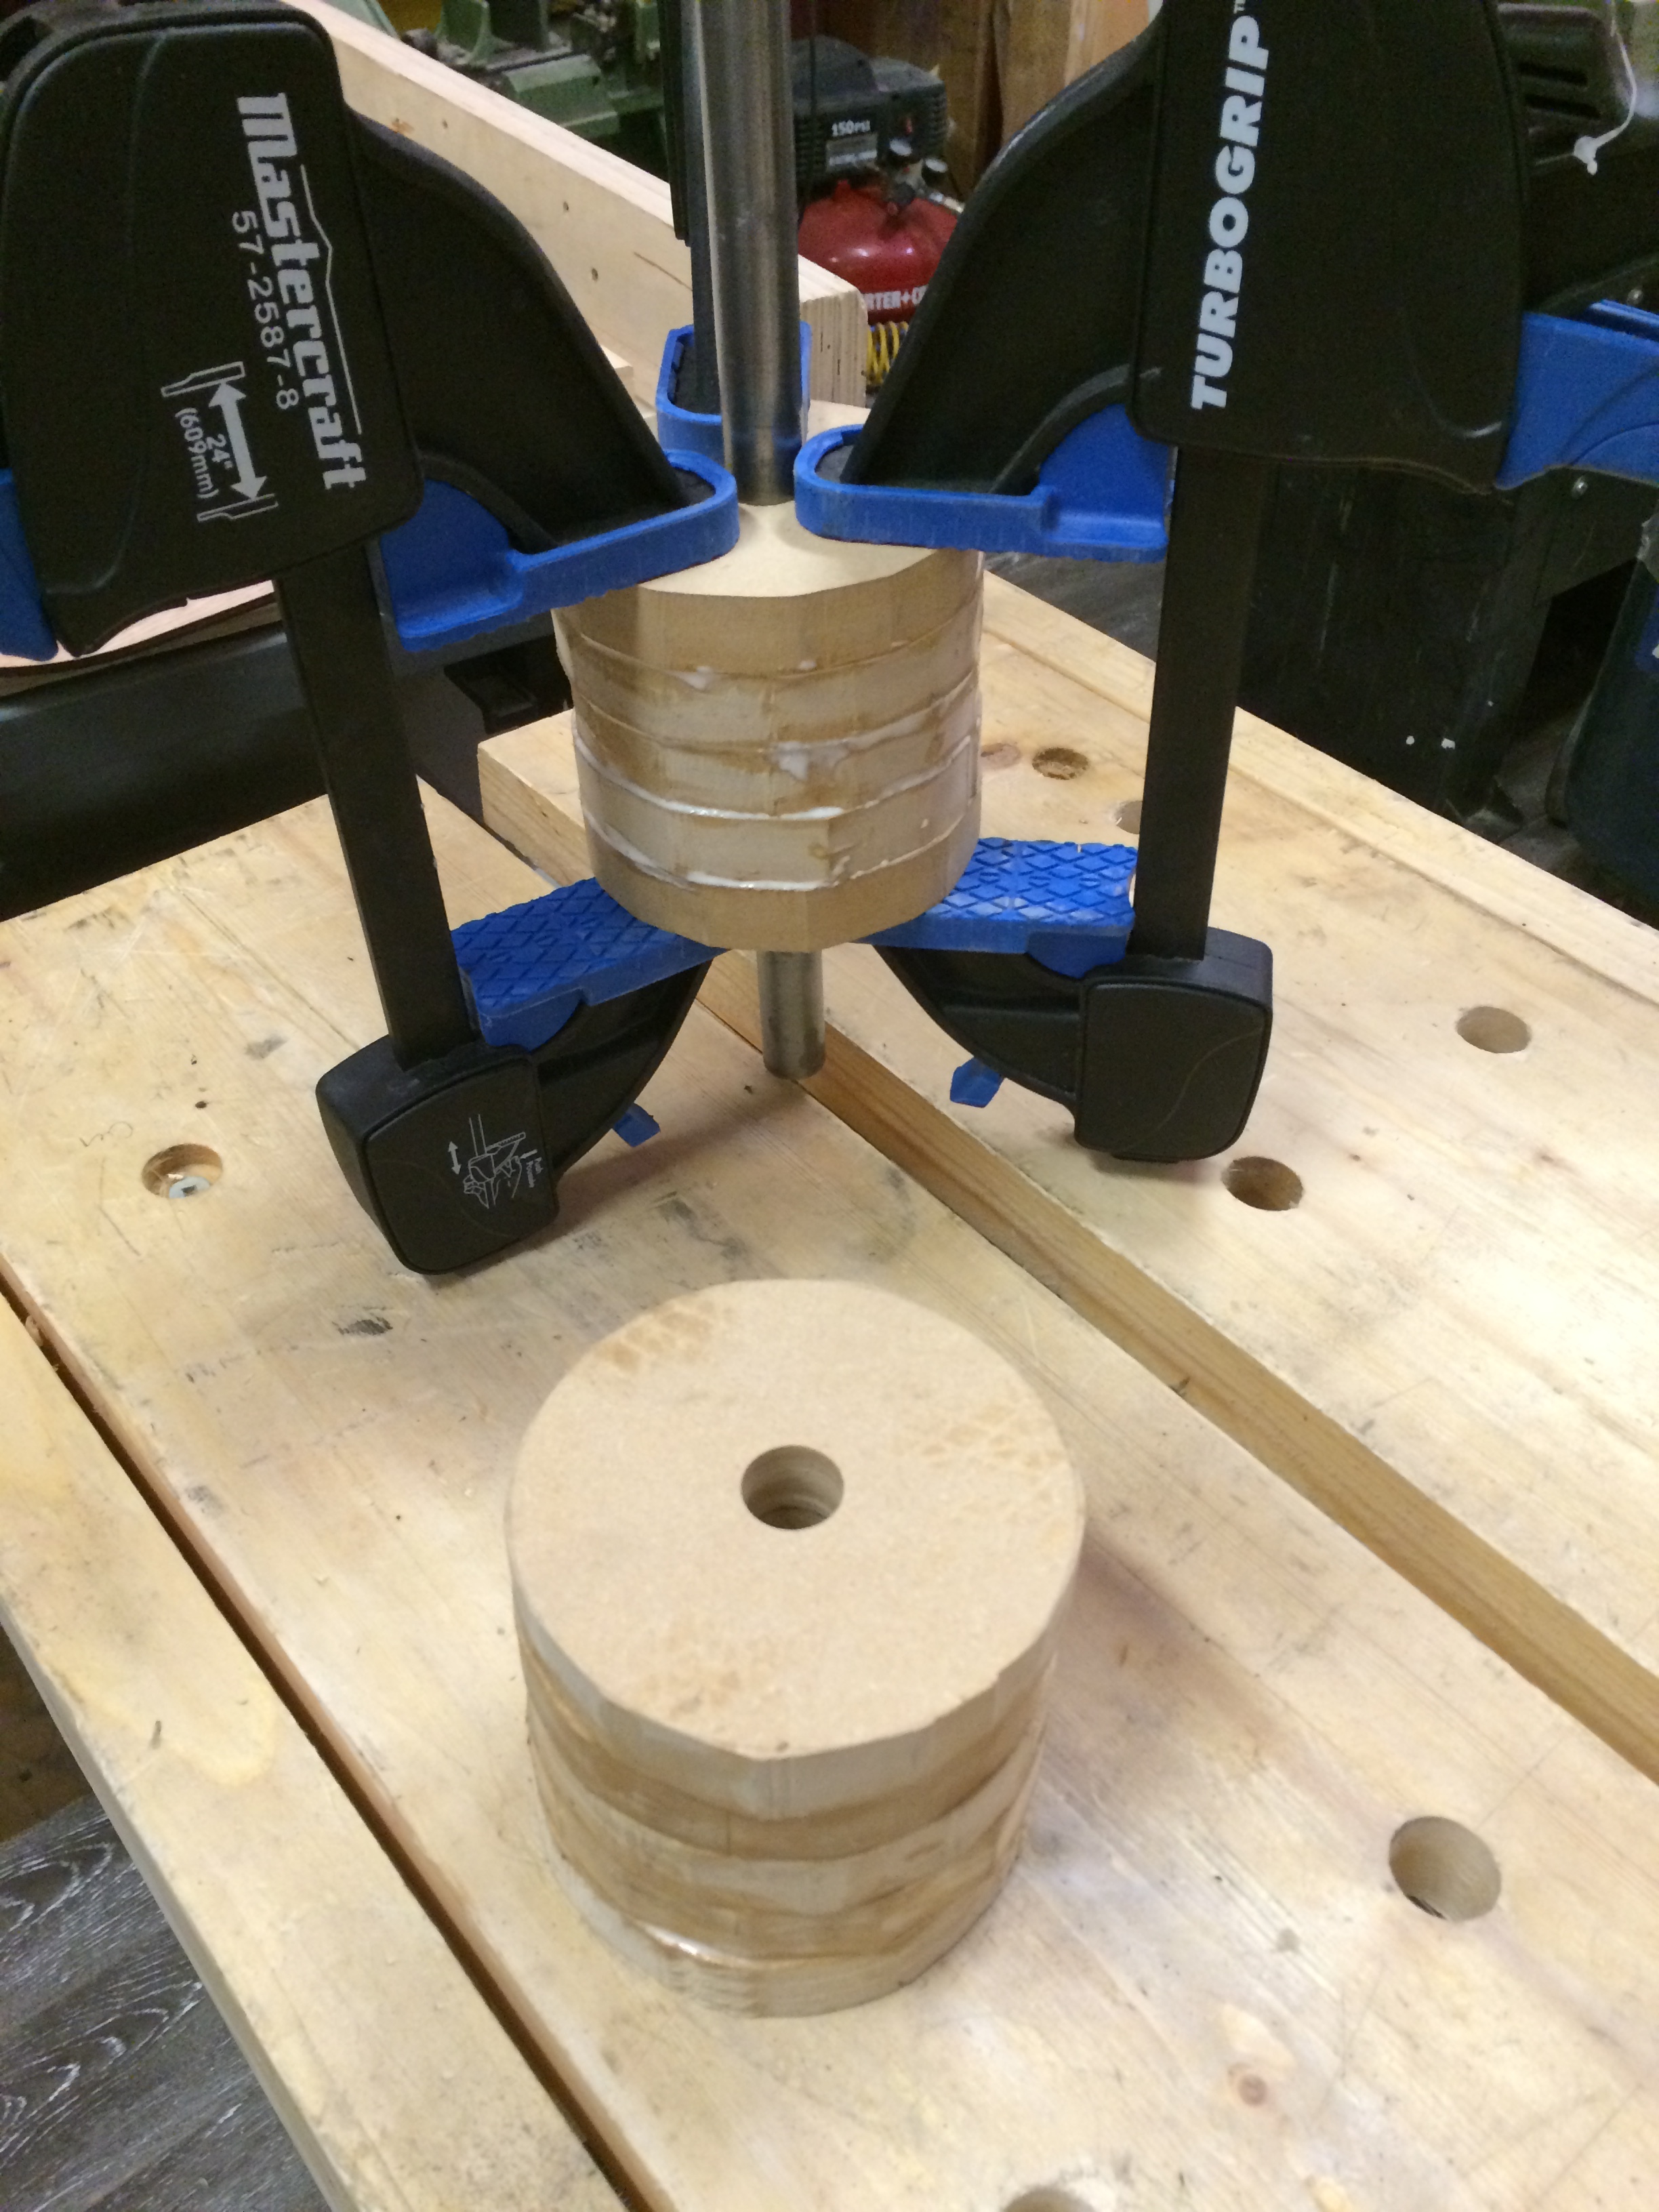
After I had a group of 5, 5, and 6, I put them on the shaft and glued them together. They kinda remind me of shawarma…

While that dried, I cut some oak blocks and screwed two together. I took the 3/4" forstner bit (yes, that one bit is getting a lot of play on this project) and drilled sideways so that the hole was half on each block. I did that twice for two wooden bearings. I mounted them on a couple blocks of wood screwed to a board.

I took the whole thing at a 45 degree angle onto the belt sander and sanded down most of the irregularities.

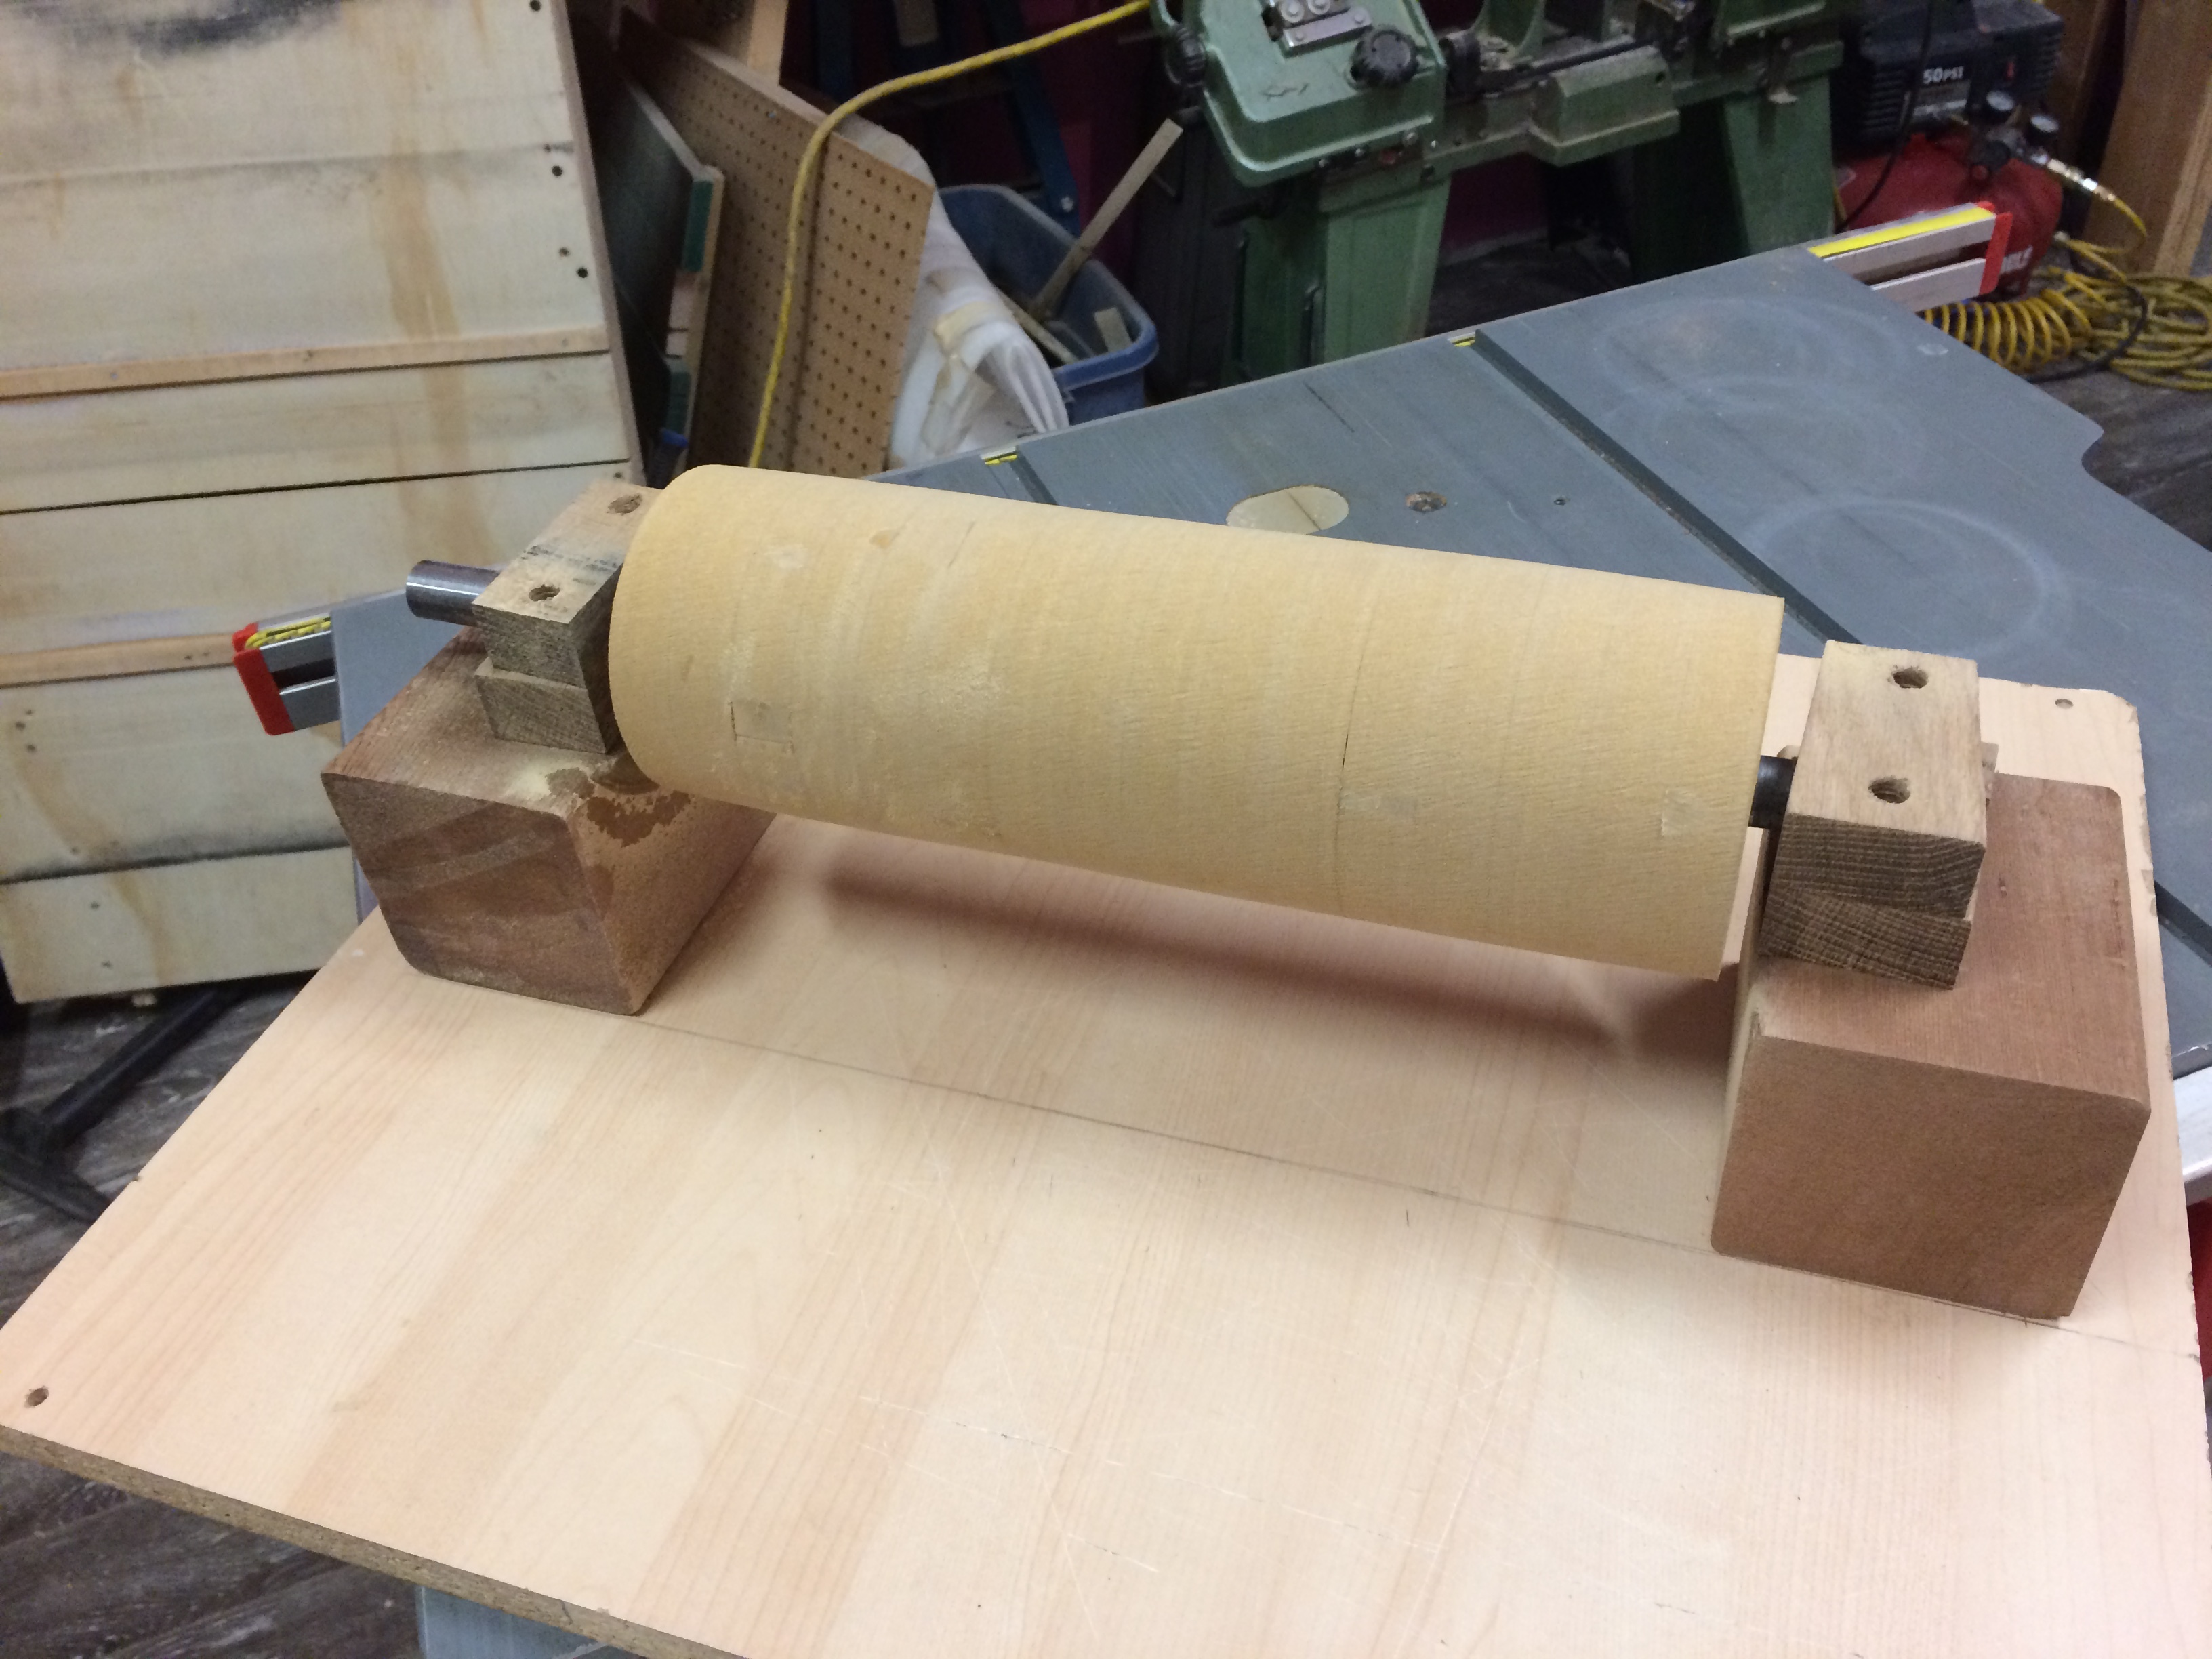
After finding some pillow blocks and mounting them temporarily, I called it a night.

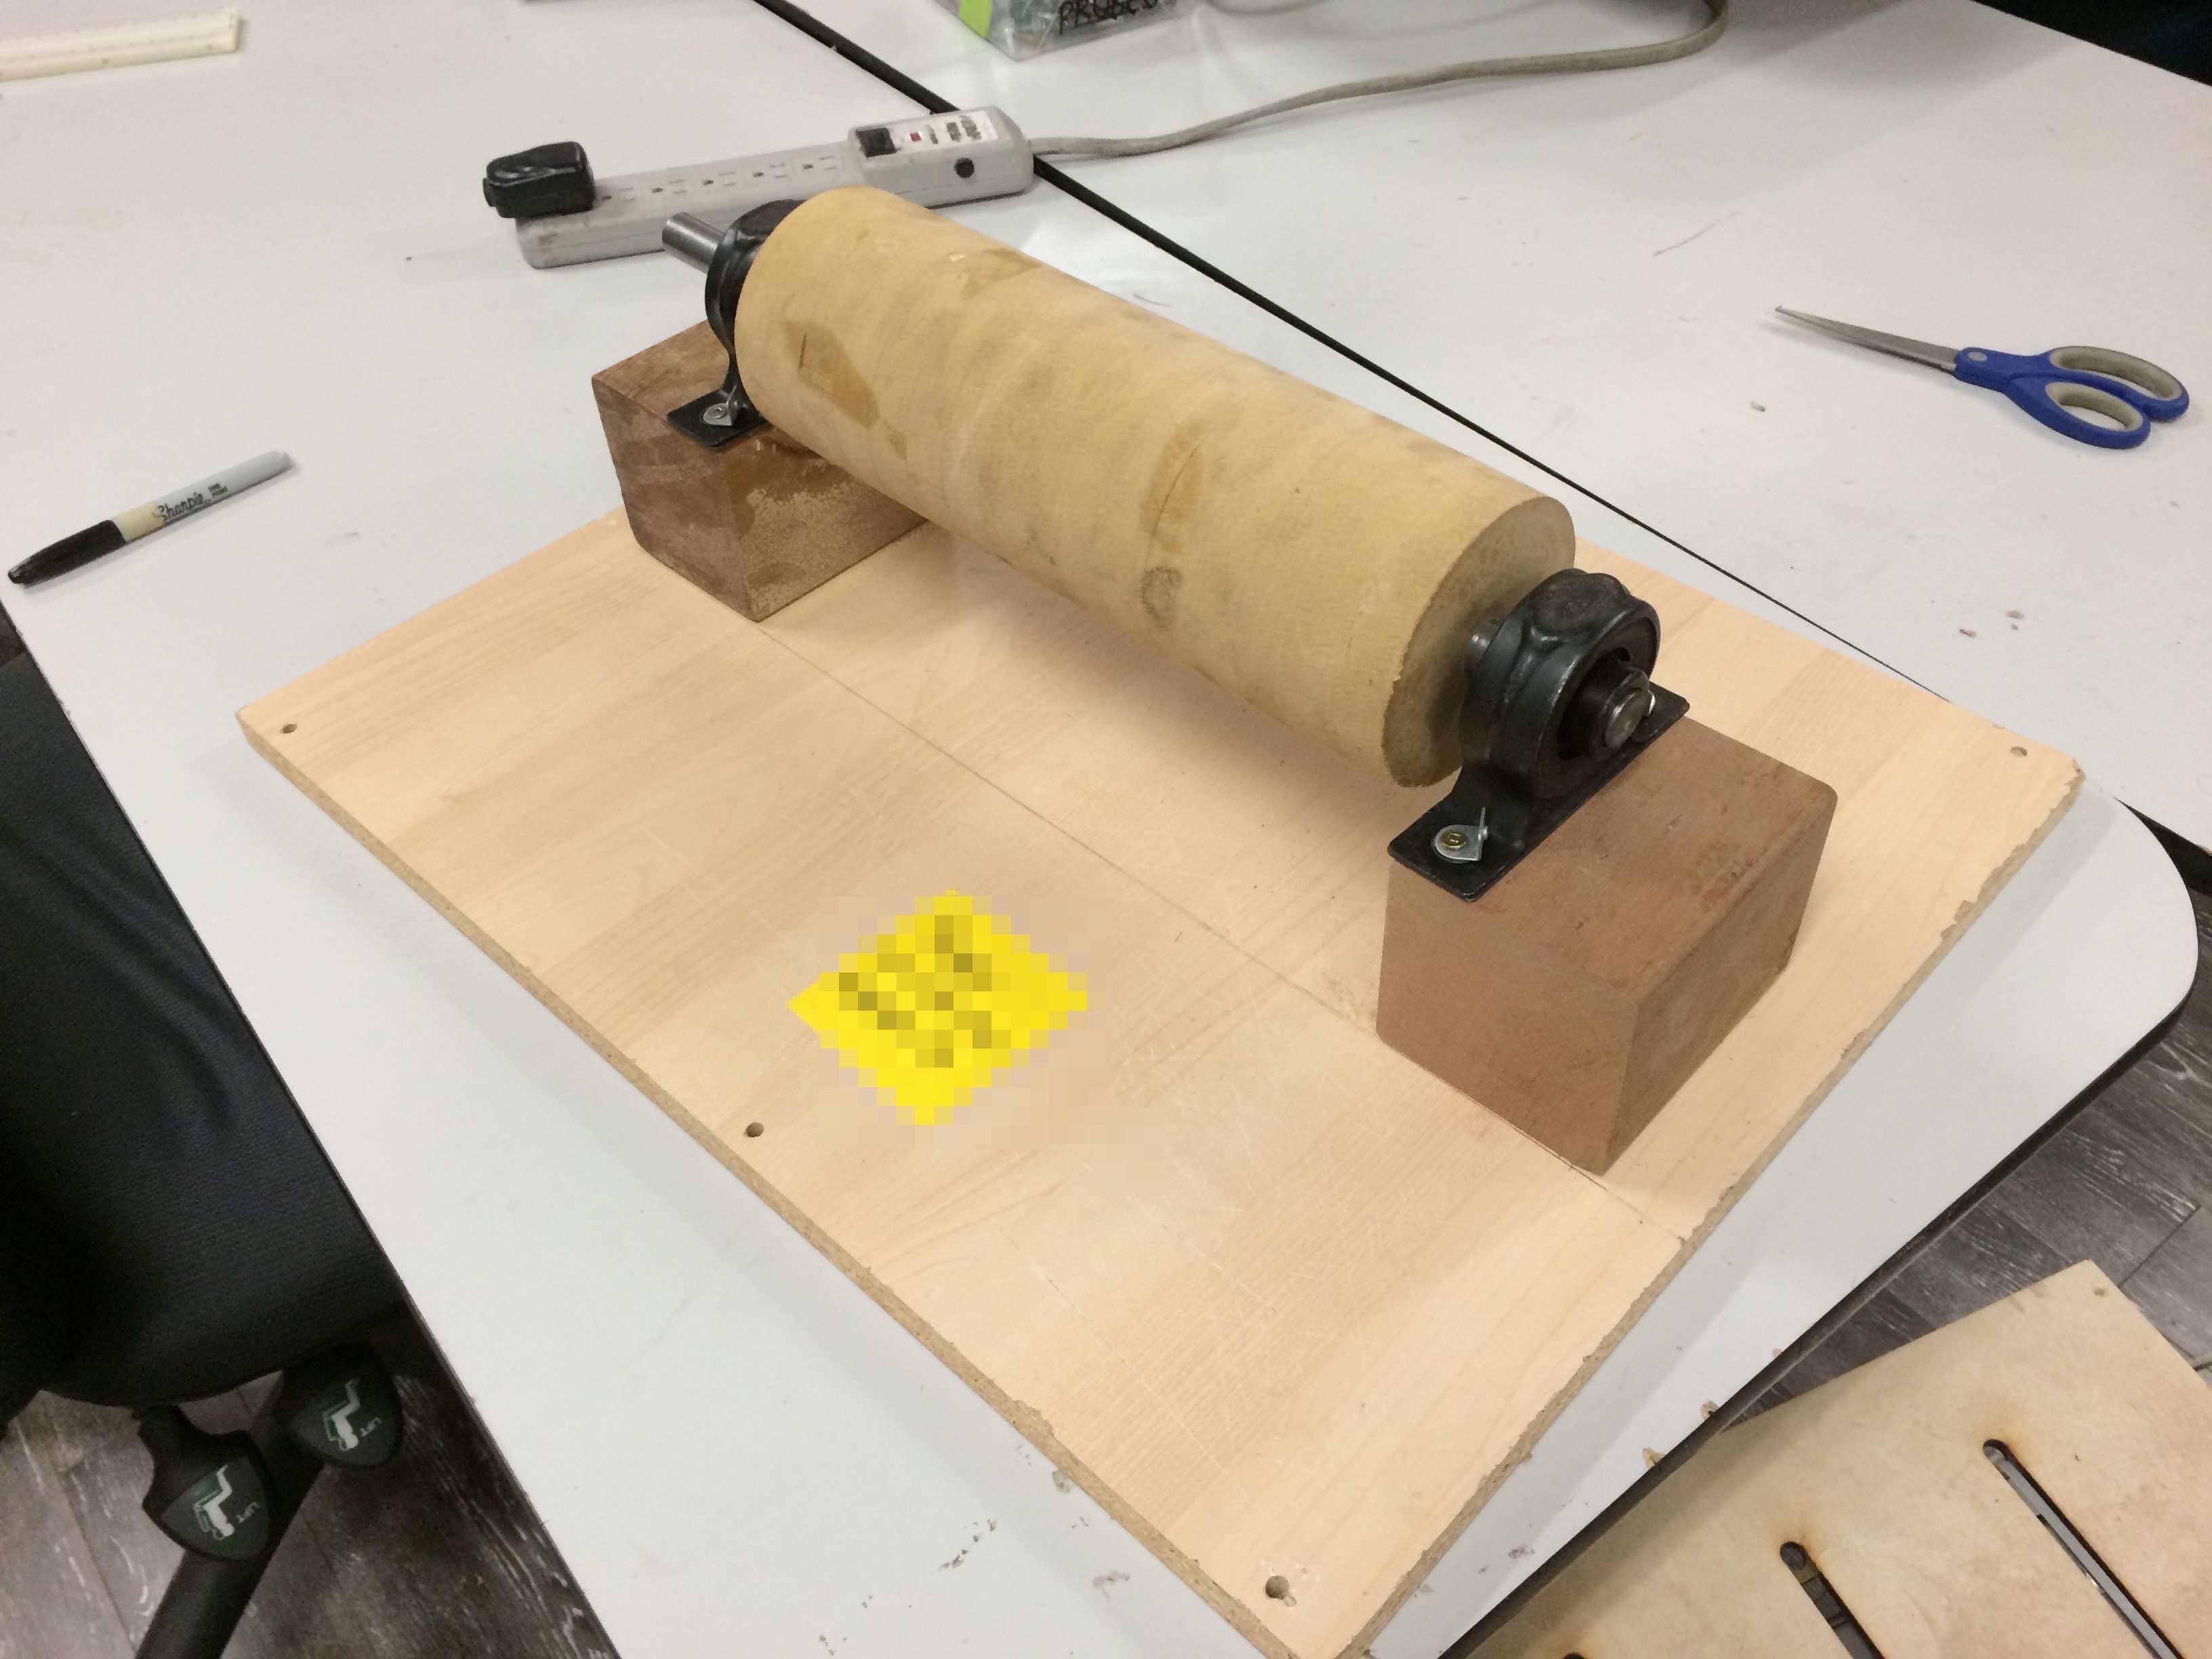
Next I’ll need to build the table for this to mount to and figure out the drive mechanics.

5 Likes

Last night I bought a bunch of wood for the thickness sander structure and started chopping it up to workable dimensions. I decided to do sunken butt joints so I had slightly more stability, but those take longer to make.

I only got one corner done last night, but mostlly figured out my tool chain for the remaining work on Saturday.

I also did a quick mockup in Fusion360 of my plans so far; i haven’t gotten all the plans into Fusion yet (they are written on paper old-fashioned) but here’s my Fusion render:

3 Likes

Yesterday I had a large amount of time to spend at the hack space, I feel like I got a lot done.

I finished each side and began attaching each side together. I placed the motor on the motor shelf for a dry fit.

Here it is with the sanding drum on top; final location not 100% worked out. I put oak rails at the top for mounting and for impact resistance.

I scored a couple circles and then cut them out of MDF for the upper belt pulley.

I glued the two pulley discs together and cut out an adjustment knob out of maple. The knob only has two wings; when really I’d like a 3 or 4 wing adjustment knob. Not a super big deal so I’ll replace later if it bothers me. I sanded the knob on the belt sander to shape it a bit, chiseled out the hole in the center to fit a nut and pressed a nut using the vice. No glue needed; all pressure-fit.

Here it is all together at the end of the night, you can see the knob with the threaded rod on the stationary table.

What is left to make this minimally functional is to attach the hinged table and adjustment mechanism., wire up the motor, lathe out the upper pulley, attach the upper pulley, final-sand the drum (using the hinged table) lacquer the drum, and then attach the velcro+sandpaper.

Once those are done, it should be functional, but the final touches will include:

  • Adding dust collection hood and potentially including a top-sander cut-out for added benefit.
  • Adding a belt cover (for added safety)
  • Adding side lockdowns (for added stability)
  • Adding “On” indicator light (I don’t expect this thing to be super quiet when on, but its always nice to have more than just sound and vibration as an indication that something is on.
  • Add rubber feet for reduced vibration transfer and better stick.
  • (Longer goal) add feed belt for automatic feeding.

Any suggestions as I’m getting close to minimally functional?
Also, what power switch should I use for the motor? The motor is a 1/2hp motor. (Do we have a power-tool style switch somewhere unused?)

Anything I’ve done wrong and should fix?

2 Likes

Forgot the last pic:

1 Like

…and just when I thought my order was lost in Canada Post, my velcro conversion kit and my sandpaper roll arrived!

Yay!

1 Like

I had a couple short nights where I did some various work, got hinges installed, bored a hole in the future pulley, cleaned up some edges, etc.

The bigger items are, I cut and glued the top table, seen here:

And then I mounted the table on hinges, as seen here:

That photo is actually from the back of the table and the table has been risen to almost meet the drum. There is a screw knob for adjustment, but after playing with it I’ll need to devise a better system for holding the end of the threaded rod on the under-side of the table. Currently I glued a piece of metal, I think I’ll need to make a hinged assembly.

To get this minimally functional, the motor needs to be mounted and wired, the pulley needs to be keyed, set, and lathed, the drum needs to be smoothed, sealed, and wrapped with velcro.

At that point, I’ll design a dust hood add various nice items and paint it. I’d like to use some of the volume under the table to store the sandpaper roll so that they are never separated.

This is getting exciting!!!

4 Likes

Just wanted to give a shout-out to @lukecyca or help wiring up the motor. No pics for today but Luke wired up the motor to the E-Stop/Start switch; this week I’ll mount the switch, motor, and start working on drivetrain.

Thanks Luke!

3 Likes

I think that would be @lukecyca ?

1 Like

Updated; sorry; autosuggest wasn’t working last night.

1 Like

It has been much too long since I updated this. Between holiday travel and some illness I haven’t been in the space much, but the few times I went I made some progress.

Back in December, I got the sander to the point where I needed to make a belt pulley. I rigged up a temporary lathe by putting the belt over the shaft and using some angled metal clamped down as a tool rest.

The motor seemed super weak, even for the temp setup I had, turns out it was still set to high voltage. A quick change of a few plugs in the motor, following a guide on the side of the motor and it was fixed. By that point I owned my own lathe tools and finished the pulley in nearly no time.

Today I used sandpaper attached to a board to true the drum.

Once it was true and to size, I applied the velcro.

Then I cut the edge taper of the sandpaper and rolled it on (easier said than done)

I wanted to cut some thin pieces of my block of walnut for my Ukulele back (yes, this is the Ukulele build log, I do have focus even though the last two months has been about the sander). I planed down the block so I’d have a nice edge to put against the tablesaw fence. This also happened to be the initial test piece of the sander. This block was nice and flat after about 4-5 passes (slightly lowering each time).

After cutting and sanding I had thin pieces for the back like this:

Rinse and repeat, and once on a piece of Wenge, I was able to glue up three pieces to make the back of my Uke body

After it is mostly dry (about 5 hours at this point) I take it out of the clamps and weights. I’m letting it dry some more before I sand the glue off.

I have to be delicate with this piece as it is only butt jointed together. once I get the body in place some ribs will help with the structure.

Progress!!!

5 Likes

Looks good! I bought a small 50ml bottle of Kunos Natural Oil Sealer, Walnut color, for my jewerly box, and I didn’t need it in the end. If you have a need for it, feel free to use it. It’s in the chemical closet.

2 Likes

Excellent, thanks! I’ve got a few scraps; I’ll try it out and see how it plays.

Getting back into the habit of posting each step…

Now that the back has had some time to dry, I sanded it down on the thickness sander.

I figured I’d show the sides on top of the back to start getting an idea of what this thing will look like.

Next up will be to make the top, then I can do some adjustments on the sides and potentially start some assembly.

3 Likes

Actually, why not show a better representation, here’s the neck placed…

… color and material-wise its a bit more hodge podgey than I original imagined, but I’m still enjoying it. I expect the wenge from the back and heel cap will end up being a similar color when finished; not entirely sure why the end cap is so much darker right now.

4 Likes

While steam bending was what I used for the initial shape, its pretty obvious that in prior images I had quite a bit of bend back that I needed to adjust for.

Because I don’t have access to a bending iron (which is probably what I should have built instead of the box), I ended up finding great success on some test pieces with a hair curling iron. So much so that I went straight to the piece. While I have a little bit of touching up to do, I feel this worked out quite well.

4 Likes