Having a little difficulty with the 3d printed parts - the knob on the joystick stand holder appears too big to fit through the hole in board 3?
Should I just attempt to free-hand that and proceed, or is the spacing extremely critical?
Edit: Was able to carve enough of a chamfer on the guide to work with.
You can try sanding/carving off some of the holder knob to make the PCB fit…
Or use the PCB to grind away some of the knob PLA
The angle of the FSR and its alignment are a bit critical in that it makes assembly of the joystick much easier…
I must be getting lucky then, I found that you can take the board and clamp it in a vice dead flat and if you drop the FSRs in so they are sticking up, they sit in the holes naturally square and at the right angle. Tack solder lightly one leg of each from the top before flipping the board over and proper soldering them on the backside. Its a little fiddly getting your soldering iron angled right so you don’t touch an FSR but its fast.
Yea the jig for soldering is tight. Can sand down or wedge on a bit. As @dbynoe shares you dont NEED it, but in our builds over the year, we found it helps reduce the number of killed fsrs.
Edit: I’ll leave it in the dropbox at the space for you @chadleaman. Will hold onto the used filter/mouthpiece for testing, if you need more assembled down the line.
Mimi and I are chatting to MMC about VHS building lipsyncs. We will of course talk about the team of VHSers jumping in to help and all about VHS. I think this will end up as a MMC blog post. Photos of anyone building the kits I’m sure would also be excellent (if you are willing to have your pic published…please indicate that). Thanks @chadleaman for this.
Edit: also if you have any cool anecdotes you’d like to get across about your experience building these please chime in. Cheers!
Delivered to @packetbob, thanks a ton. And @jon nabbed your lipsync out of the dropbox as well. Finally thank you @xquared for the toys, nabbed those as well. Y"all good peeps!
Got 4 done here, currently I just need a couple more FSR’s (one was missing, one had an “incident” involving crazy glue that ended up several cm’s from where it was applied and then was crushed during assembly.) and the kit was also missing one of the three pin female headers.
You can totally replace the FSR’s from the top though if you are careful. This saves you from having to disassemble half the thing. I, of course, disassembled it anyway before I realized that the rest of the FSR’s hold the board in place. Protip, if you ever need to get a CA glued nut off a plastic thread just heat the nut with a soldering iron until the CA melts.
For the repair I cut the leads off the broken FSR and used tweezers to puck them out individually while heating the pad. I was then able to carefully get a solder sucker in place to clear the hole and soldered the new FSR in place from the top, just held the iron a little longer so the solder would wick to the back some.
Fun kits though, the only things I found finicky was getting the two buttons installed and getting the boards lined up to the slots in the housing while inserting them, I had a few different kinds of right angle USB cable and some were bigger than others which made it more challenging.
My production line:
Nice man! I am in office tomorrow, so can nab that 3 position header (or if you have an extra 4 position, you may be able to cut to size). I also can naba couple extra FSRs.
Our original install guide used to have the FSRs installed from the top… and not as many people were as delicate as you.
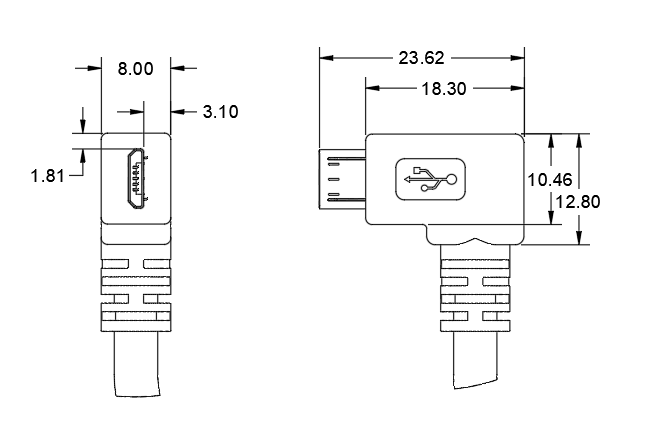
The casing is certainly tight. Our supplier changed that 90 degree USB and some of the heads were huge, which forced us to change the rear housing to make broader. Between the joystick and the housing install, it certainly fits the “final mile is the longest” definition.
I finally got my soldering stuff set up post move and finished 3/5.
I’ve been cannibalizing one kit whenever i needed something, so I will need to restock before i can finish the last one.
@chadleaman One thing I noticed is that there’s two different types of the 90 degree USB cables. One of them is just a bit too bulky for being inside the lipsync. You have extras of the cable on the left?
Yea the supplier changed the form factor of the cable, and some are worse than others. I may have a couple of the more forgiving ones. I have once shave off some of the top/back edge to enable it to fit in the case… how many of each type of cable do you have?
@chadleaman
I am leaving the 5 I pledged to make in your totes. I have returned any surplus components back into your master kit box, along with a bag of random extra 3d parts.
In addition to the mouth piece, I am also keeping the super glue, the soldering jig and the bag of surreptitiously unlabelled baby powder, in anticipation of future builds.
We updated the case a while back to accommodate the bigger USB cables, though the insertion process is still tricky. Do these dimensions match the bigger one, or has it grown even bigger?