Check out this vid starting at 8min or so. Well the whole thing is excellent actually.

Check out this vid starting at 8min or so. Well the whole thing is excellent actually.
@ninetynein - great video… it doesn’t show what he used to drive the cables (hidden behind the rear alum plate) so i’ll have to check out any other vids and pictures to get an idea…
i did get a length of 1.5" delrin rod stock today. i plan to cut it into 1/4" (or thinner) discs for part of the vertebrae. aluminum was my first thought but i worried about the friction of the cable through the aluminum and figured Delrin would be better.
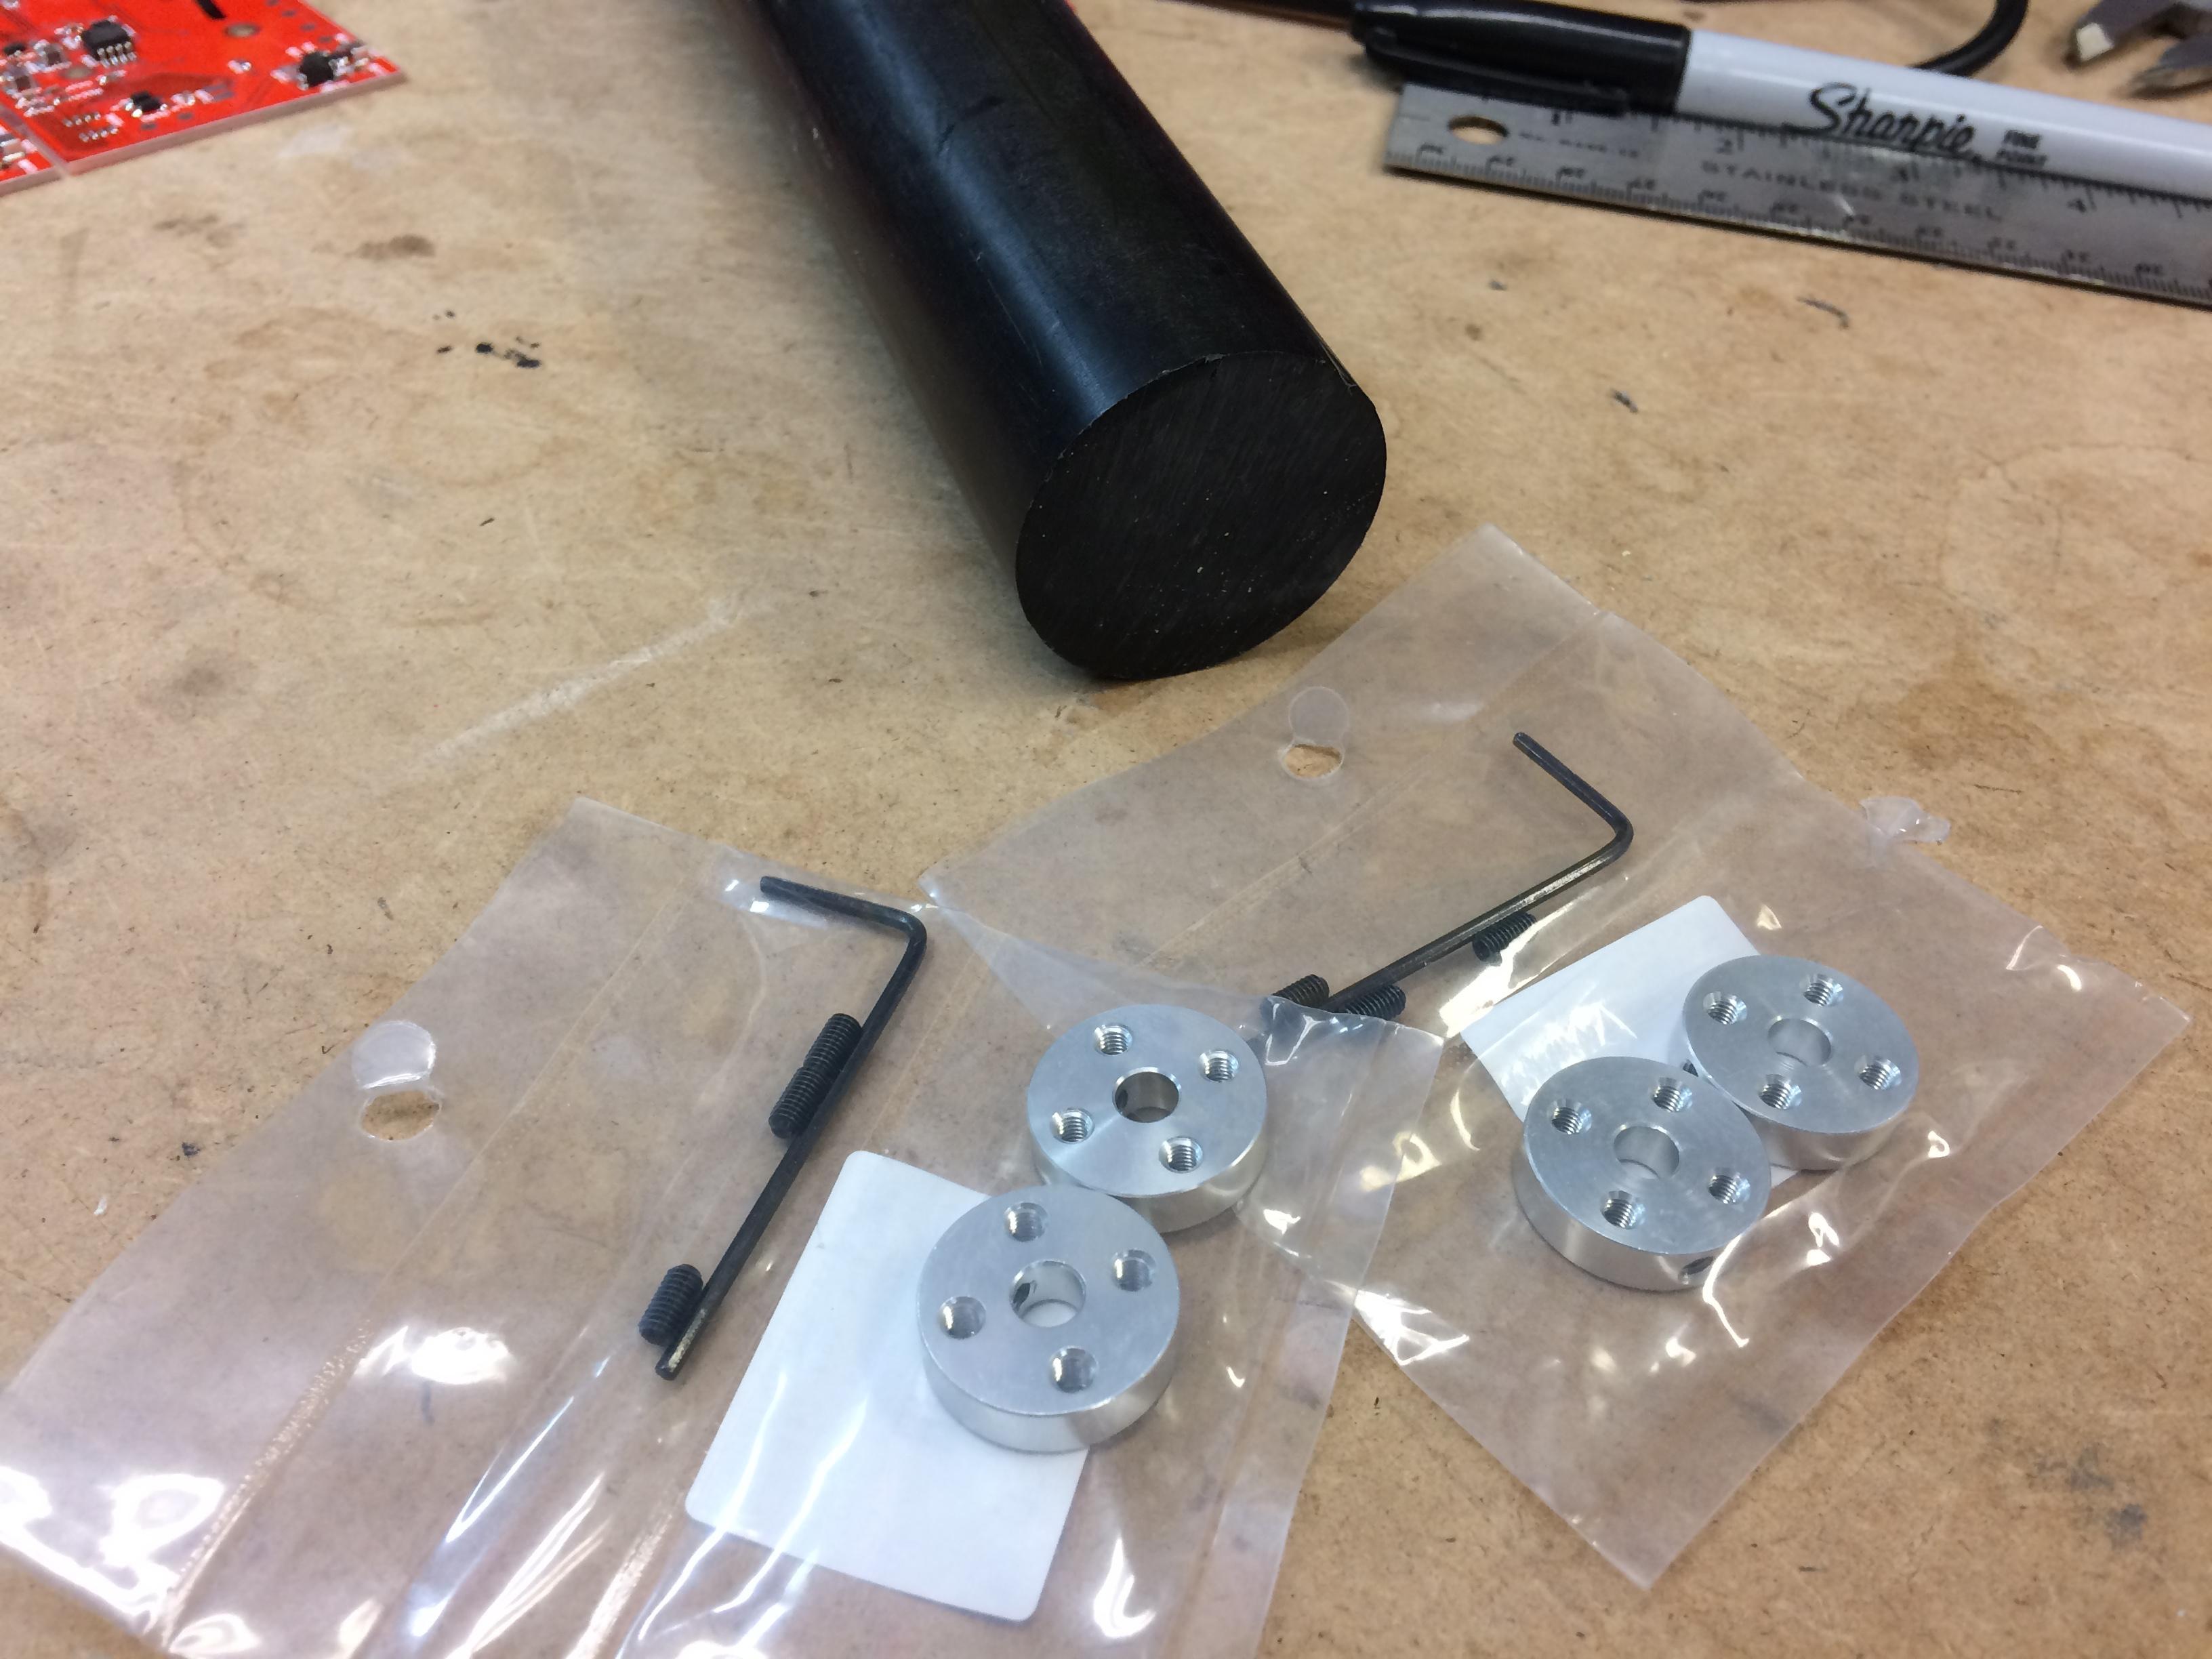
attaching the delrin disks to the spine requires some sort of metal adapter. i had originally planned to machine them (time to learn how to use the vhs lathe) out of 3/4" aluminum rod stock but realized this would take a long time. so i went to lees and got a few of the pololu adapters and will try them for the first section… kinda pricey but will save me lots of time…
now i have to figure a easy way to slice up the delrin… will start with my chop saw but if that doesn’t work will try the bandsaw or power hack saw at the space…
Where did you source the derlin from?
Associated Plastics & Supply Corp
1104 Franklin Street
Vancouver, BC
Tel: 604.251.9441
$15.90 for a lineal foot of 1.5" rod stock
They only had black…
So spent some time looking for the spine of the the tentacle…
The articles mention using $$ McMaster Carr parts or a speedometer cable…
Check out Lordco and a few other places for Speedo cables and could only find pretty thin ones that probably won`t handle the weight of the eye assembly…
Also looked at plumbing augers but they twist too much…
I do have some Dremel flexible shafts coming from AliExpress so will probably use them…
So not much luck finding anythign local…
Also looked for aircraft cable…
Rona/HD/CanTire only have it as small as 1/16 inch but I want 3/64 inch…
Also need crimps for the 3/64 cable…
Since I need cable housing also may end up using bike stuff. Need to find a place with decent brake cable and housings. Checked the MEC web site but they seem to only have $$ housings as part of a kit…
Now I have the long put off and not looking forward to task of cleaning up my garage so i can find my chop saw to start cutting up the delrin rod…
I’ve got a $4 AliExpress bike brake kit I bought for this purpose last
year. I’ll dump it in the dropbox next time I’m at VHS, you can order your
own and trade me that when it arrives in a couple months.
I also have a rotary shaft attachment for a drill that I bought from
Harbour Freight 6 or 7 years ago and have never used. It’s super beefy, so
it seems a shame to cut it up, but it might be a good cause if you want
it…
What is the diameter of the rotary shaft from Harbour Freight…
I went to Princess Auto and didn’t see anything…
Funny, they did have some misc Arduino shields and kits but the prices weer kinda high…
They did have a few Arduino DMX shields for $19.00 each…
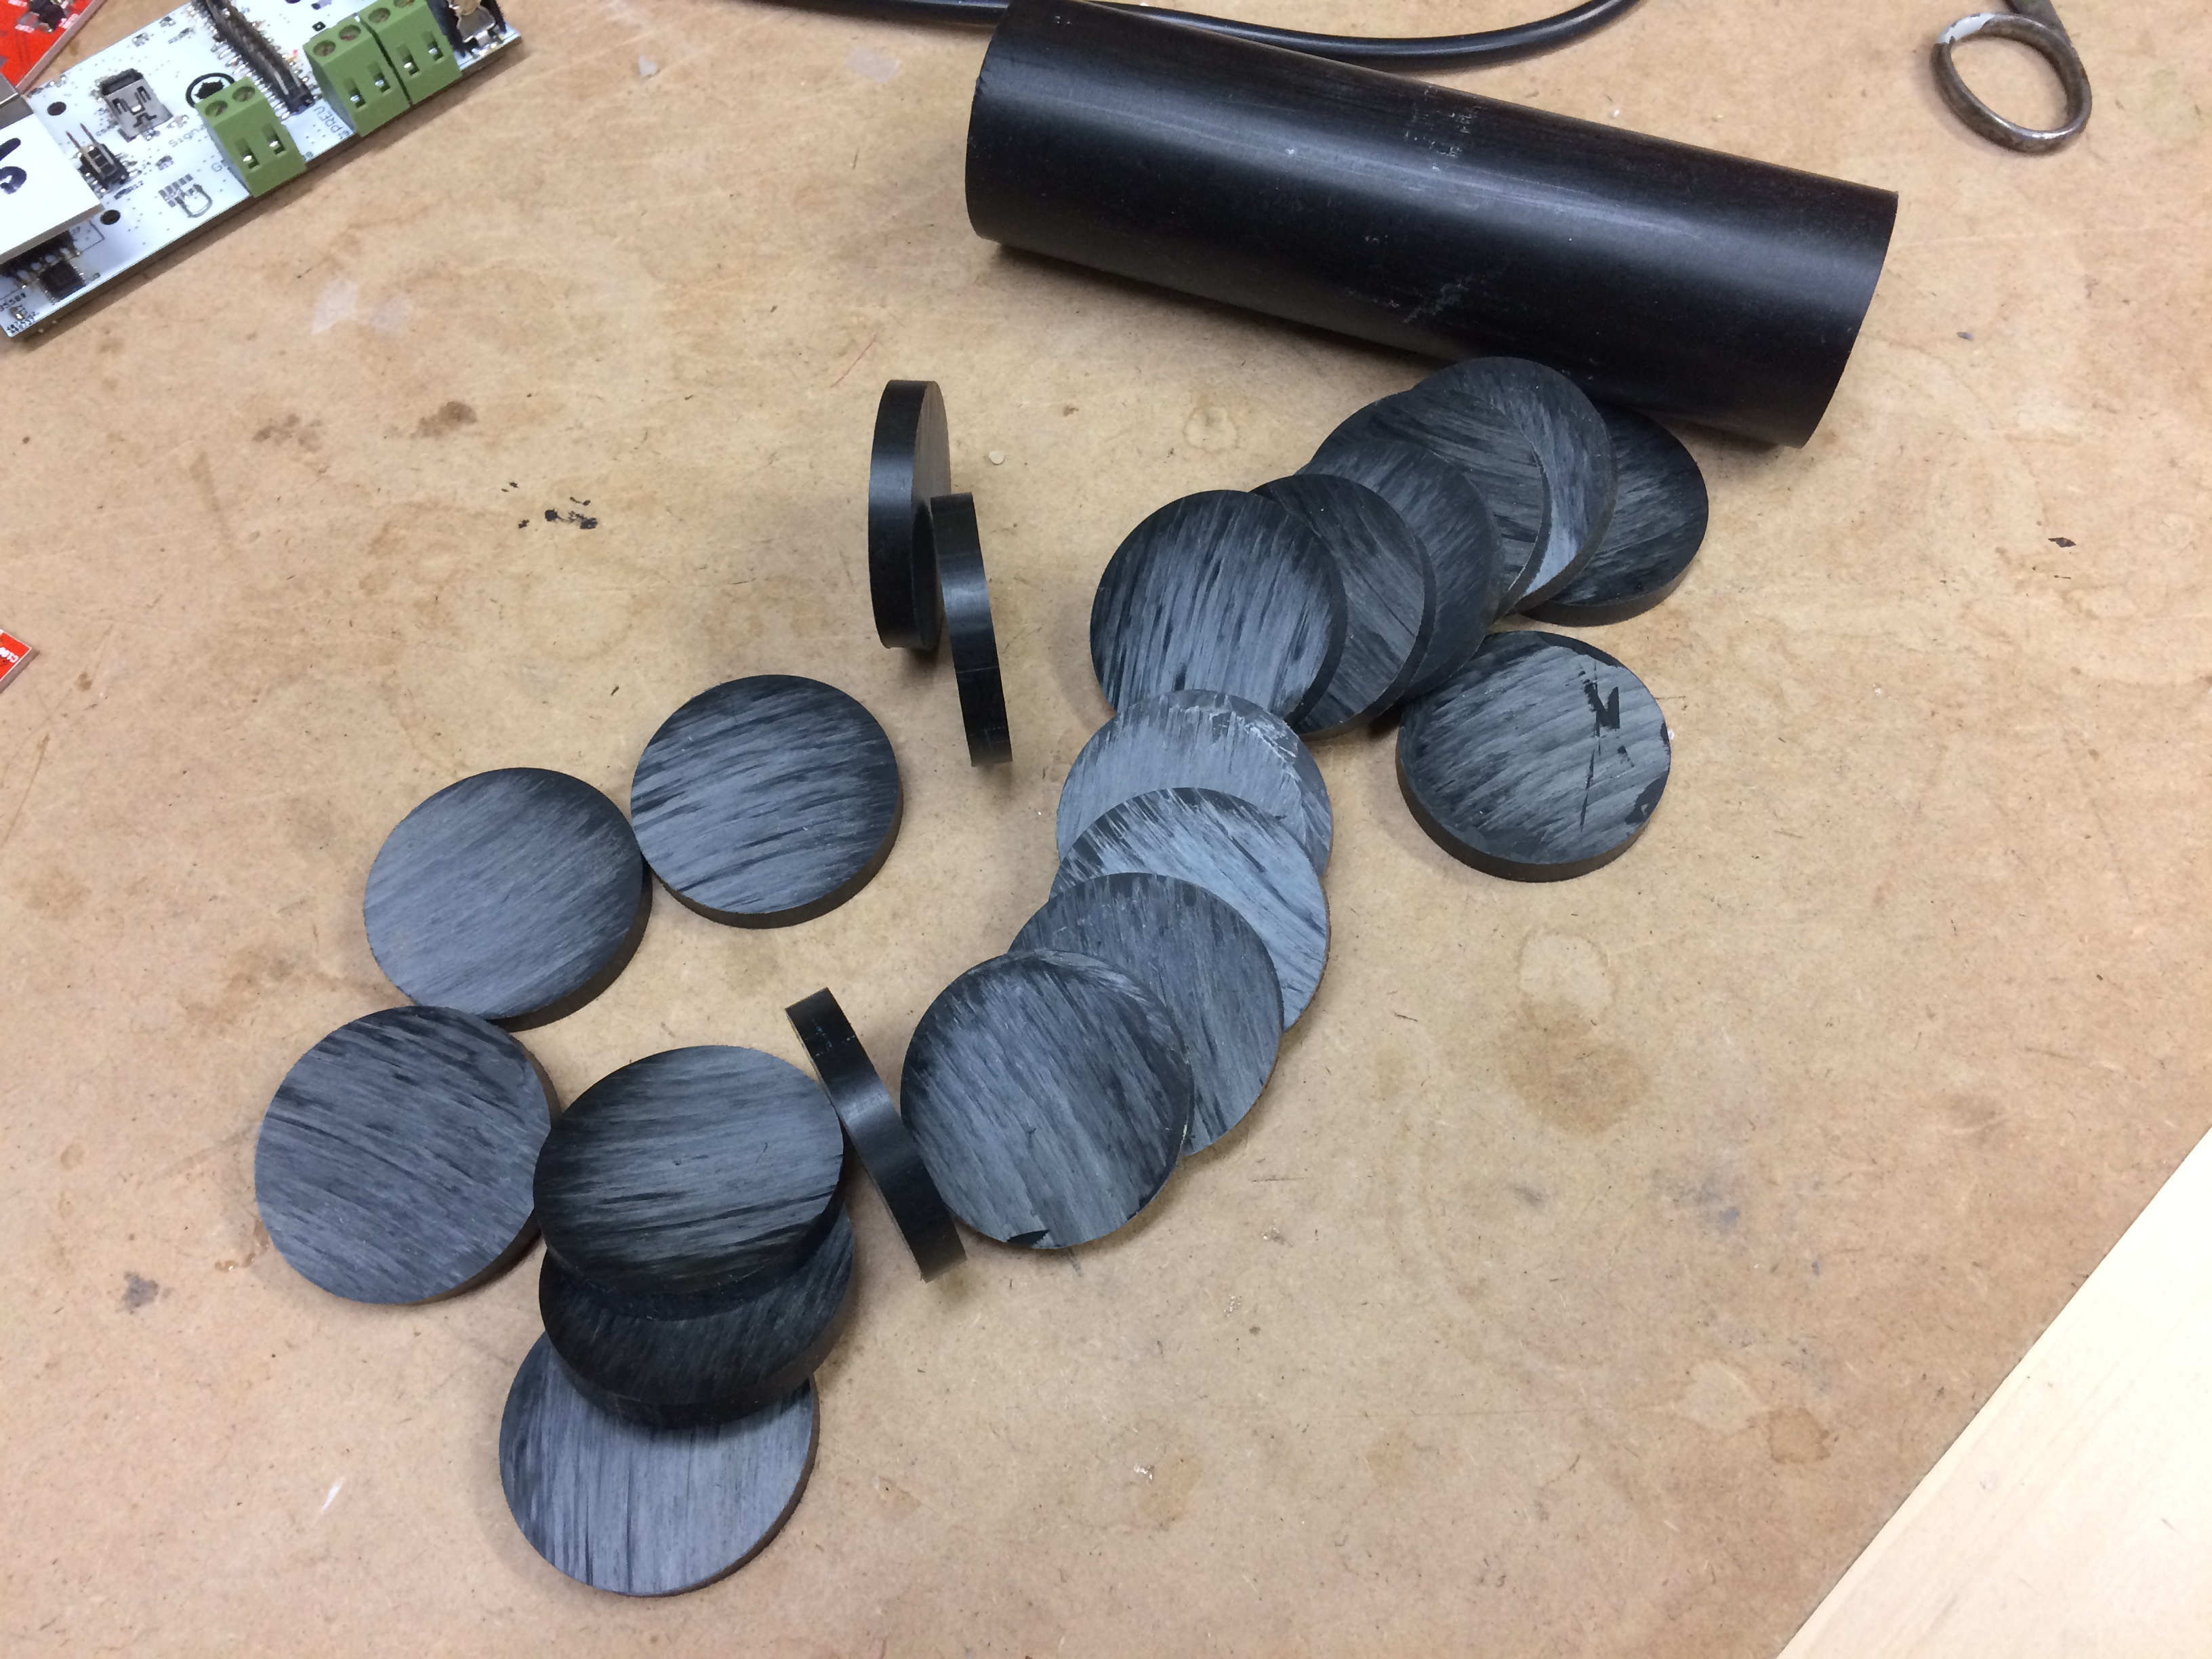
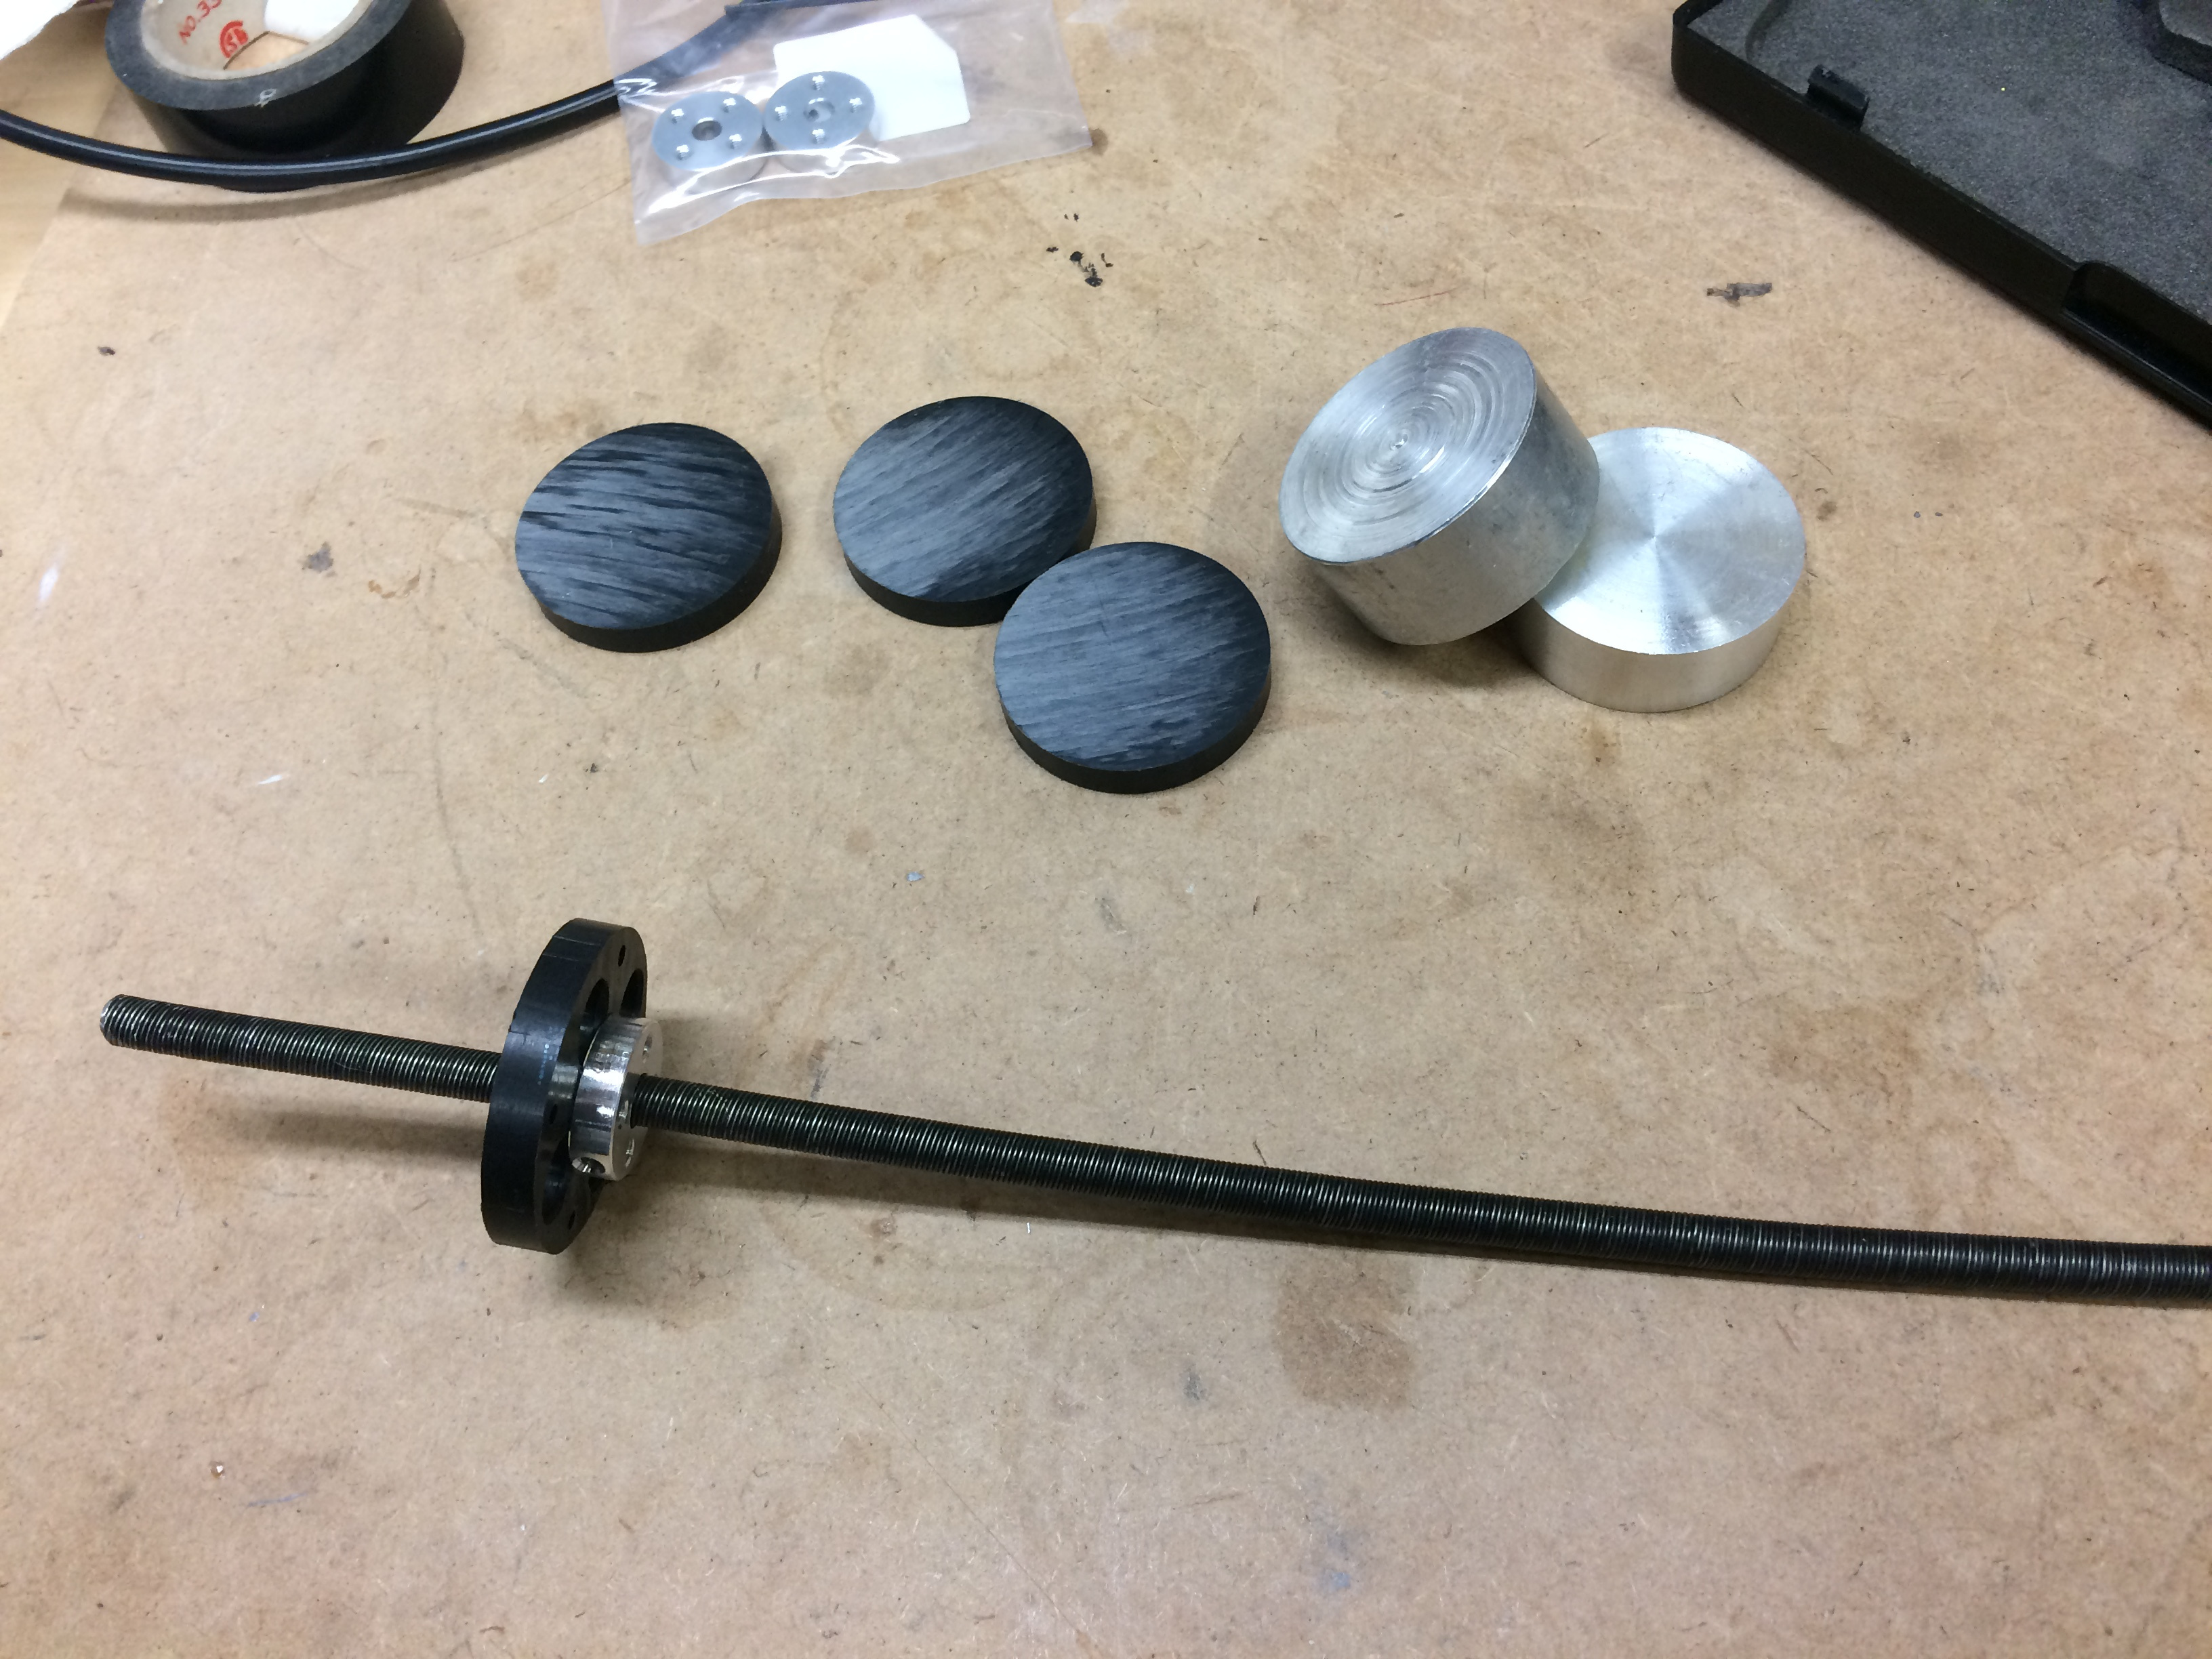
Started cutting up the Delrin rod today…
Turned out to be way easier than I had thought it would be…
The stock 40 tooth blade in my chop saw had no issues…
I had thought about making up a jig to get all the slices an exact 1/4 inch but then found that the Delrin rod would catch on the back of the saw bed to give me perfect 15/64 inch pieces…
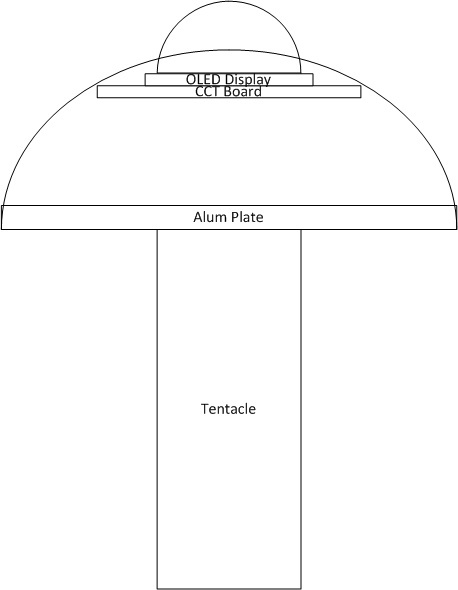
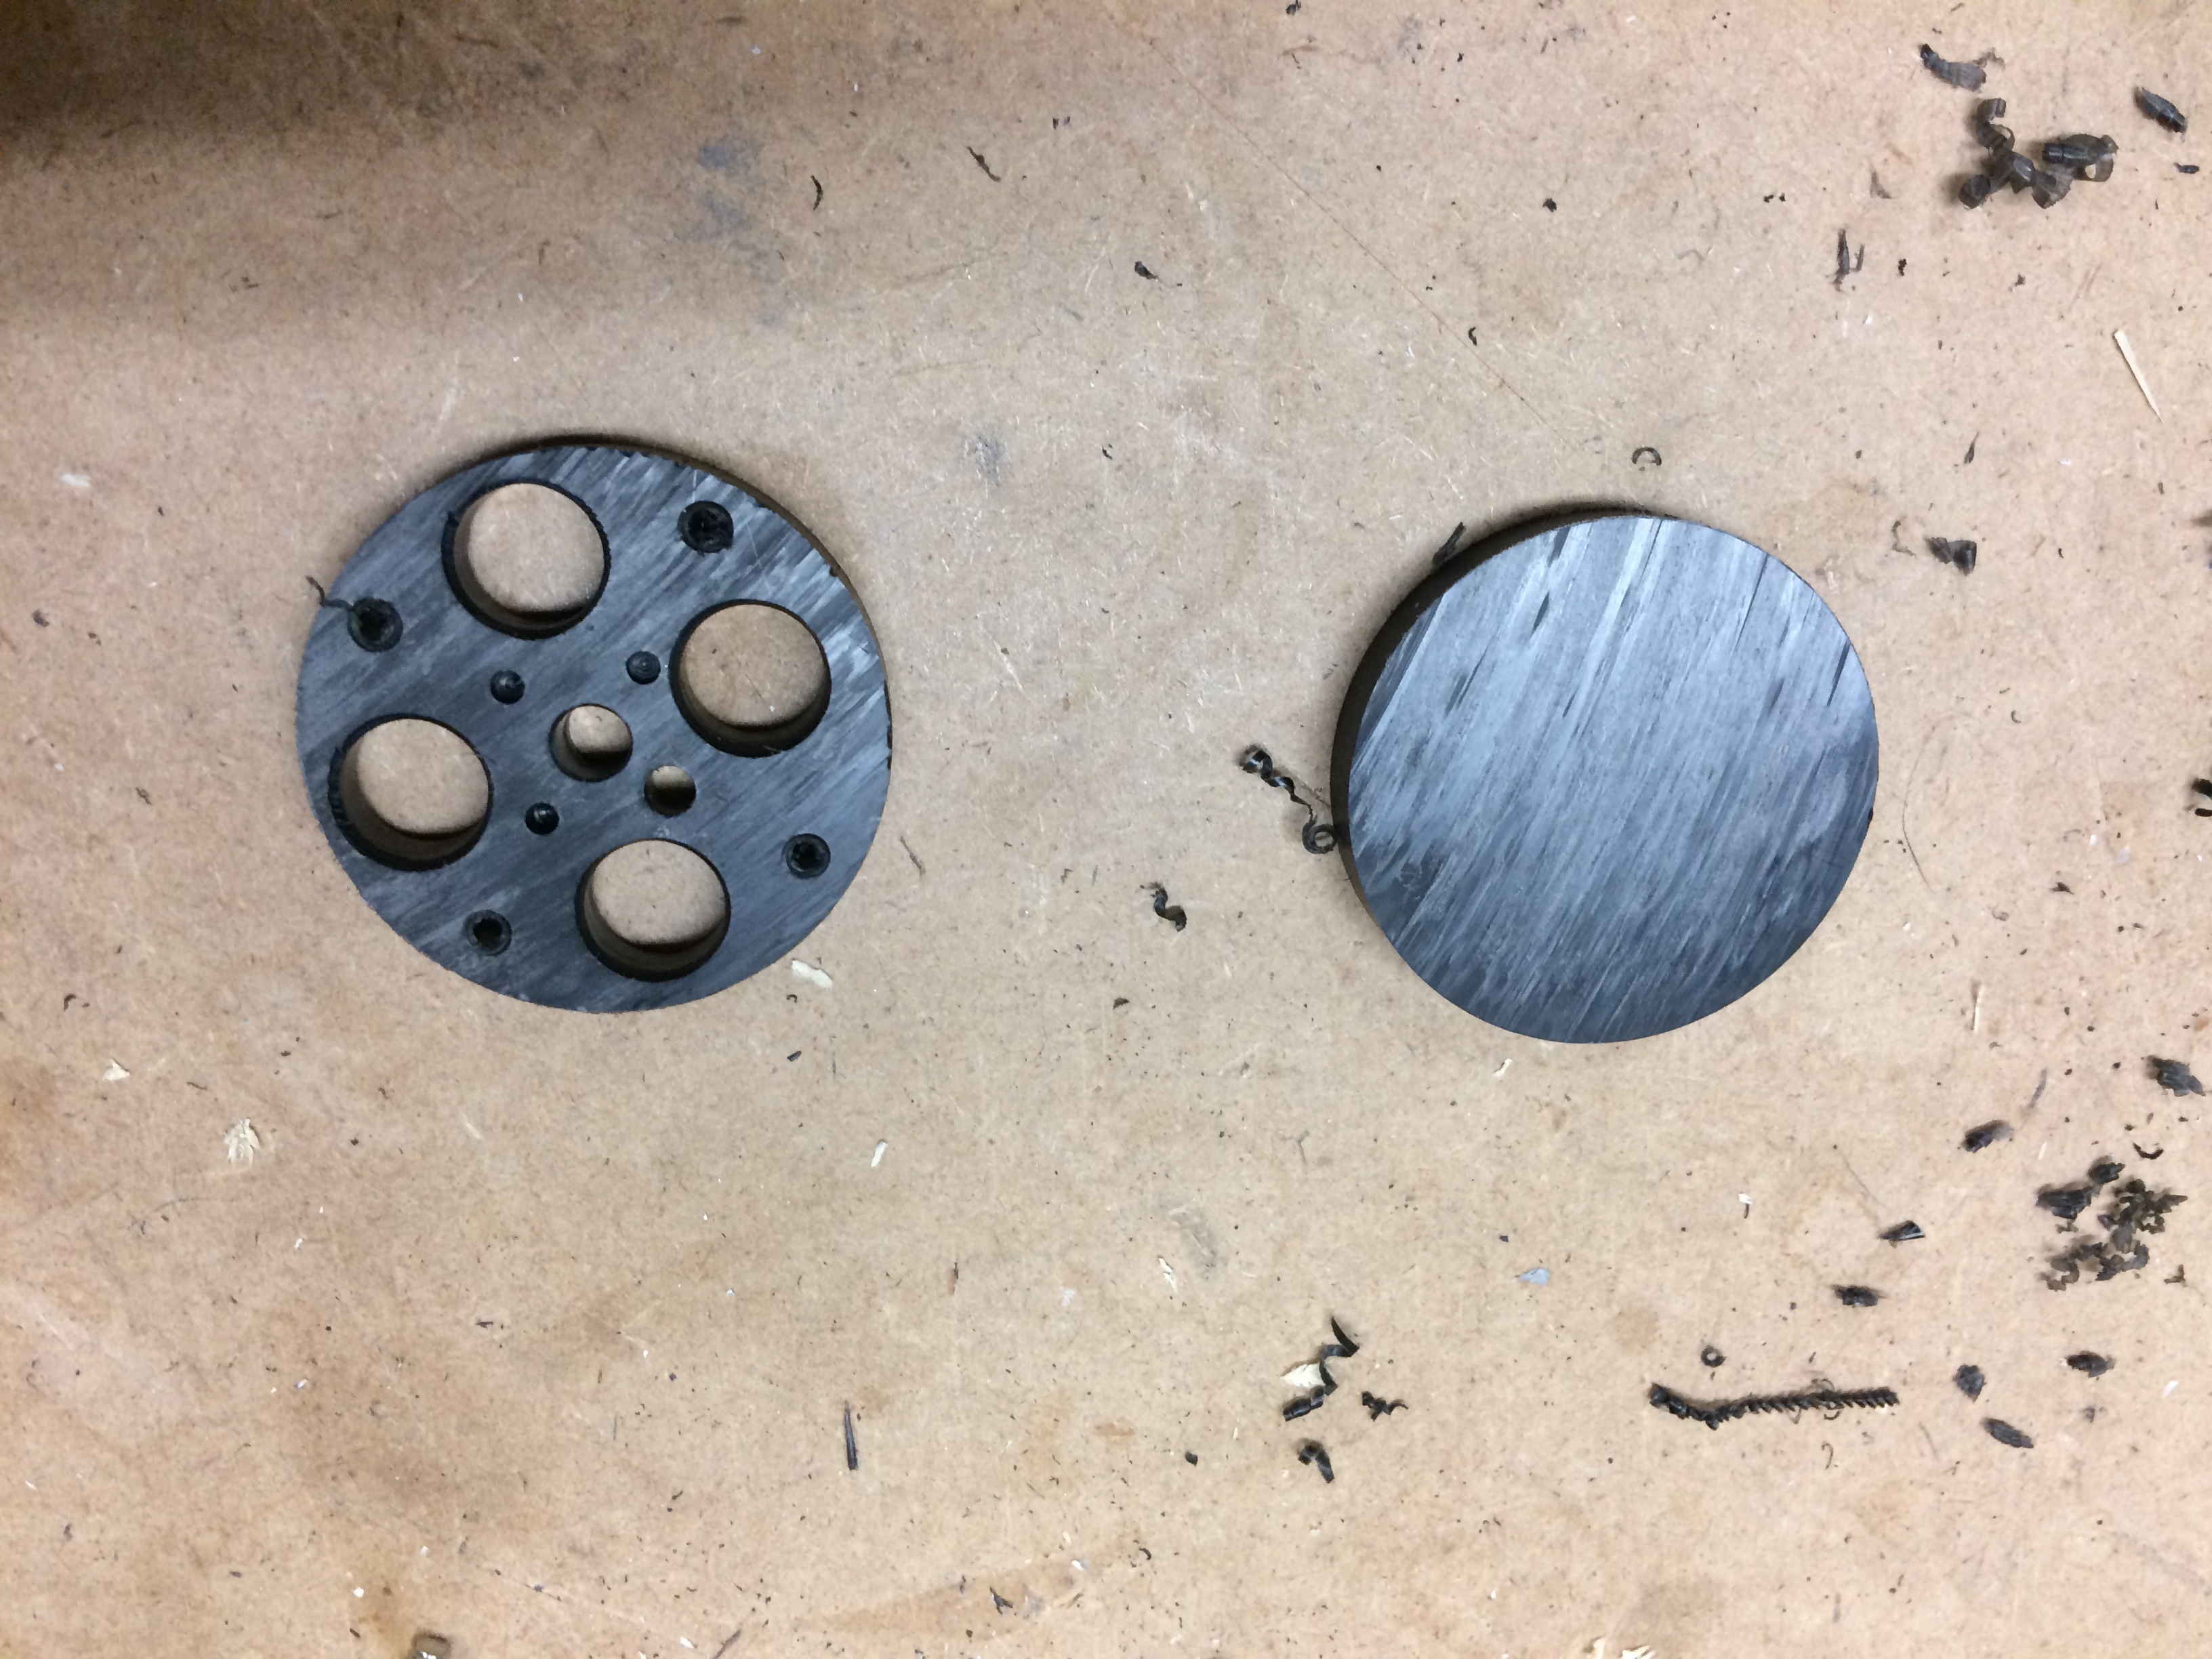
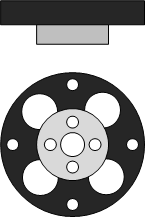
Now I have to drill out the various holes for the control cables and the aluminum hubs that I will use to mount the vertebrae to the center shaft. The drawing below shows what I have in mind. The black is the Delrin disk and the grey is the aluminum mounting hub.
I will also need a path for the power and control signals to the Teensy powered Eye. Not sure if I should allow for a dedicated path or if can route with the control cables…
My drill pattern for the Delrin slices

So ran into a bit of a snag today…
Turns out there isn’t any sort of “Robotic Tentacle Eye Pod Housing” store in the Vancouver area…
And when you ask about such a thing you seem to get funny stares…
In my mind I thought that some cheap small plastic bowls or deep saucers would work. Not the flimsy picnic stuff but something more solid… I know I have seem such things but not sure where…
Anyways I persisted…
Started with Dollar stores…
Funny thing it seems that the old fashioned independent dollar stores are no more and seem to be replaced with chain dollar stores…
No biggie but they all have the same stock which didn’t have what I wanted…
Then tried a few independent hardware stores and again no luck…
Then Value Village and I found something that I think will be suitable (plus was getting tired of looking). Found these bowels:
Figured I could grind off the base and drill a hole for the eye…
Like this:
Turns out that the bowel isn’t made of plastic but is actually wood. No big deal but the rim is really thin and may need to be strengthened.
My original thought was to sandwich two bowels together fro the eye pod but I may just use a single one and mount it all like this to cut down on the size…
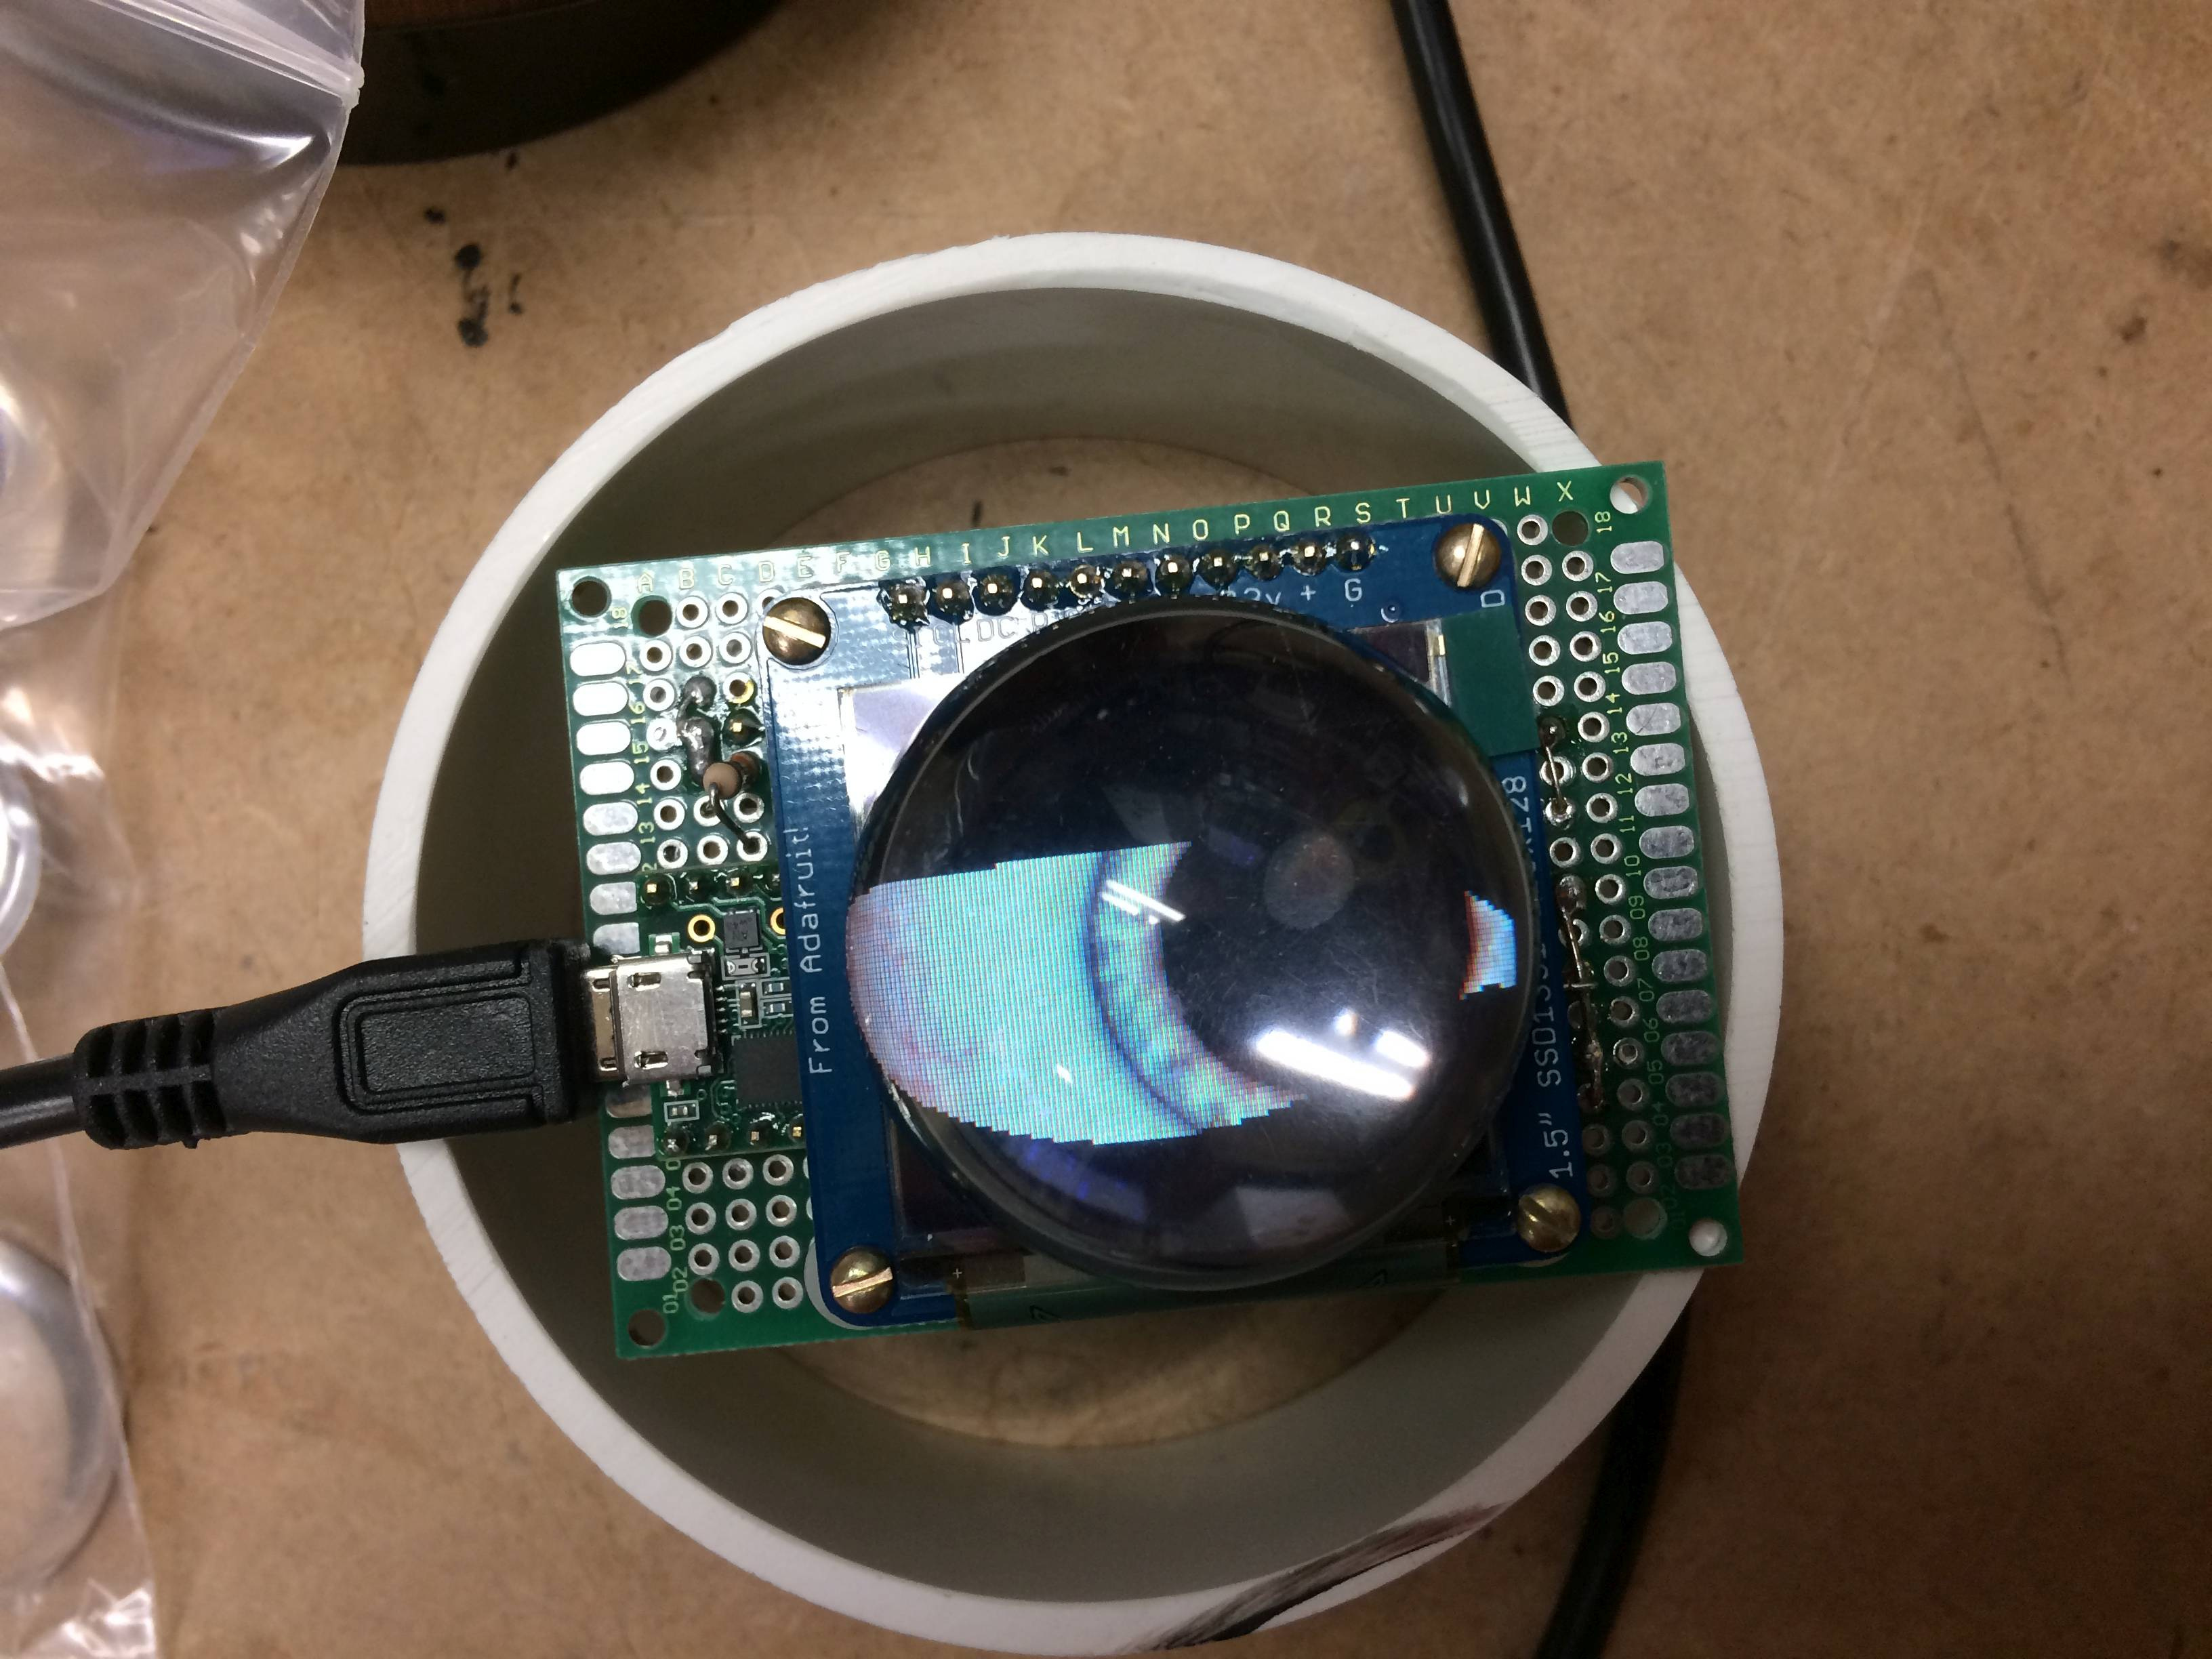
Next I have to wire up a CCT board to hold the OLED display, find a way to mount the both the board and the lens in the pod. I don’t have the lenses yet though…
Here is an idea of what I am aiming for:

Sorry about the sideways video and you have to pretend there is a half sphere lense in from of the display…and that is is all painted up… and at the end of a robotic tentacle… that can move and follow you and make some sort of sounds…
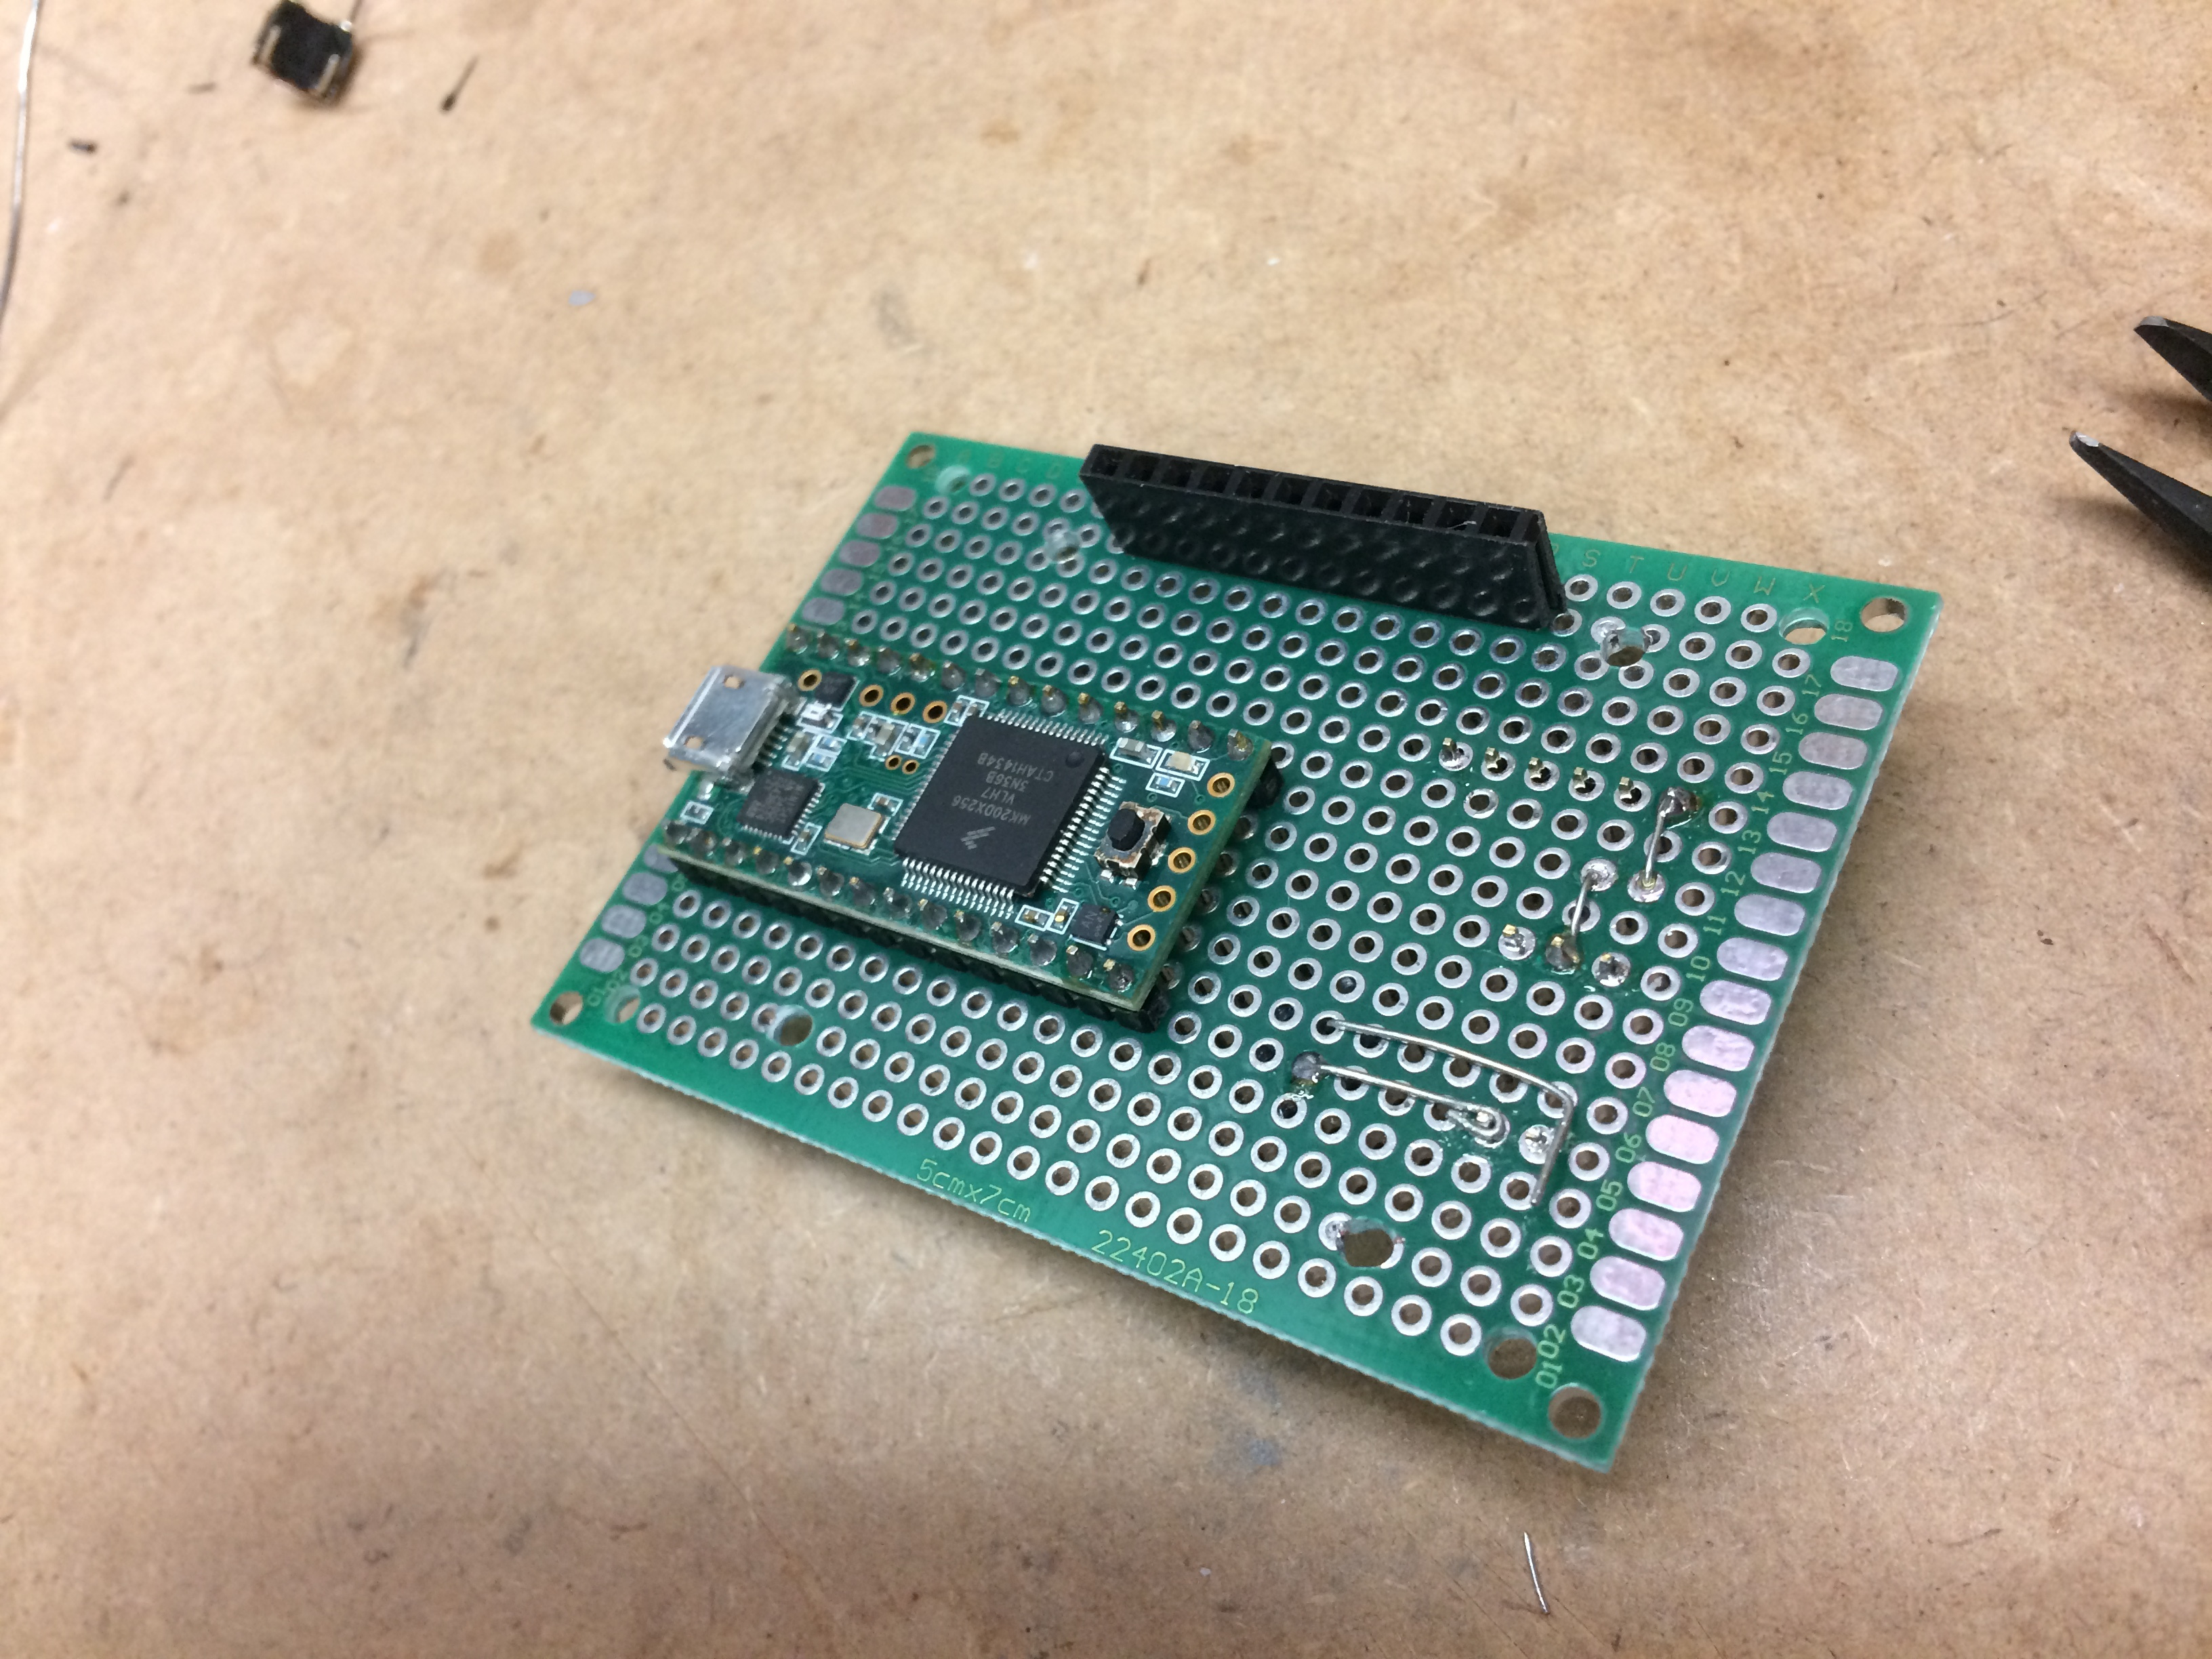
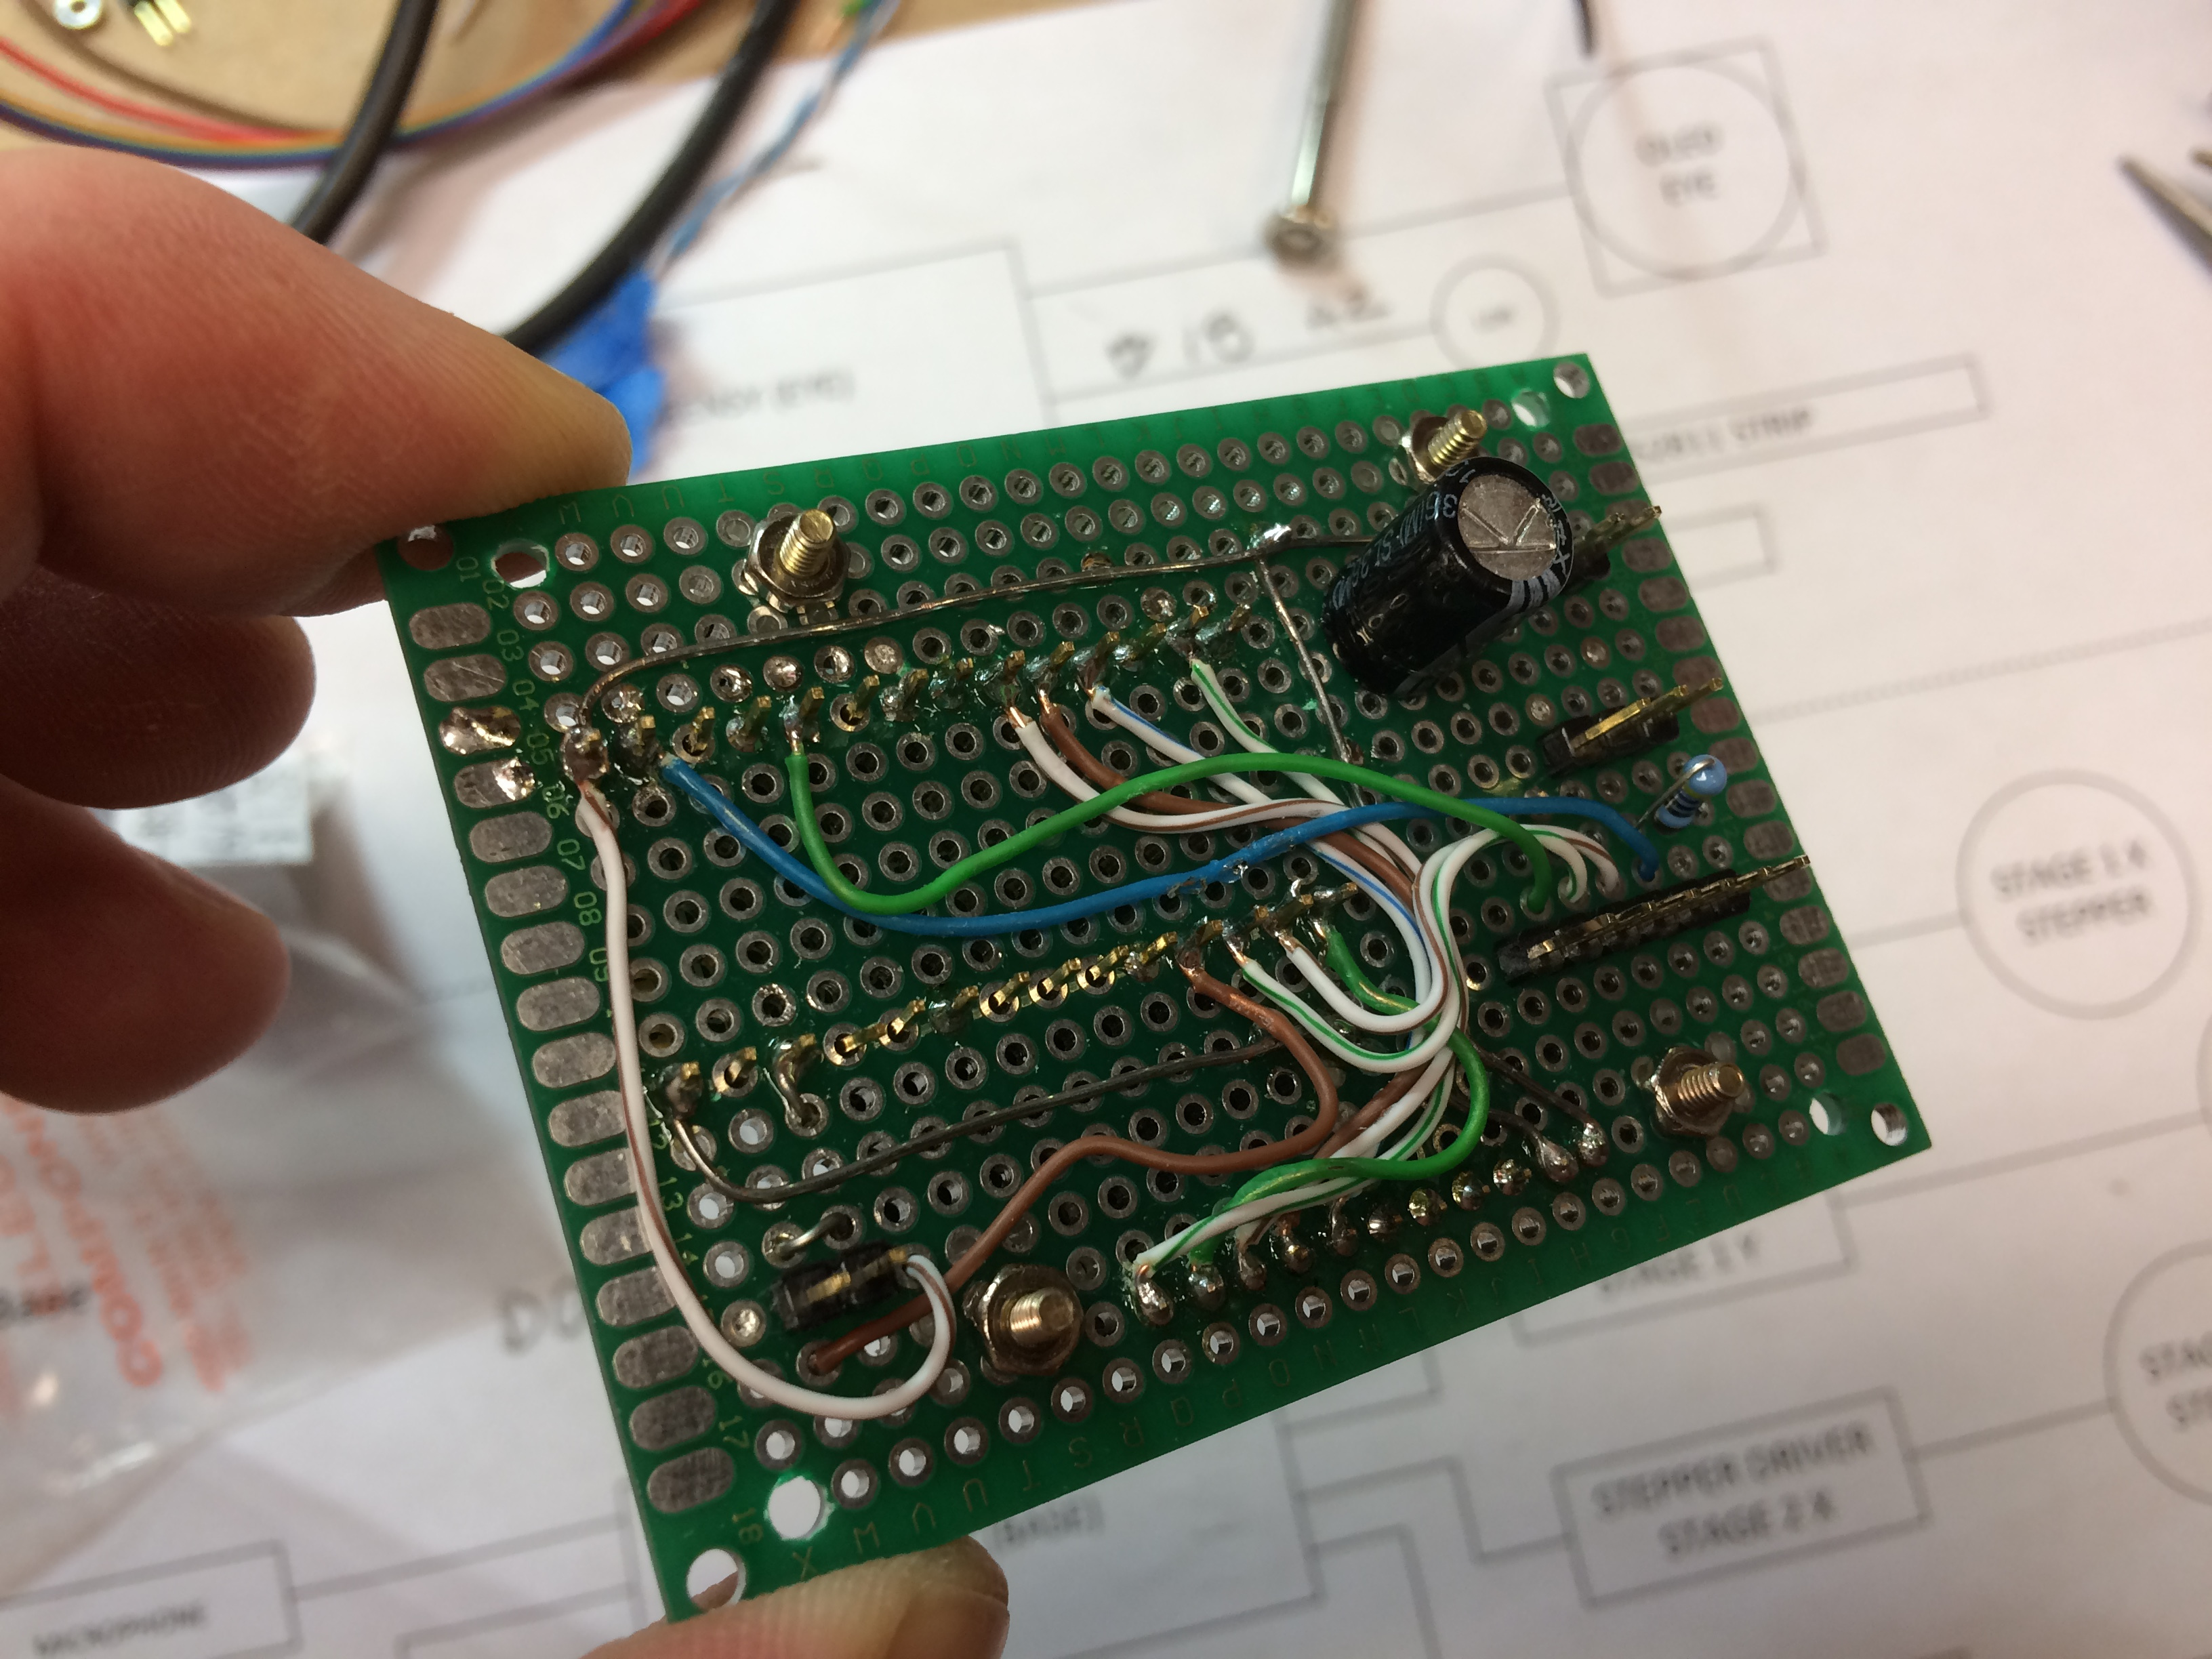
I started on the PCB to mount the OLED display and Teensy to control it. My idea is to mount it all in the eye pod. I used proto-board in sort of a double sided fashion as I wanted to use header pins on the back side to make the various connections. This was quite a pain to wire up and I made several mistakes in the wiring as I got confused going from side to side…
I want to board to be pretty small. I didn’t have the room under the display to use sockets for the Teensy so I had to solder it in (hesitated a bit before I could make that commitment). I did add a cap just to keep the power happy and a resistor inline with the SPI data that is feeding the pixel strip that I plan to add around the perimeter somehow…
The back side has 4 sets of header pins:
2 pins - +5 Power & GND (power supply from base)
3 pins - +5, DATA & GND (power and SPI to pixels strip)
6 pins - Control signals from Base Teensy (pixel control,blink and pan/tilt)
2 pins - Light Dependant Resistor (allows ambient light to control iris)
The end result is not very pretty but it works. I think I’ll smear some hot glue on it to make sure the wires stay put… I have noticed that the display is actually loose on it’s PCB so I’ll have to glue it back in place. Just as well as it was a bit crooked anyways.
I should have the lenses on next weekend, looking forward to seeing how the lense will look with the display…
You are really plugging away at this. Great work
Wow - you are a machine @packetbob (I always suspected). Looking good.
Can’t wait to see what you do next.
Got home a bit early today so thought I’d try machining up the Delrin vertebrae…
Used my cordless drill and pretty sharp jobber twist bits…
Really just too lazy to clean up my garage enough to reach the drill press…
Learned a few things…
Here are a few pics…
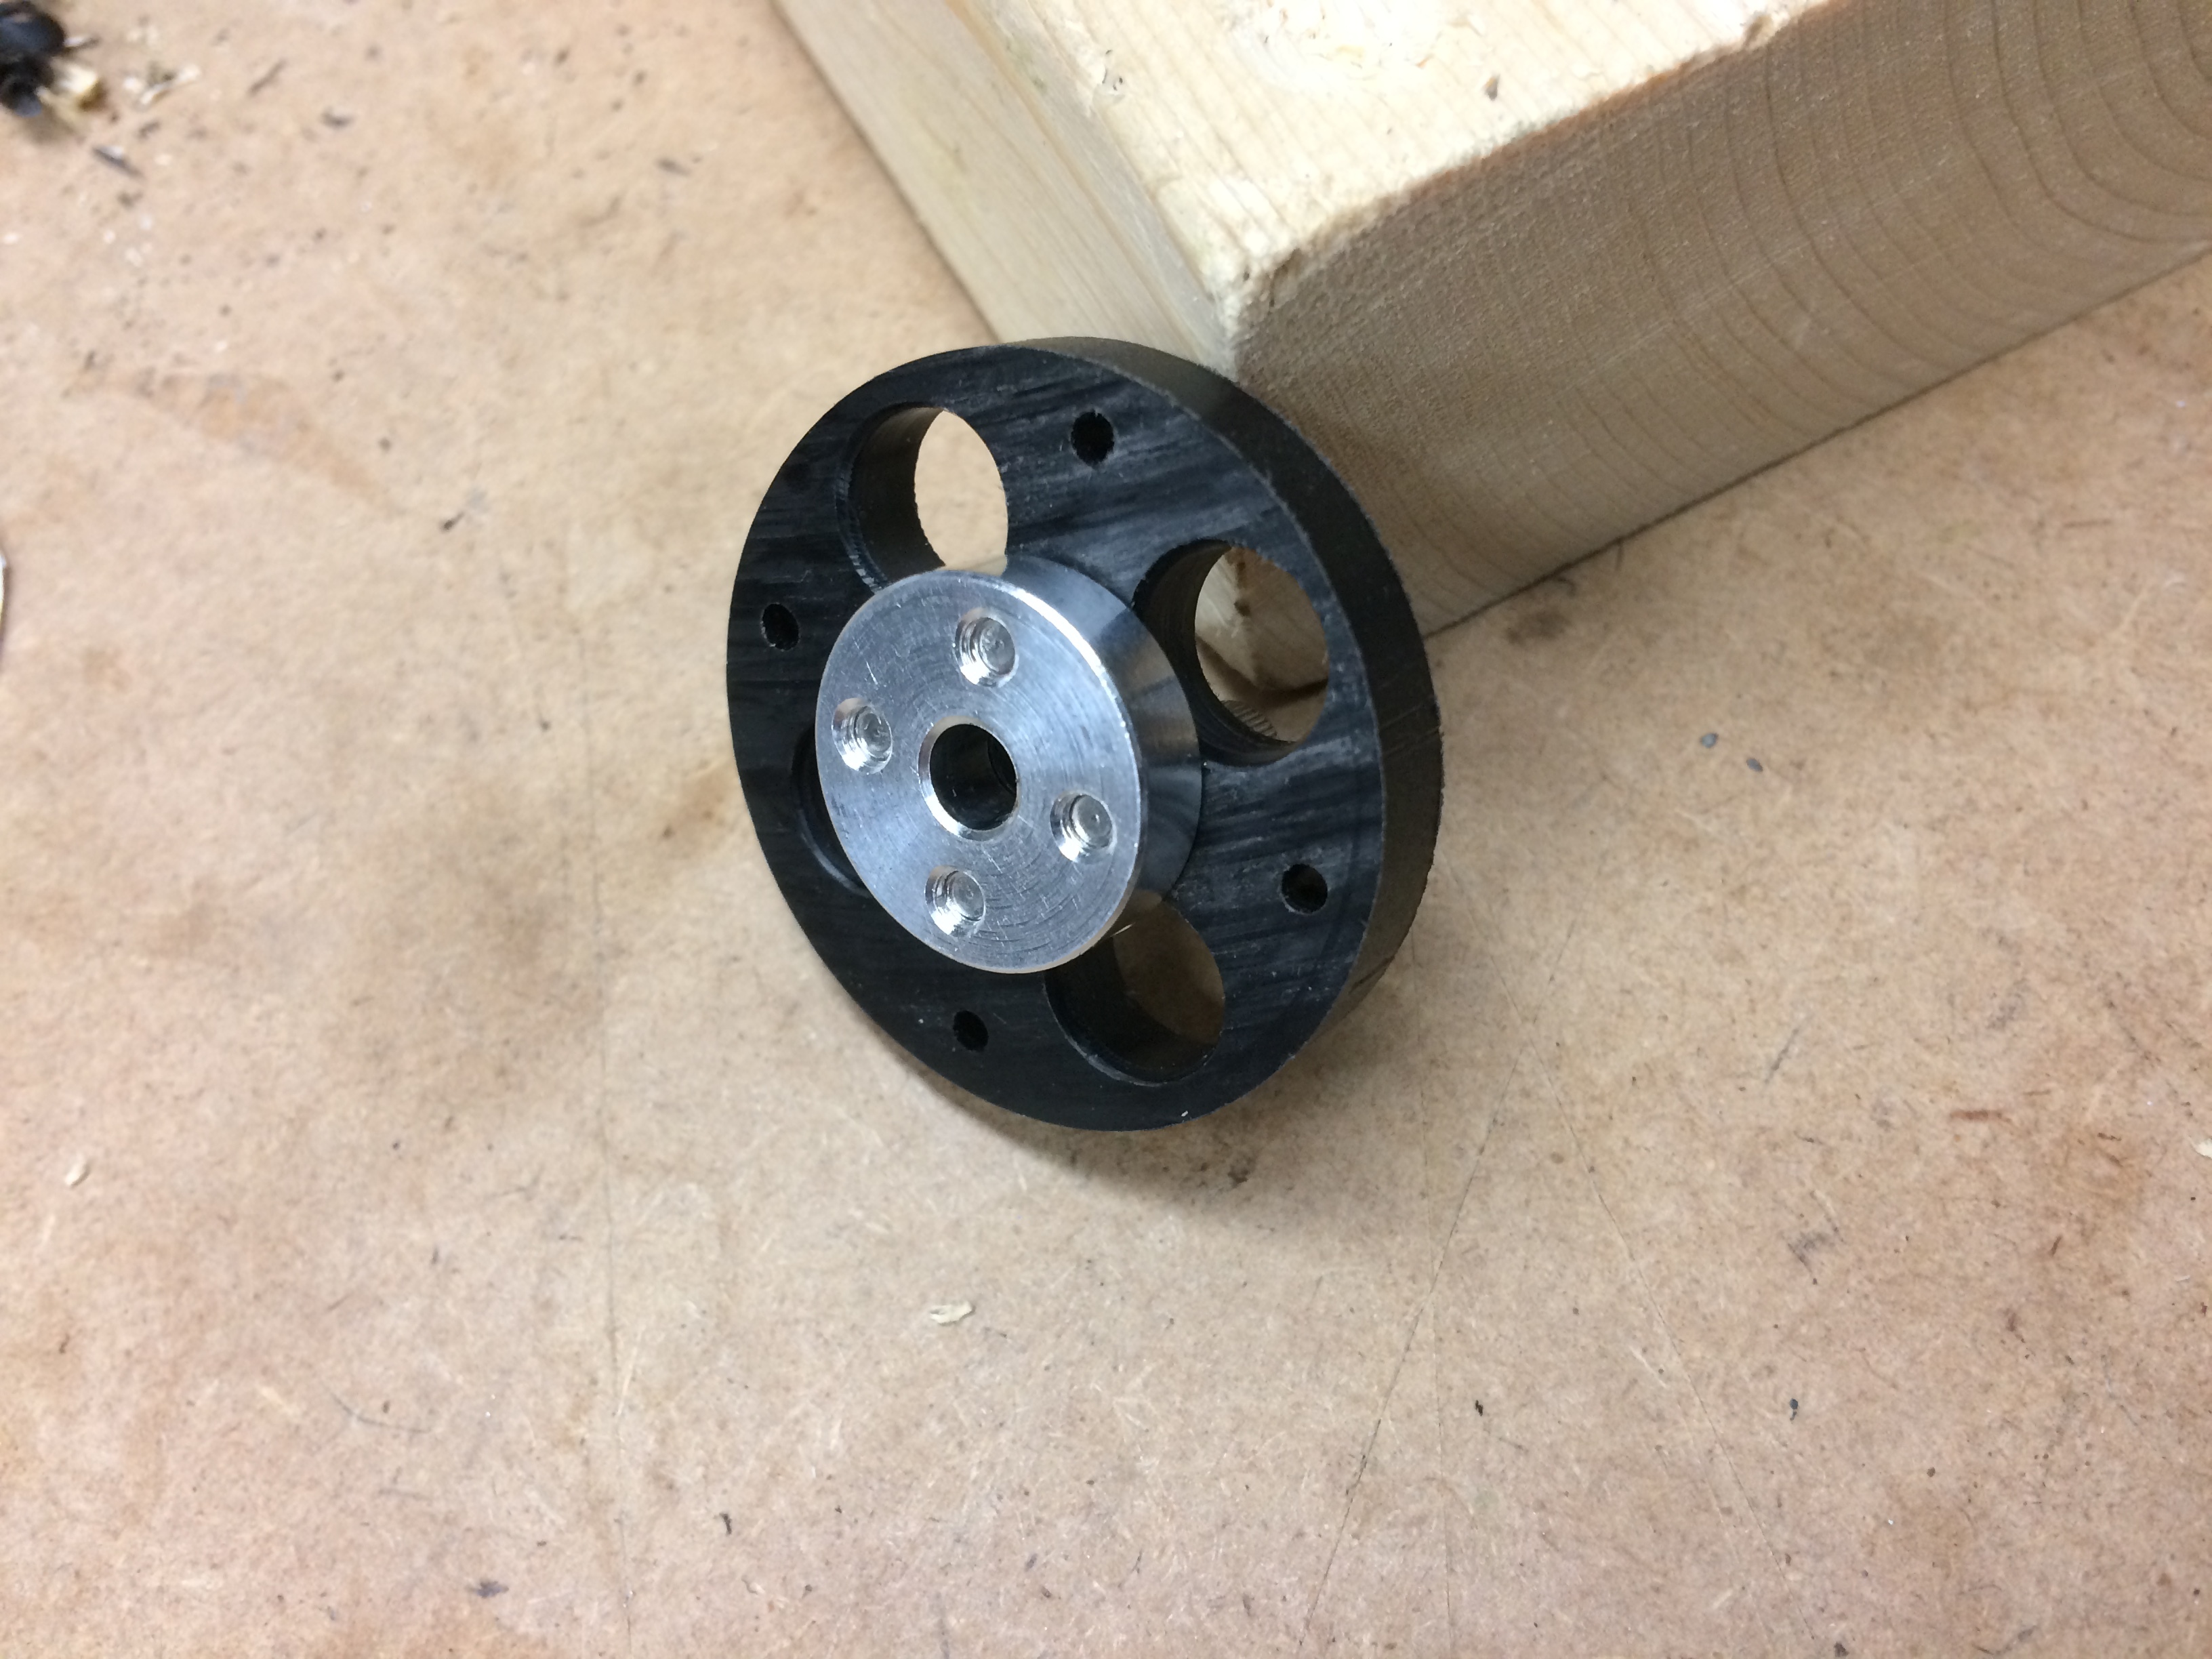
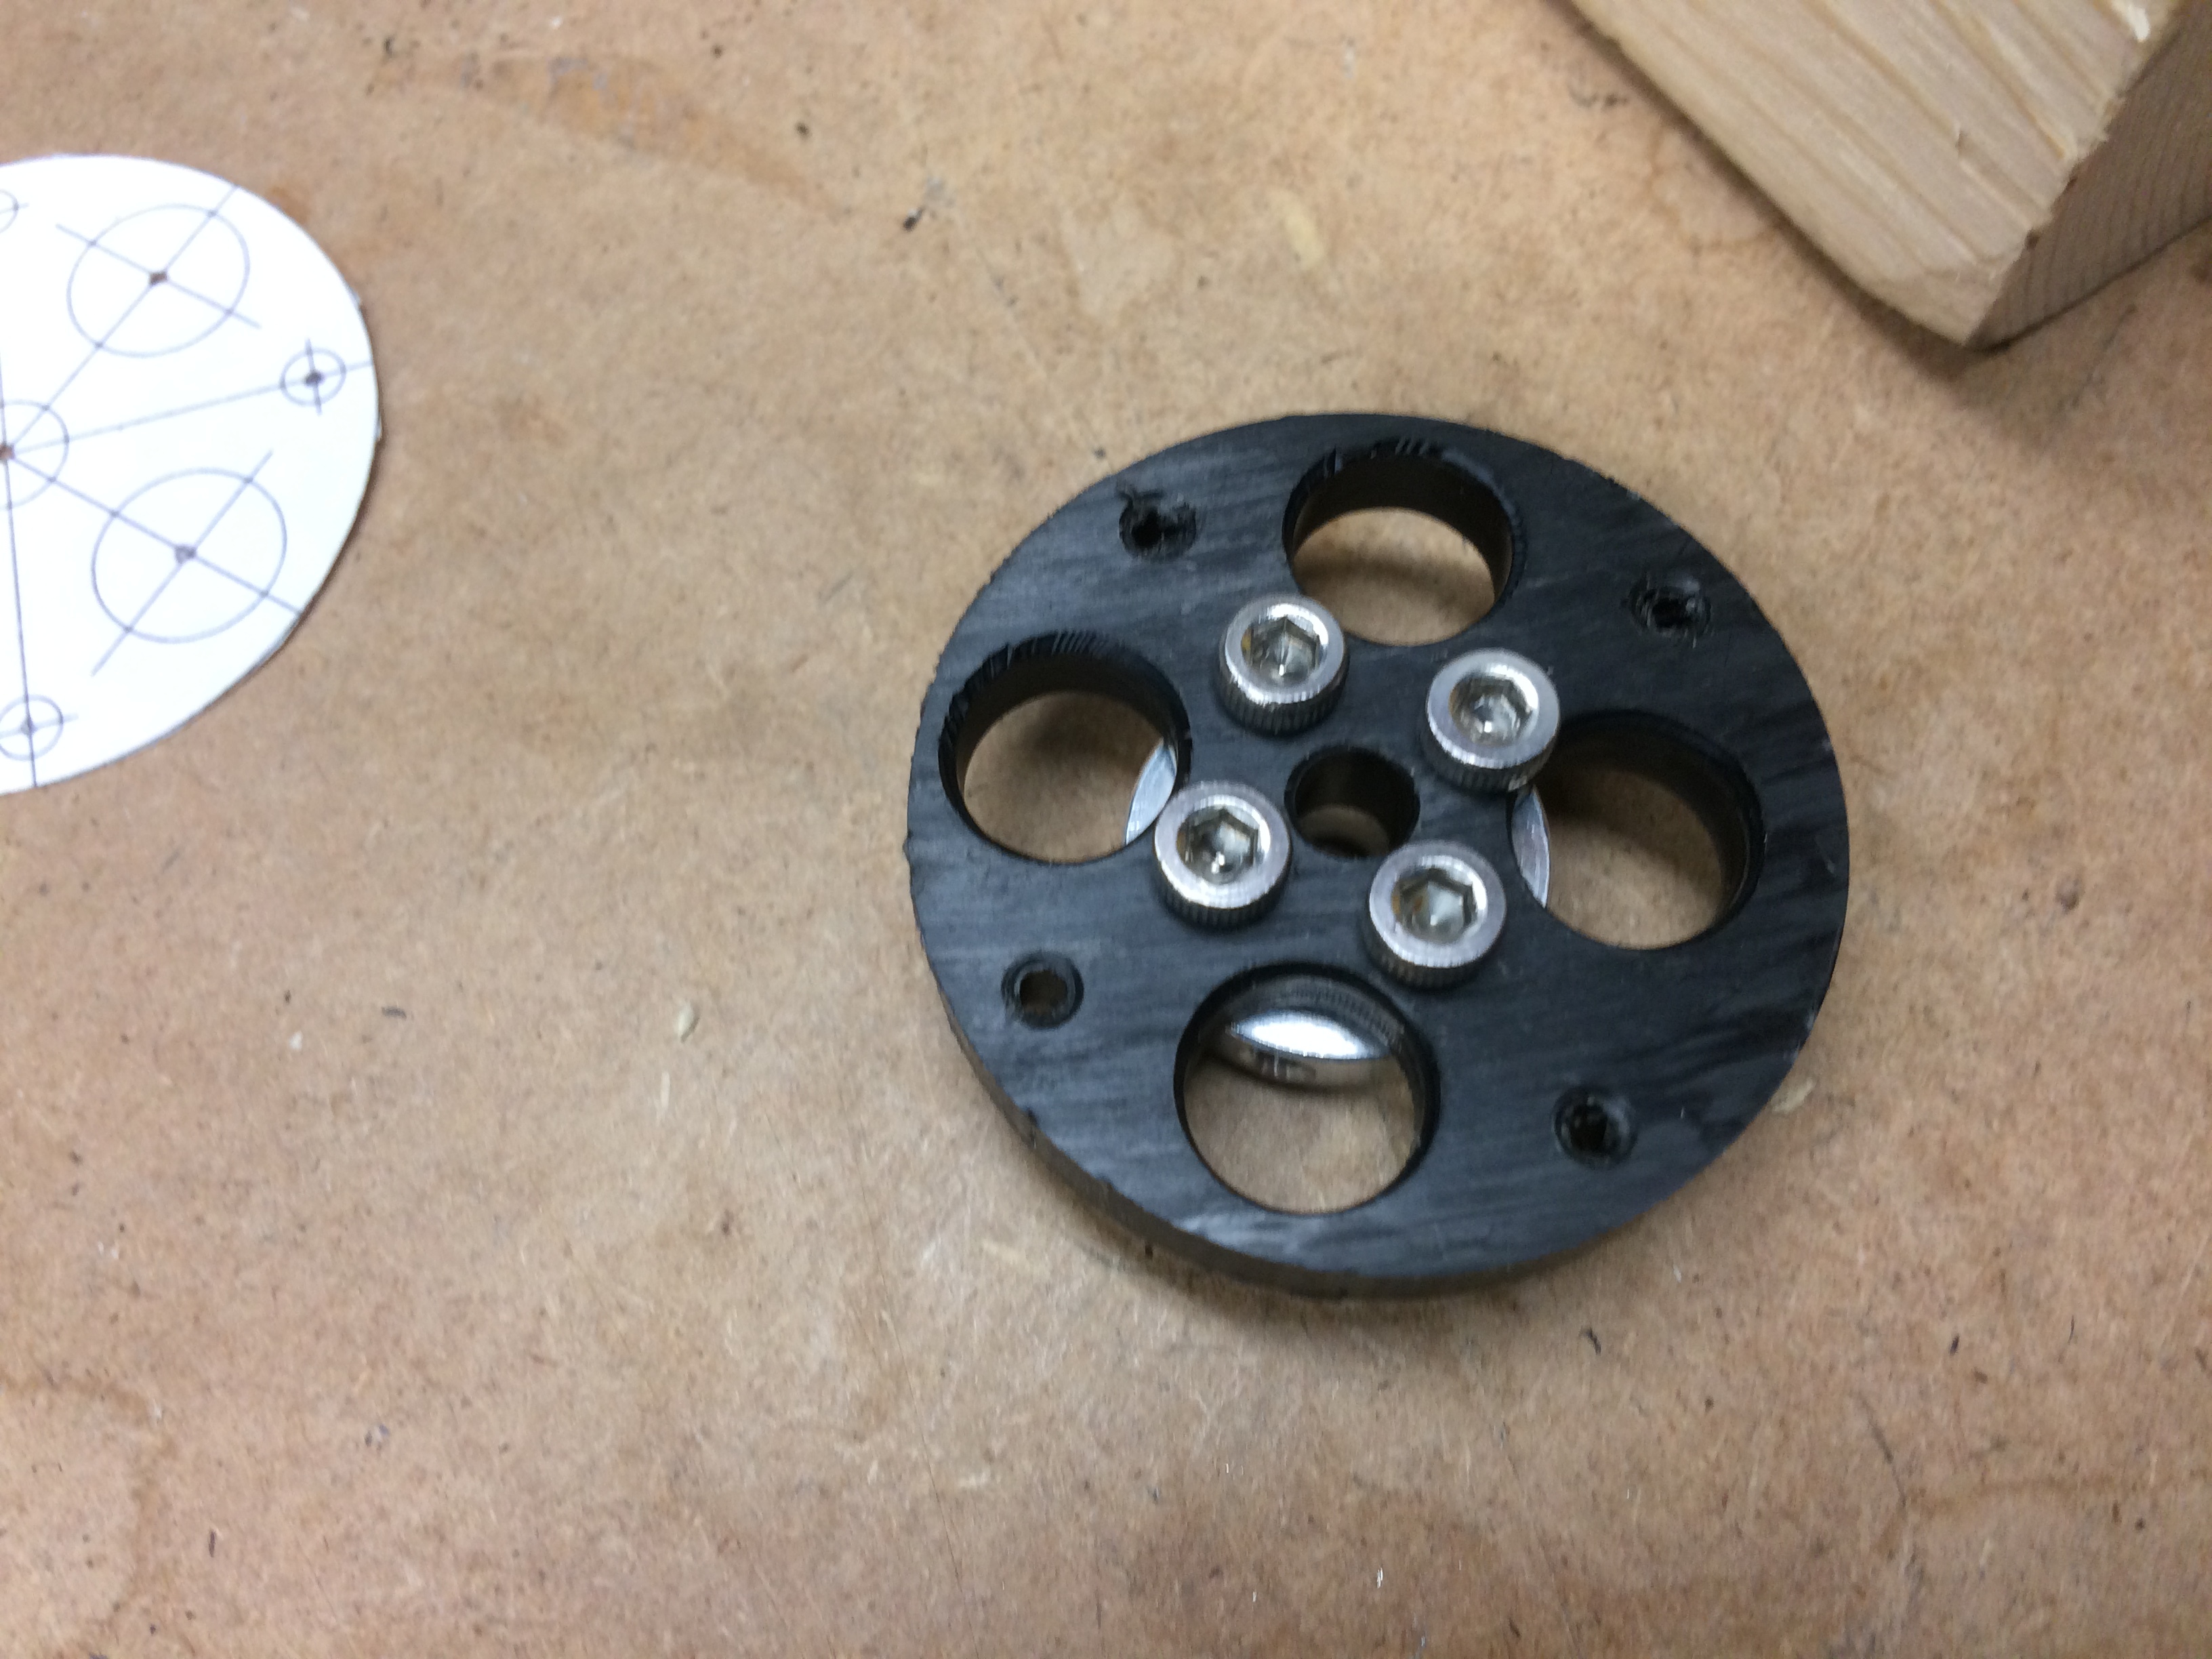
Once the holes were drilled I mounted one of the aluminum collars that will allow me to mount the vertebrae to the center spline…
The 4 small holes are for the control cables… The 4 larger holes are for the second set of control cables and wiring also to lighten up the mass of the bits… I didn’t do a great job of centering the various holes so will probably make a jig to mark out the 15 or so others I have to do… Then again having things not perfect will add to the organicness (probably not a word) of the tentacle…
Looking really awesome! Nice work, and thanks for taking us all along on the ride.
I hope your hands are OK; Forster bits, as you allude to, really should be in a drill press.
I can’t wait to see your first movement test!
Spent some time thinking about the eye housing…
Was originally thinking about two of the small bowels but wasn’t too sure how sturdy that would be at the end of the tentacle…
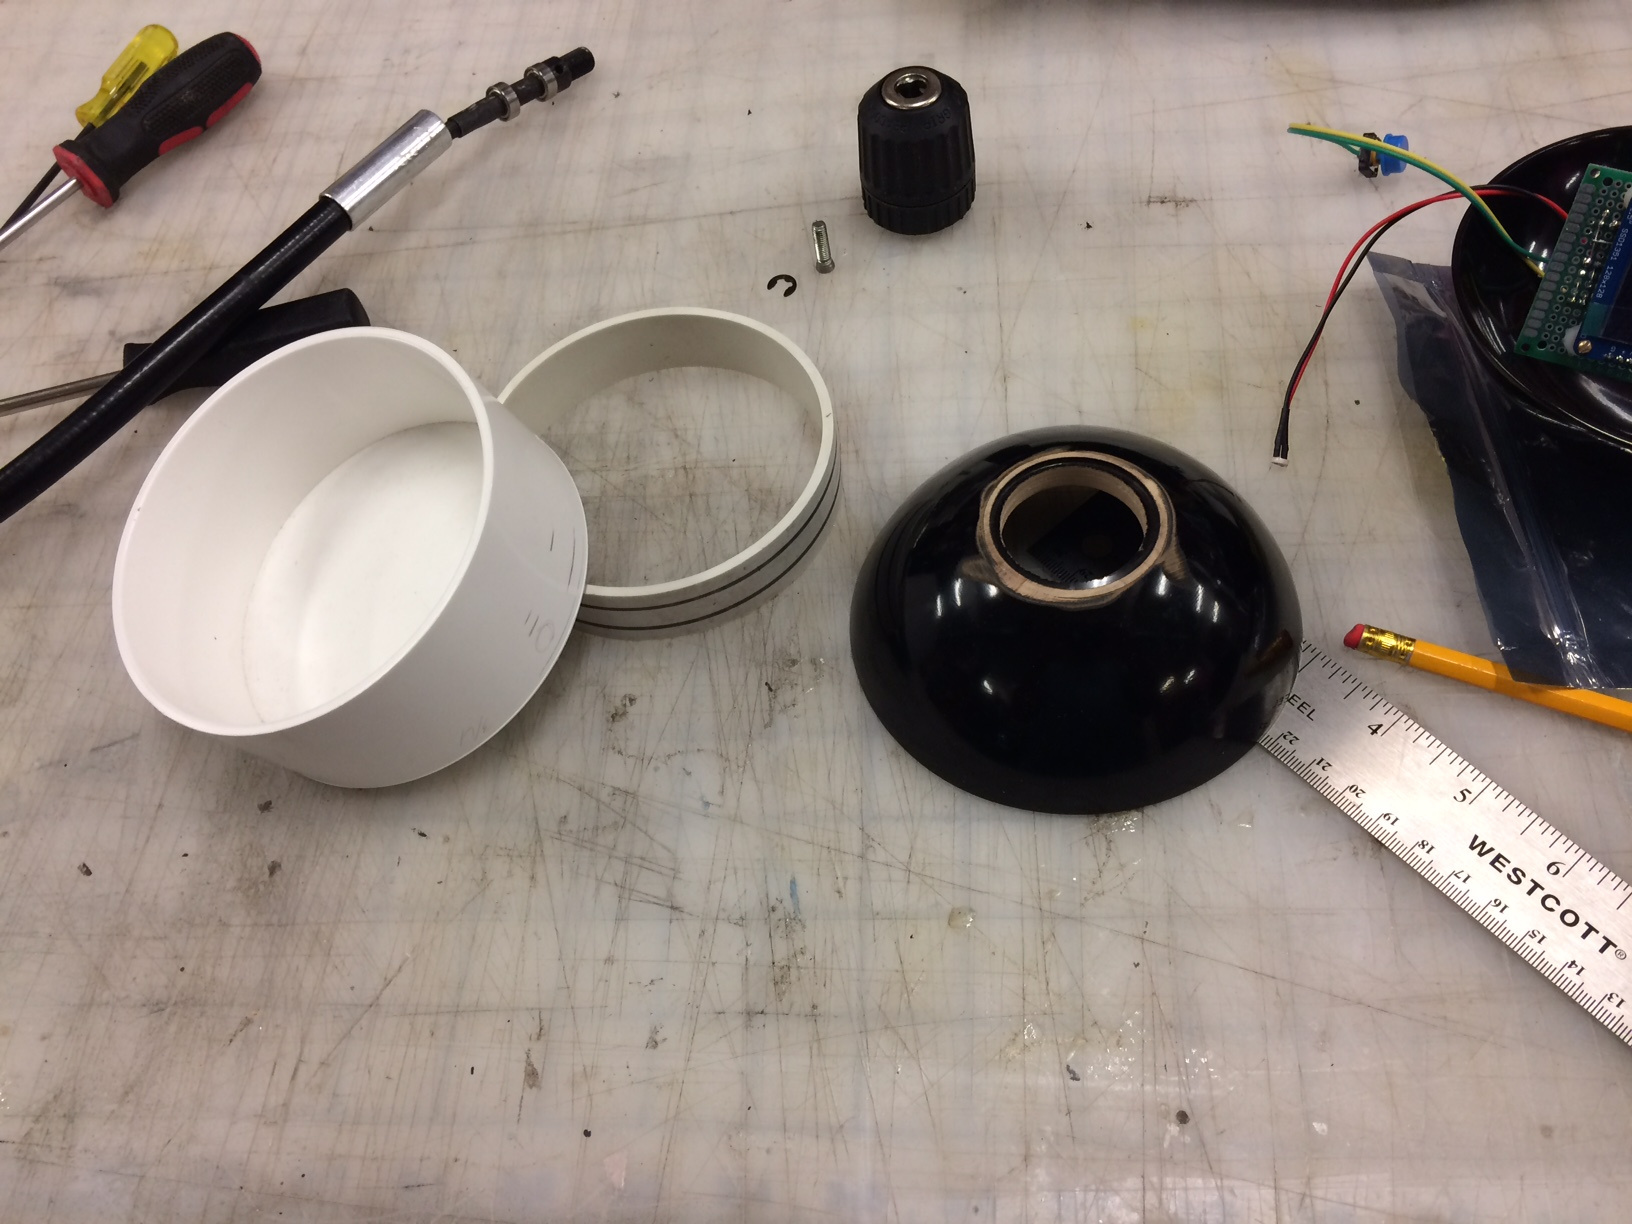
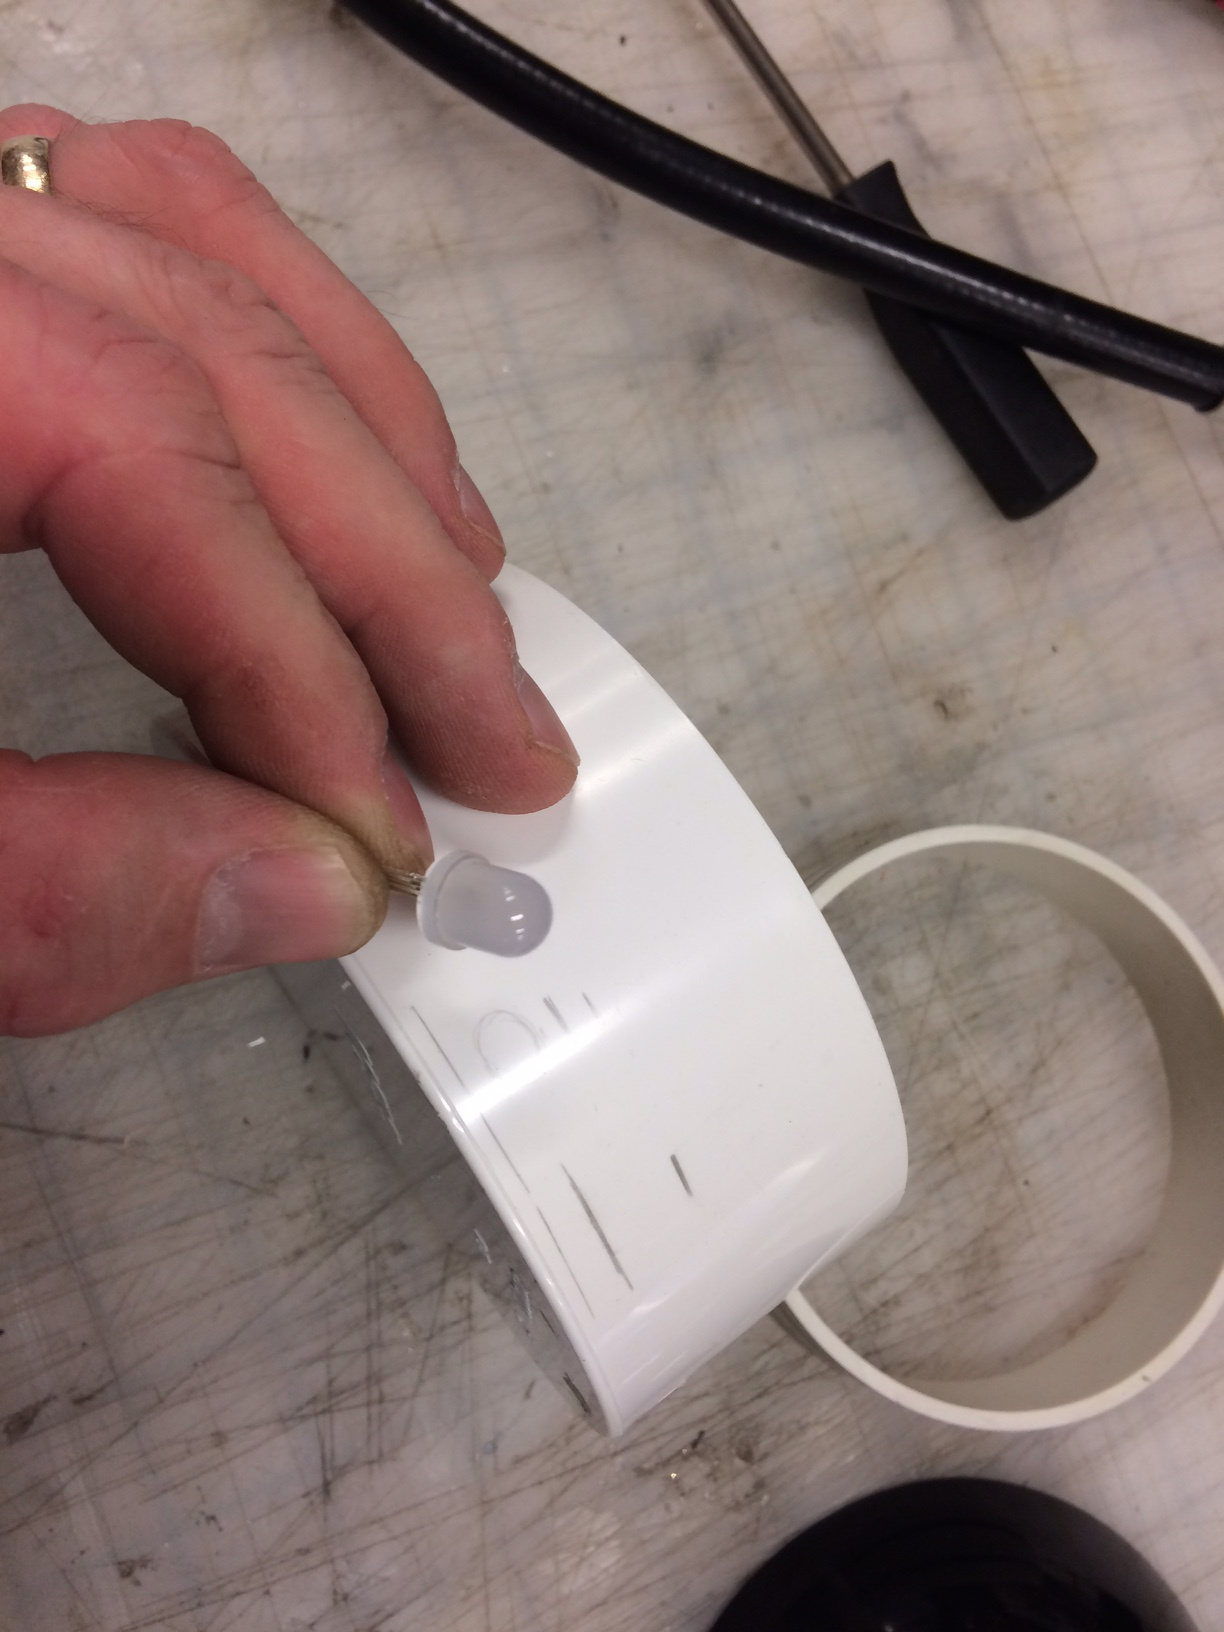
Happened to find a 4" PVC end cap while I was cleaning the garage (to get to the drill press) and thought it may work out better. More solid and potentially easier to attach to the end of the yet to be built tentacle. I think…
I think I will cut it down to about 3/4" and then line the part sticking out of the bowel with some 8mm Pixel LEDs I got from AliExpress. They are APA-106 and apparently can be driven just like the WS2812 (though I have yet to try…)
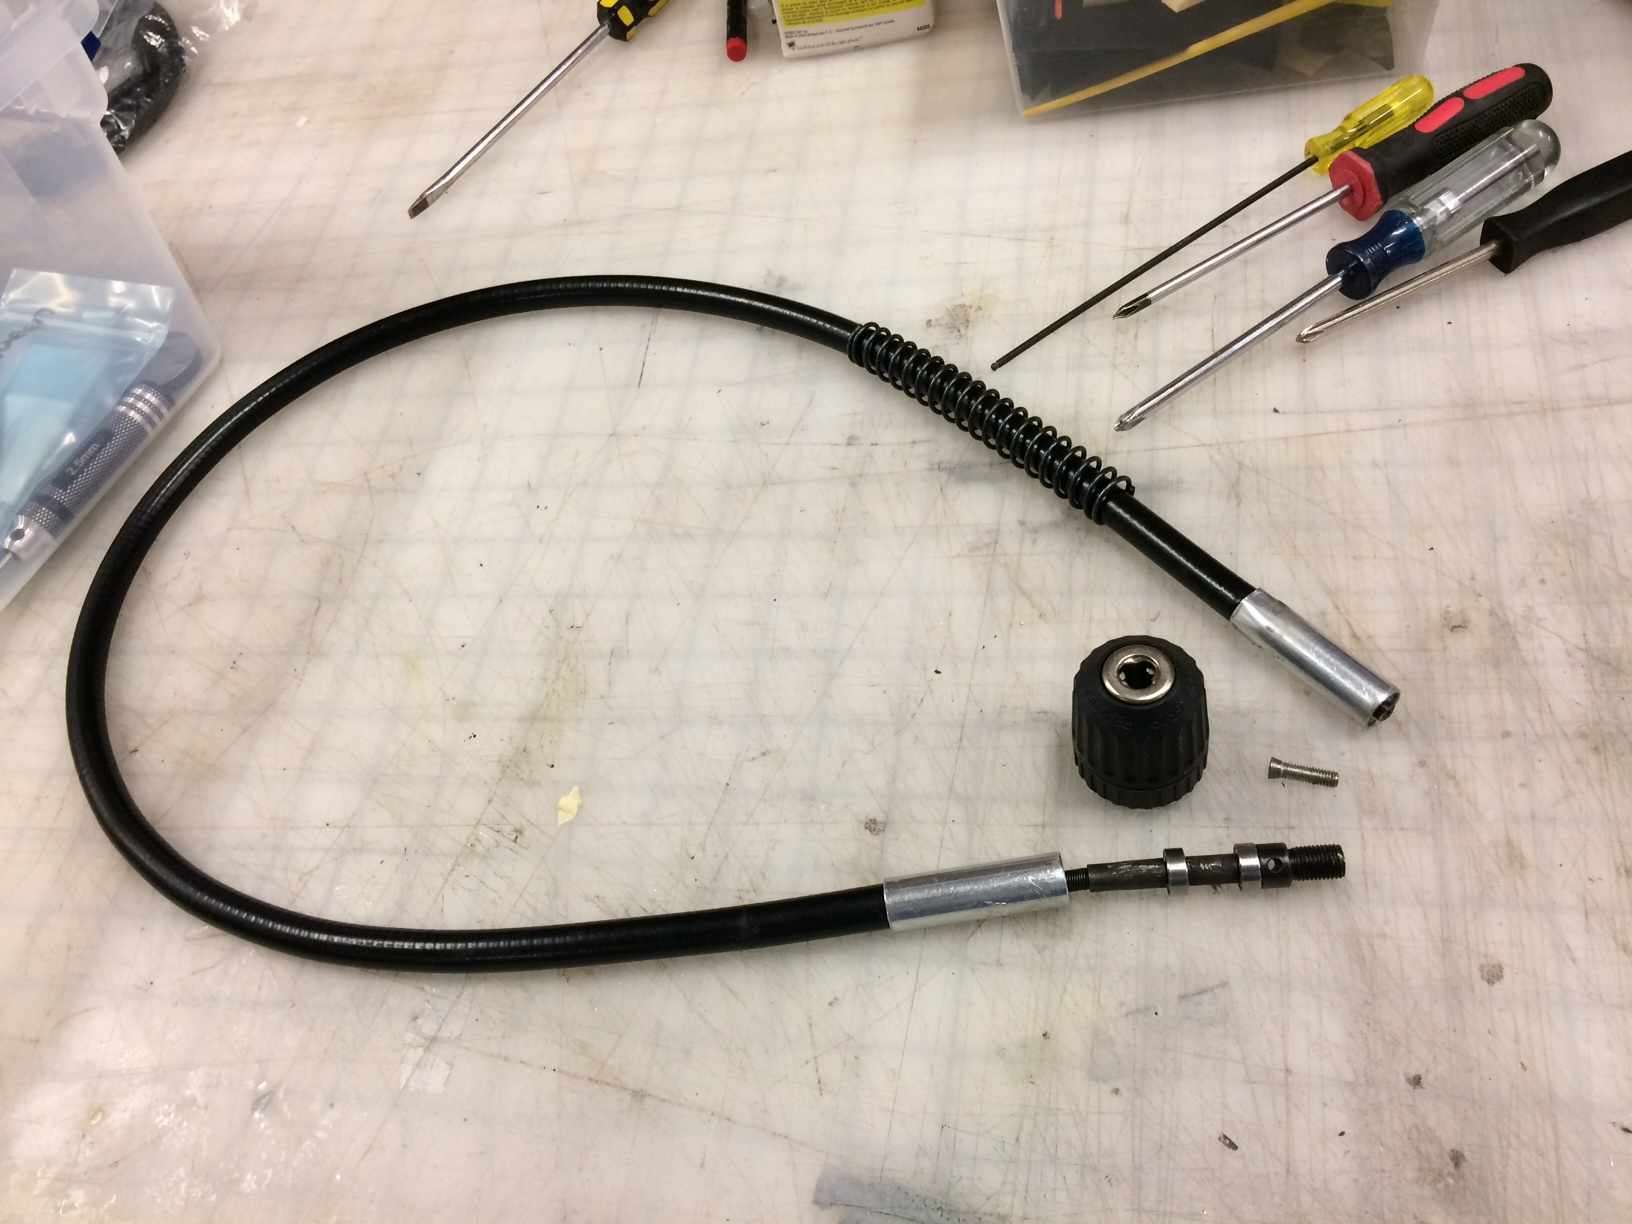
Thanks to @Jarrett I have the spine I plan to use. I was a flexible drill extension and it seems to have a 6mm counter wound spring shaft. This should be idea (assuming I can get it out of the housing). I forgot to take any before pictures before I started on trying to remove the shaft. Didn’t get very far. Need to dremel off the end housing to be able to put out the shaft.
I think it was this one
http://www.princessauto.com/en/detail/44-in-flexible-drill-shaft-with-keyless-chuck/A-p8158388e
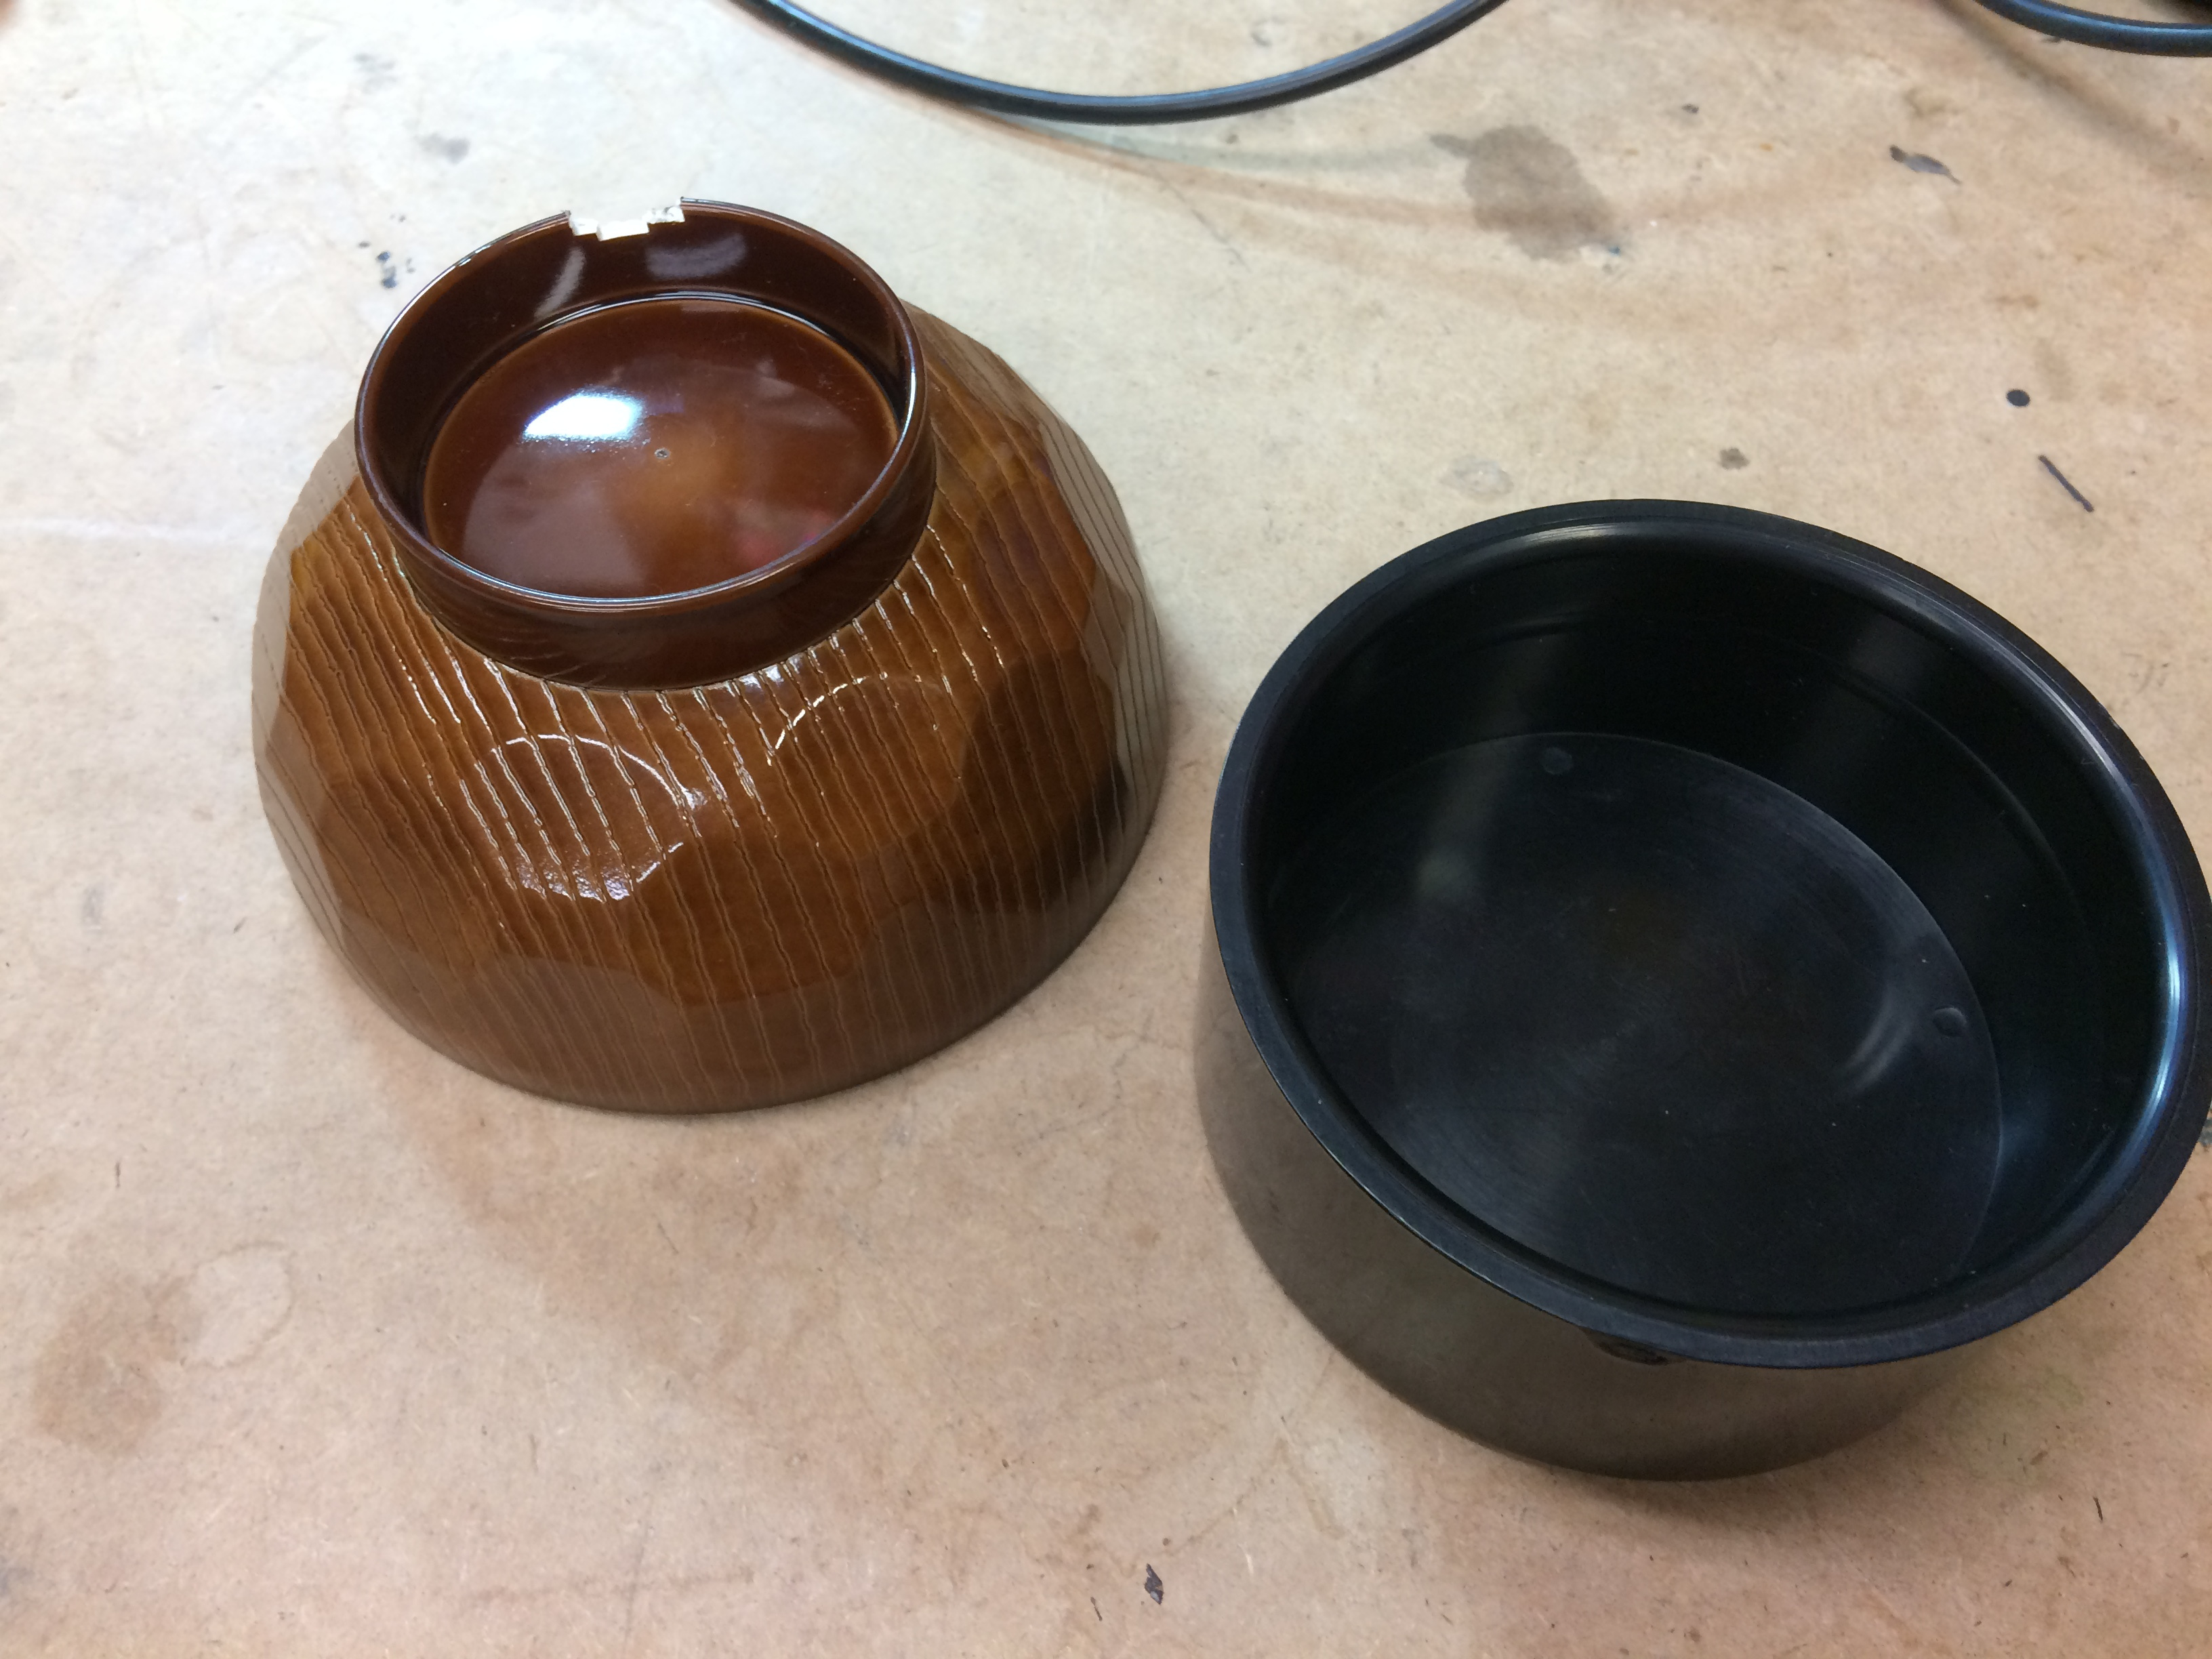
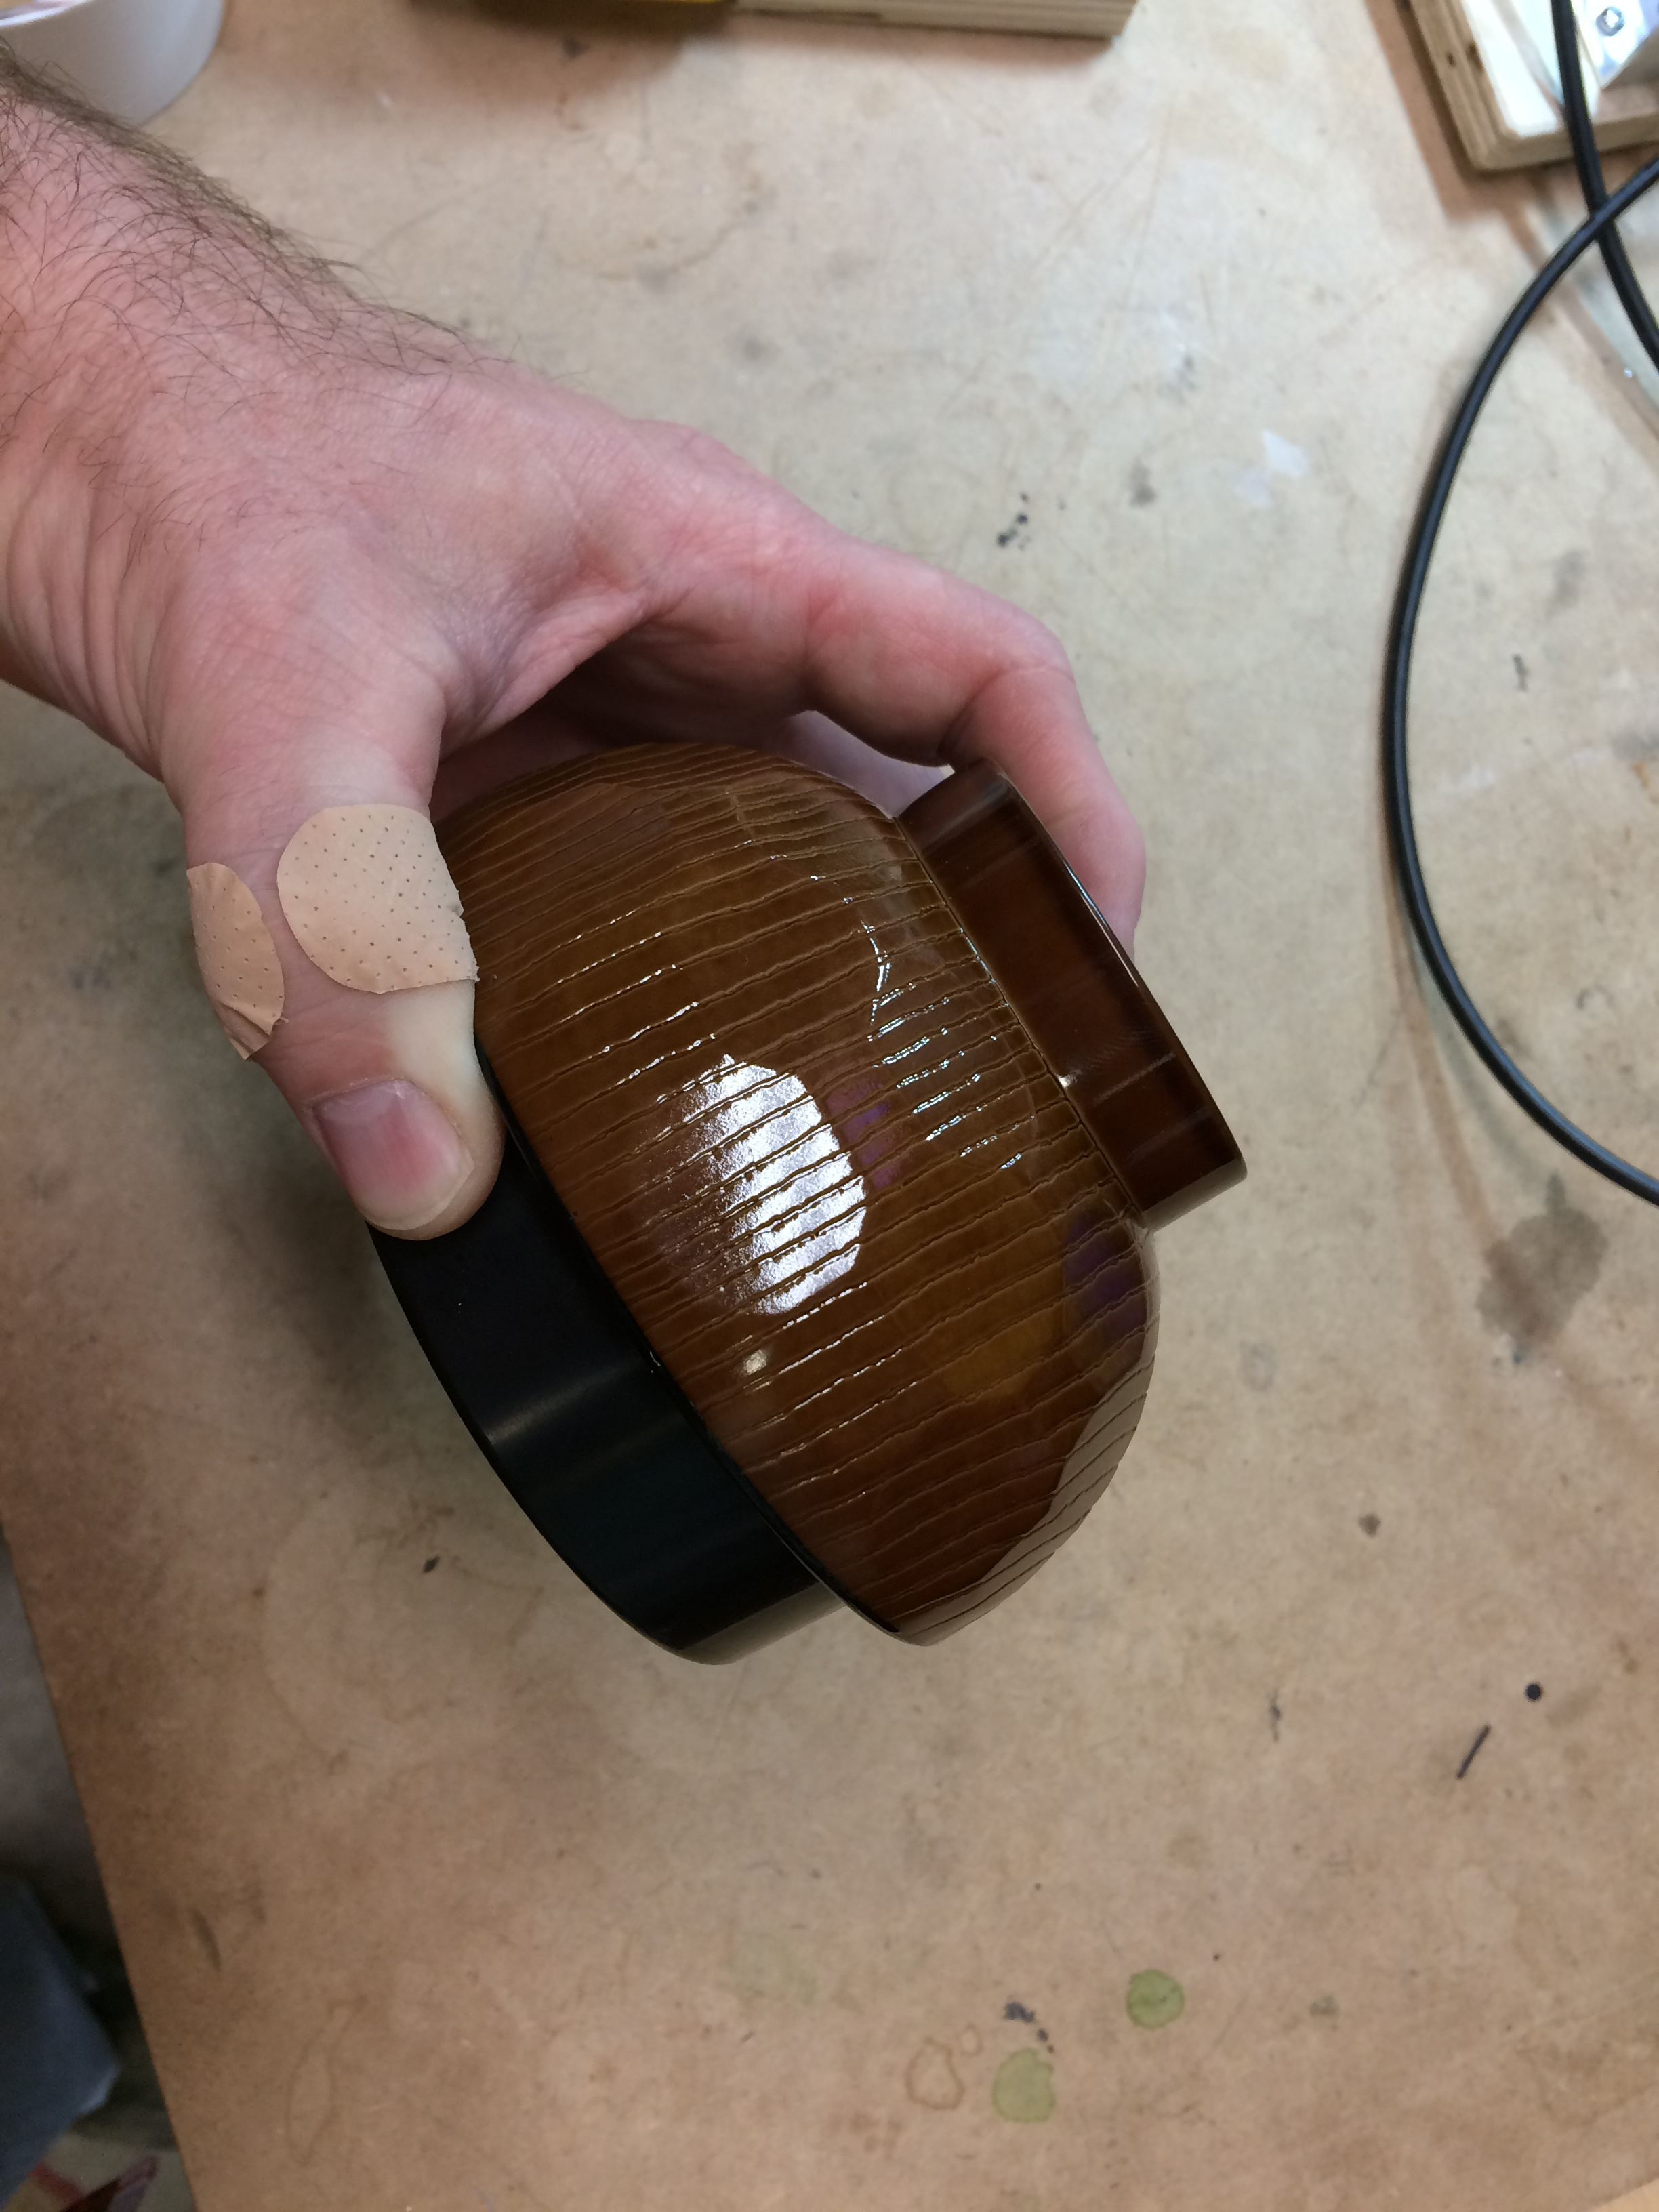
Still not happy with what I had for the eye housing so I have been checking out various dollar stores. I found a slightly deeper bowel that is made of plastic which means the walls are much thinner than the ones I originally found. I also found a better sized end cap to use. It’s black ABS instead of white PVC.
I think it will go together like this:
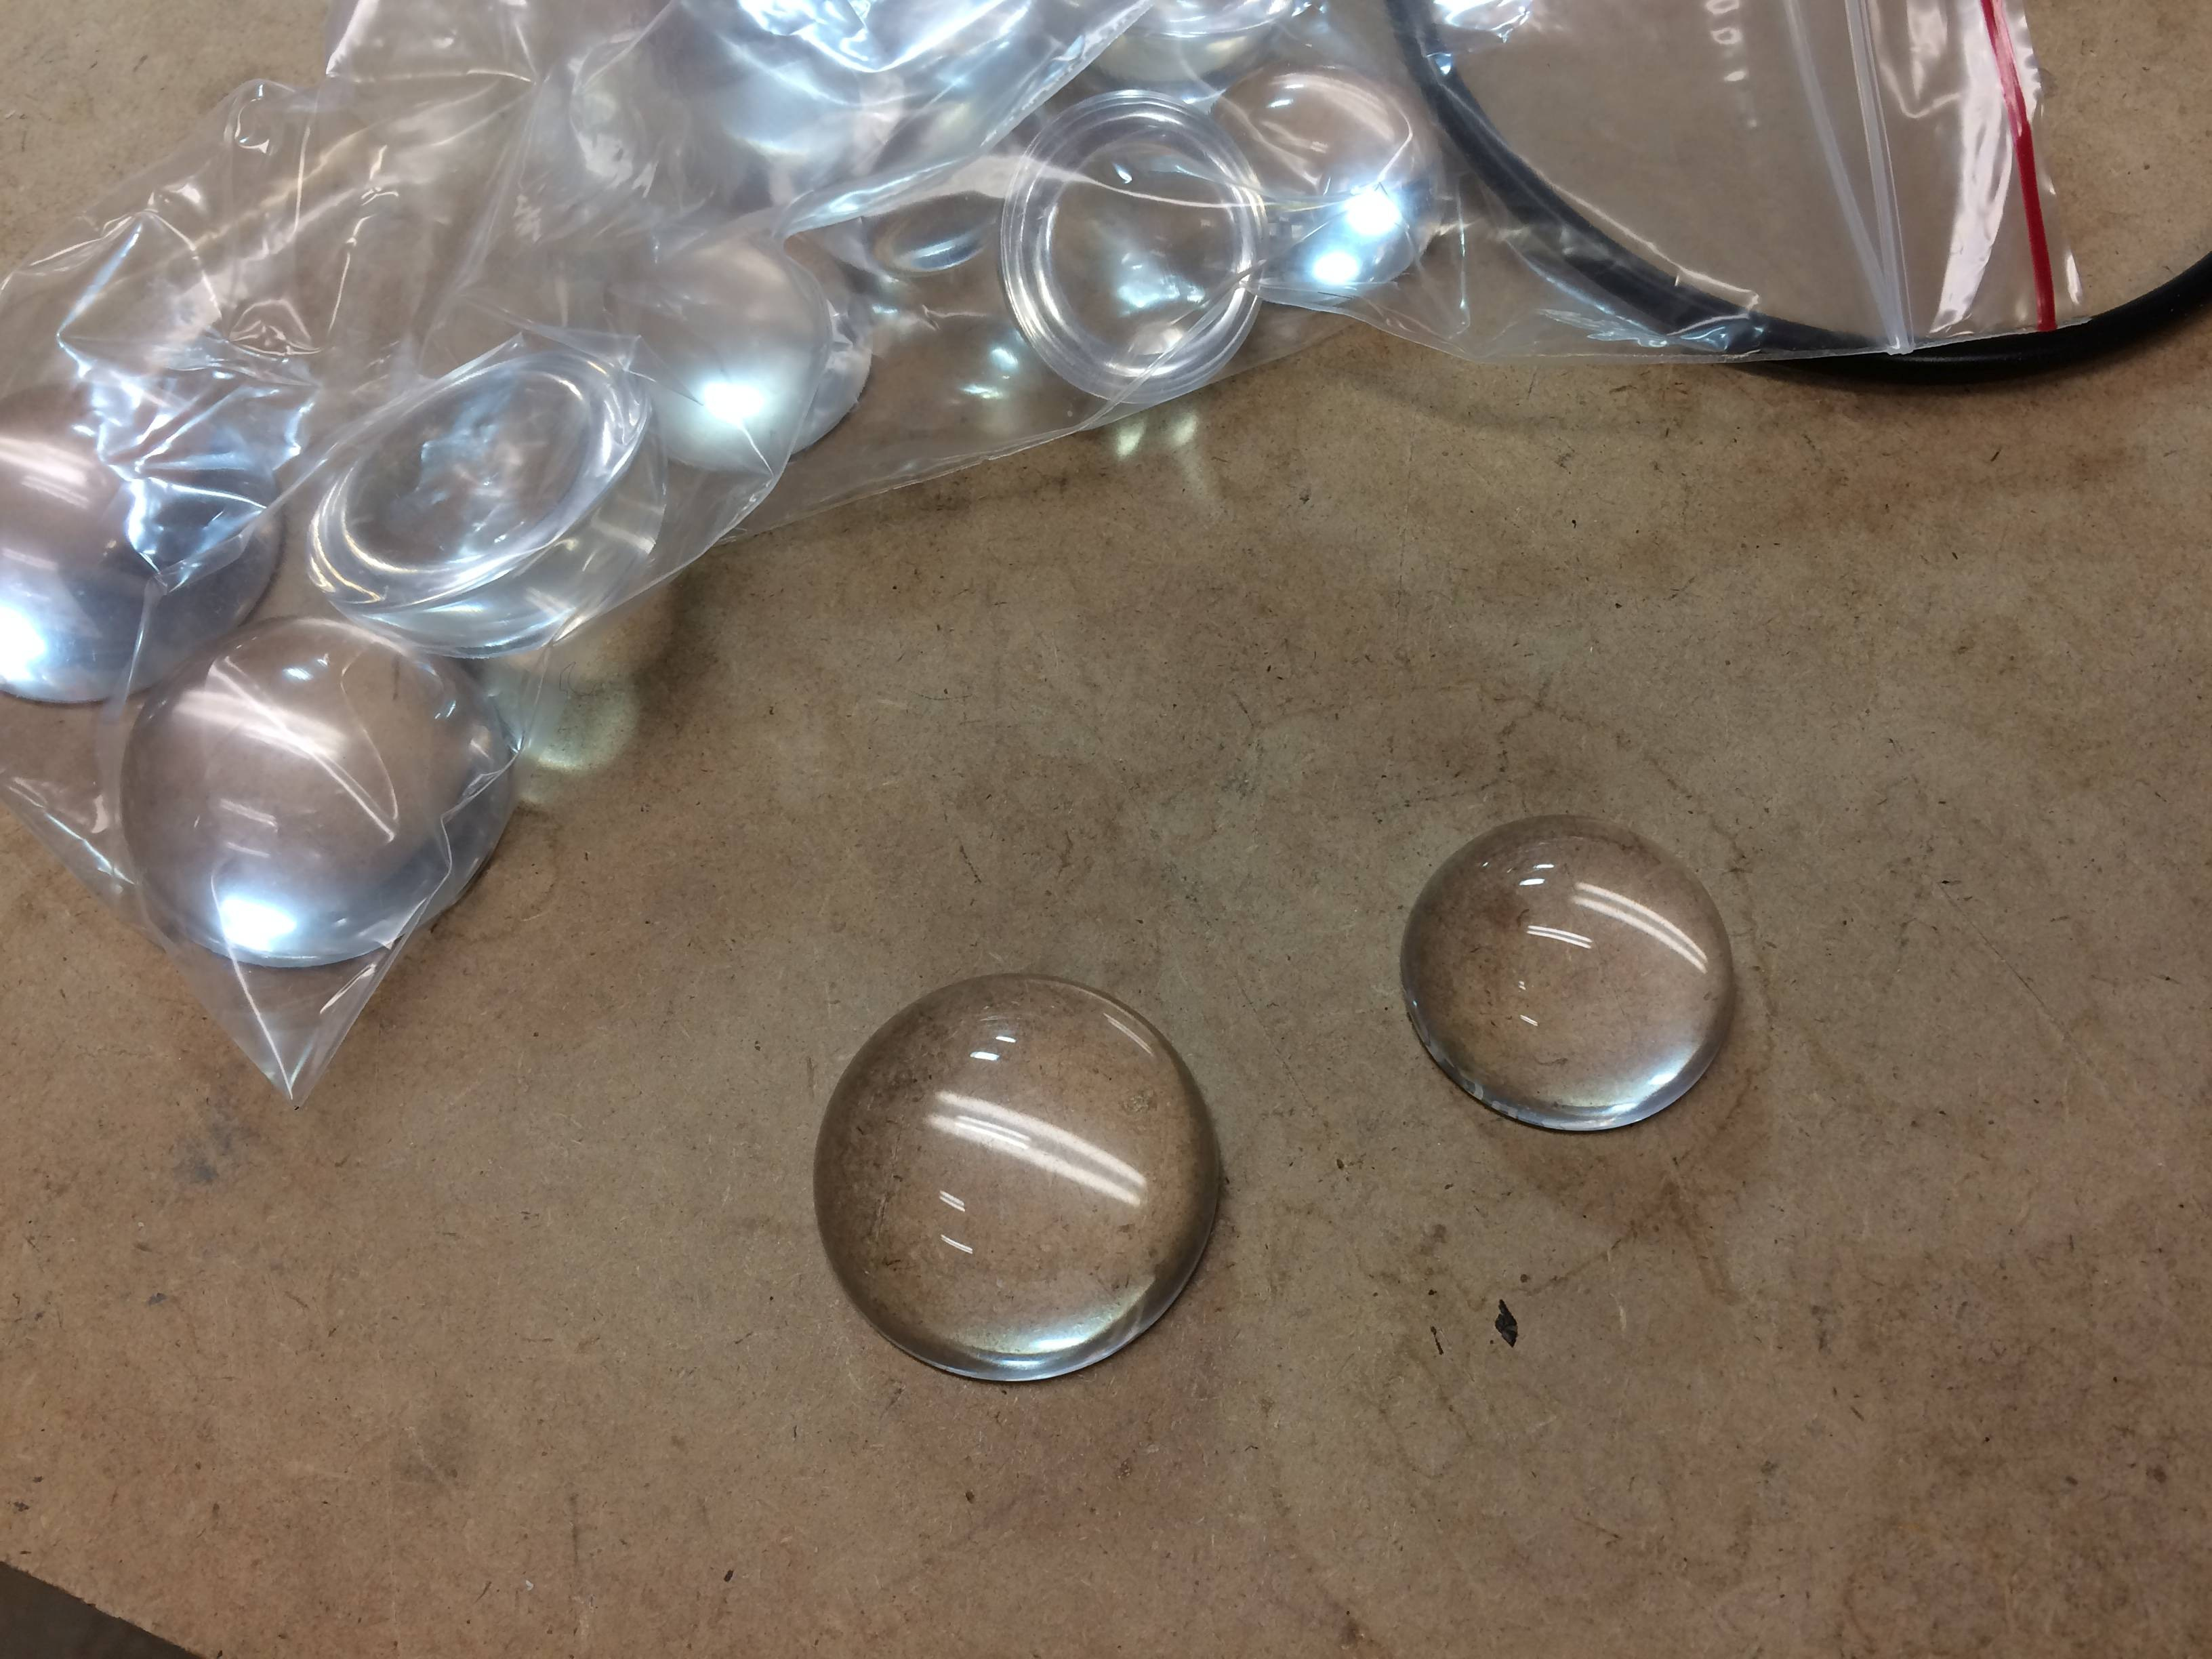
I wasn’t able to find the small acrylic half-spheres anywhere locally so I ordered from the supplier mentioned in the Adafruit tutorial… They used 1.5" but based on the OLED display size I thought that might be too large. I ordered 1.25" and 1.5".
Turns out the 1.5" works fine so I do have 10 x 1.25" acrylic cabochons (half-spheres) to sell… Having the cabochon act as a lens makes the image look much better.
Time to start putting it all together…
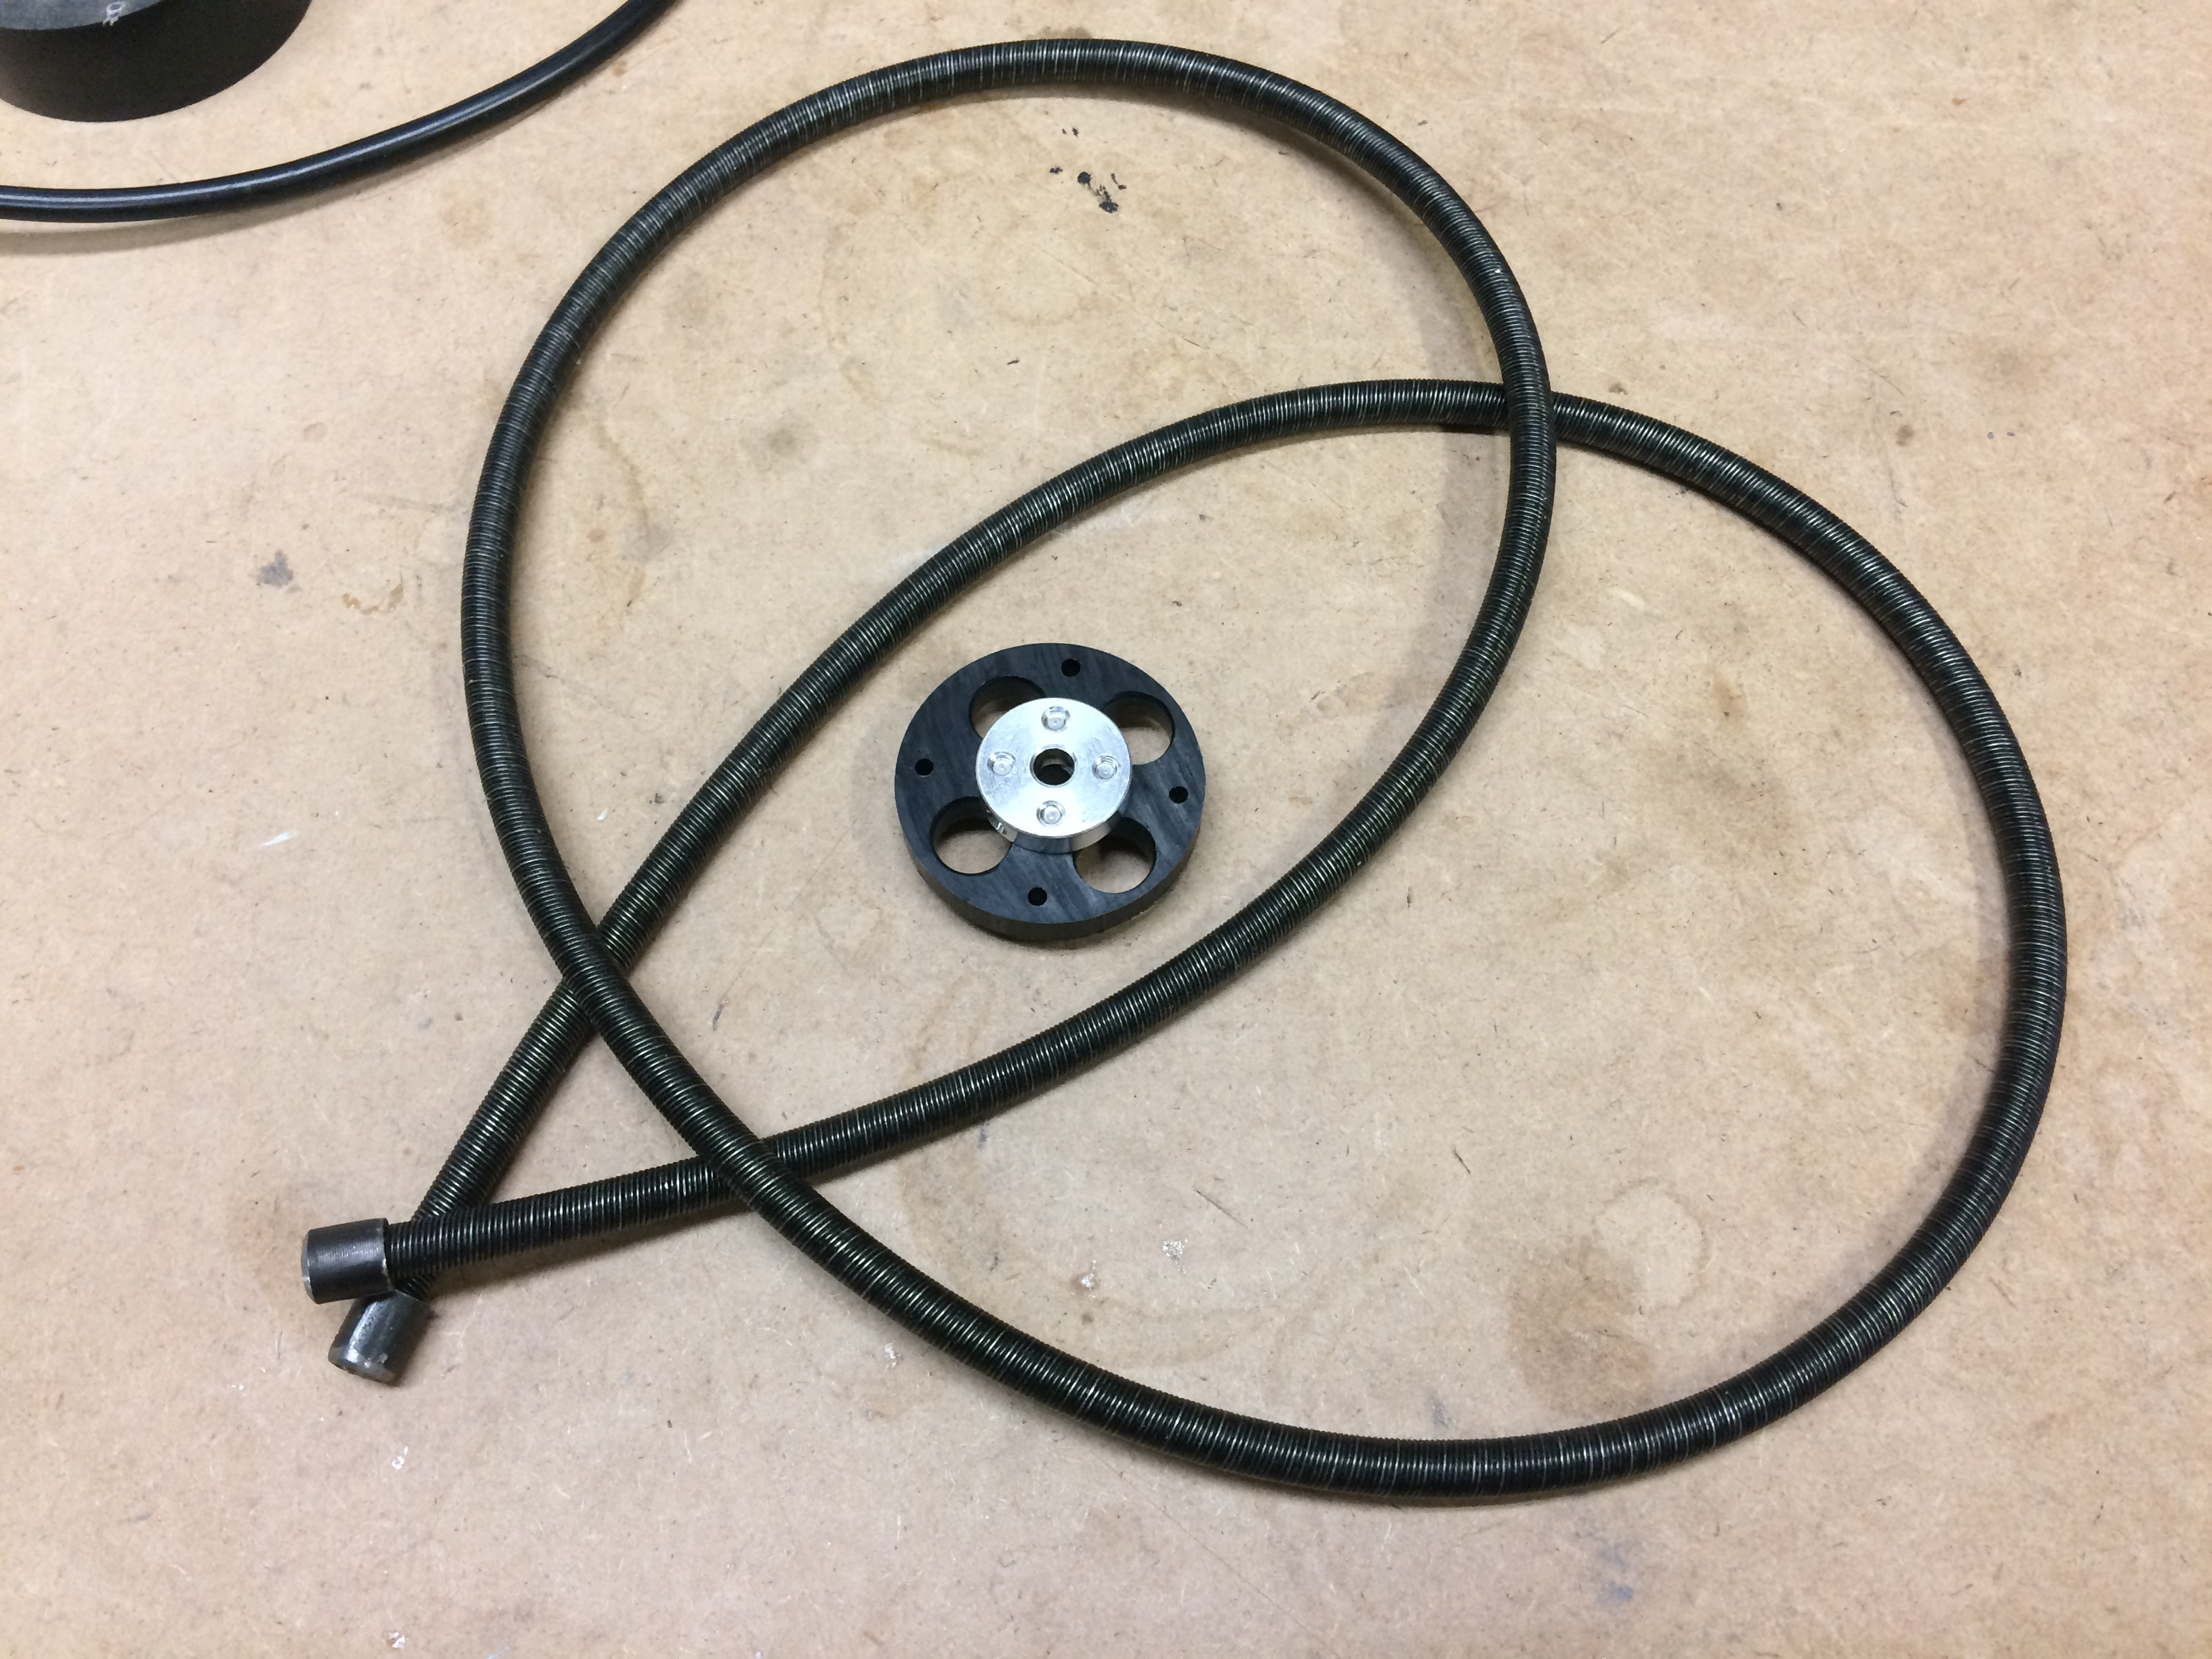
Managed to remove the inner cable from the flexible drill shaft…
It’s 6 mm in diameter and hopefully will have the strength required…
The aluminum adapters I purchased are 5mm to I will either drill them out to 6 mm or return them and get some 6mm ones.
I have yet to drill the Delrin disks yet so I am good there…
For the control cables I got some 3/64 galvanized aircraft cable and a small hand crimper off Amazon.com, could not find anything on Amazon.ca or locally…
Looks like I’m good to get started on the tentacle
First vertebrae on the spine…
Only 15 or so more to go…
I found some scrap pieces of 1 1/2" aluminum rod stock in the scrap metal bins (located in the back of the wood shop area). I will cut some 1/4 thick disks out of this, and then use these for both ends and the middle section (where the various control cables connect) as the Delrin may not be strong enough for this…
I have also started researching ways to motorize the control cables. While I have found lots of cable driven tentacle info, all of them seem to be manually driven.
I’m hoping that I can use some NEMA 17 stepper motors (cuz I have 4 of them). The plan right now is to use a small 20 tooth GT2 pulley on the motor and then a belt to connect it to a much larger GT2 pulley that is attached to a narrow pulley that push/pulls the control cables. Based on the various examples I have seen on the web I shouldn’t need a huge amount of cable movement range. I won’t know for sure till I get the tentacle done…
And this means cleaning the garage so I am procrastinating by writing this posting instead…