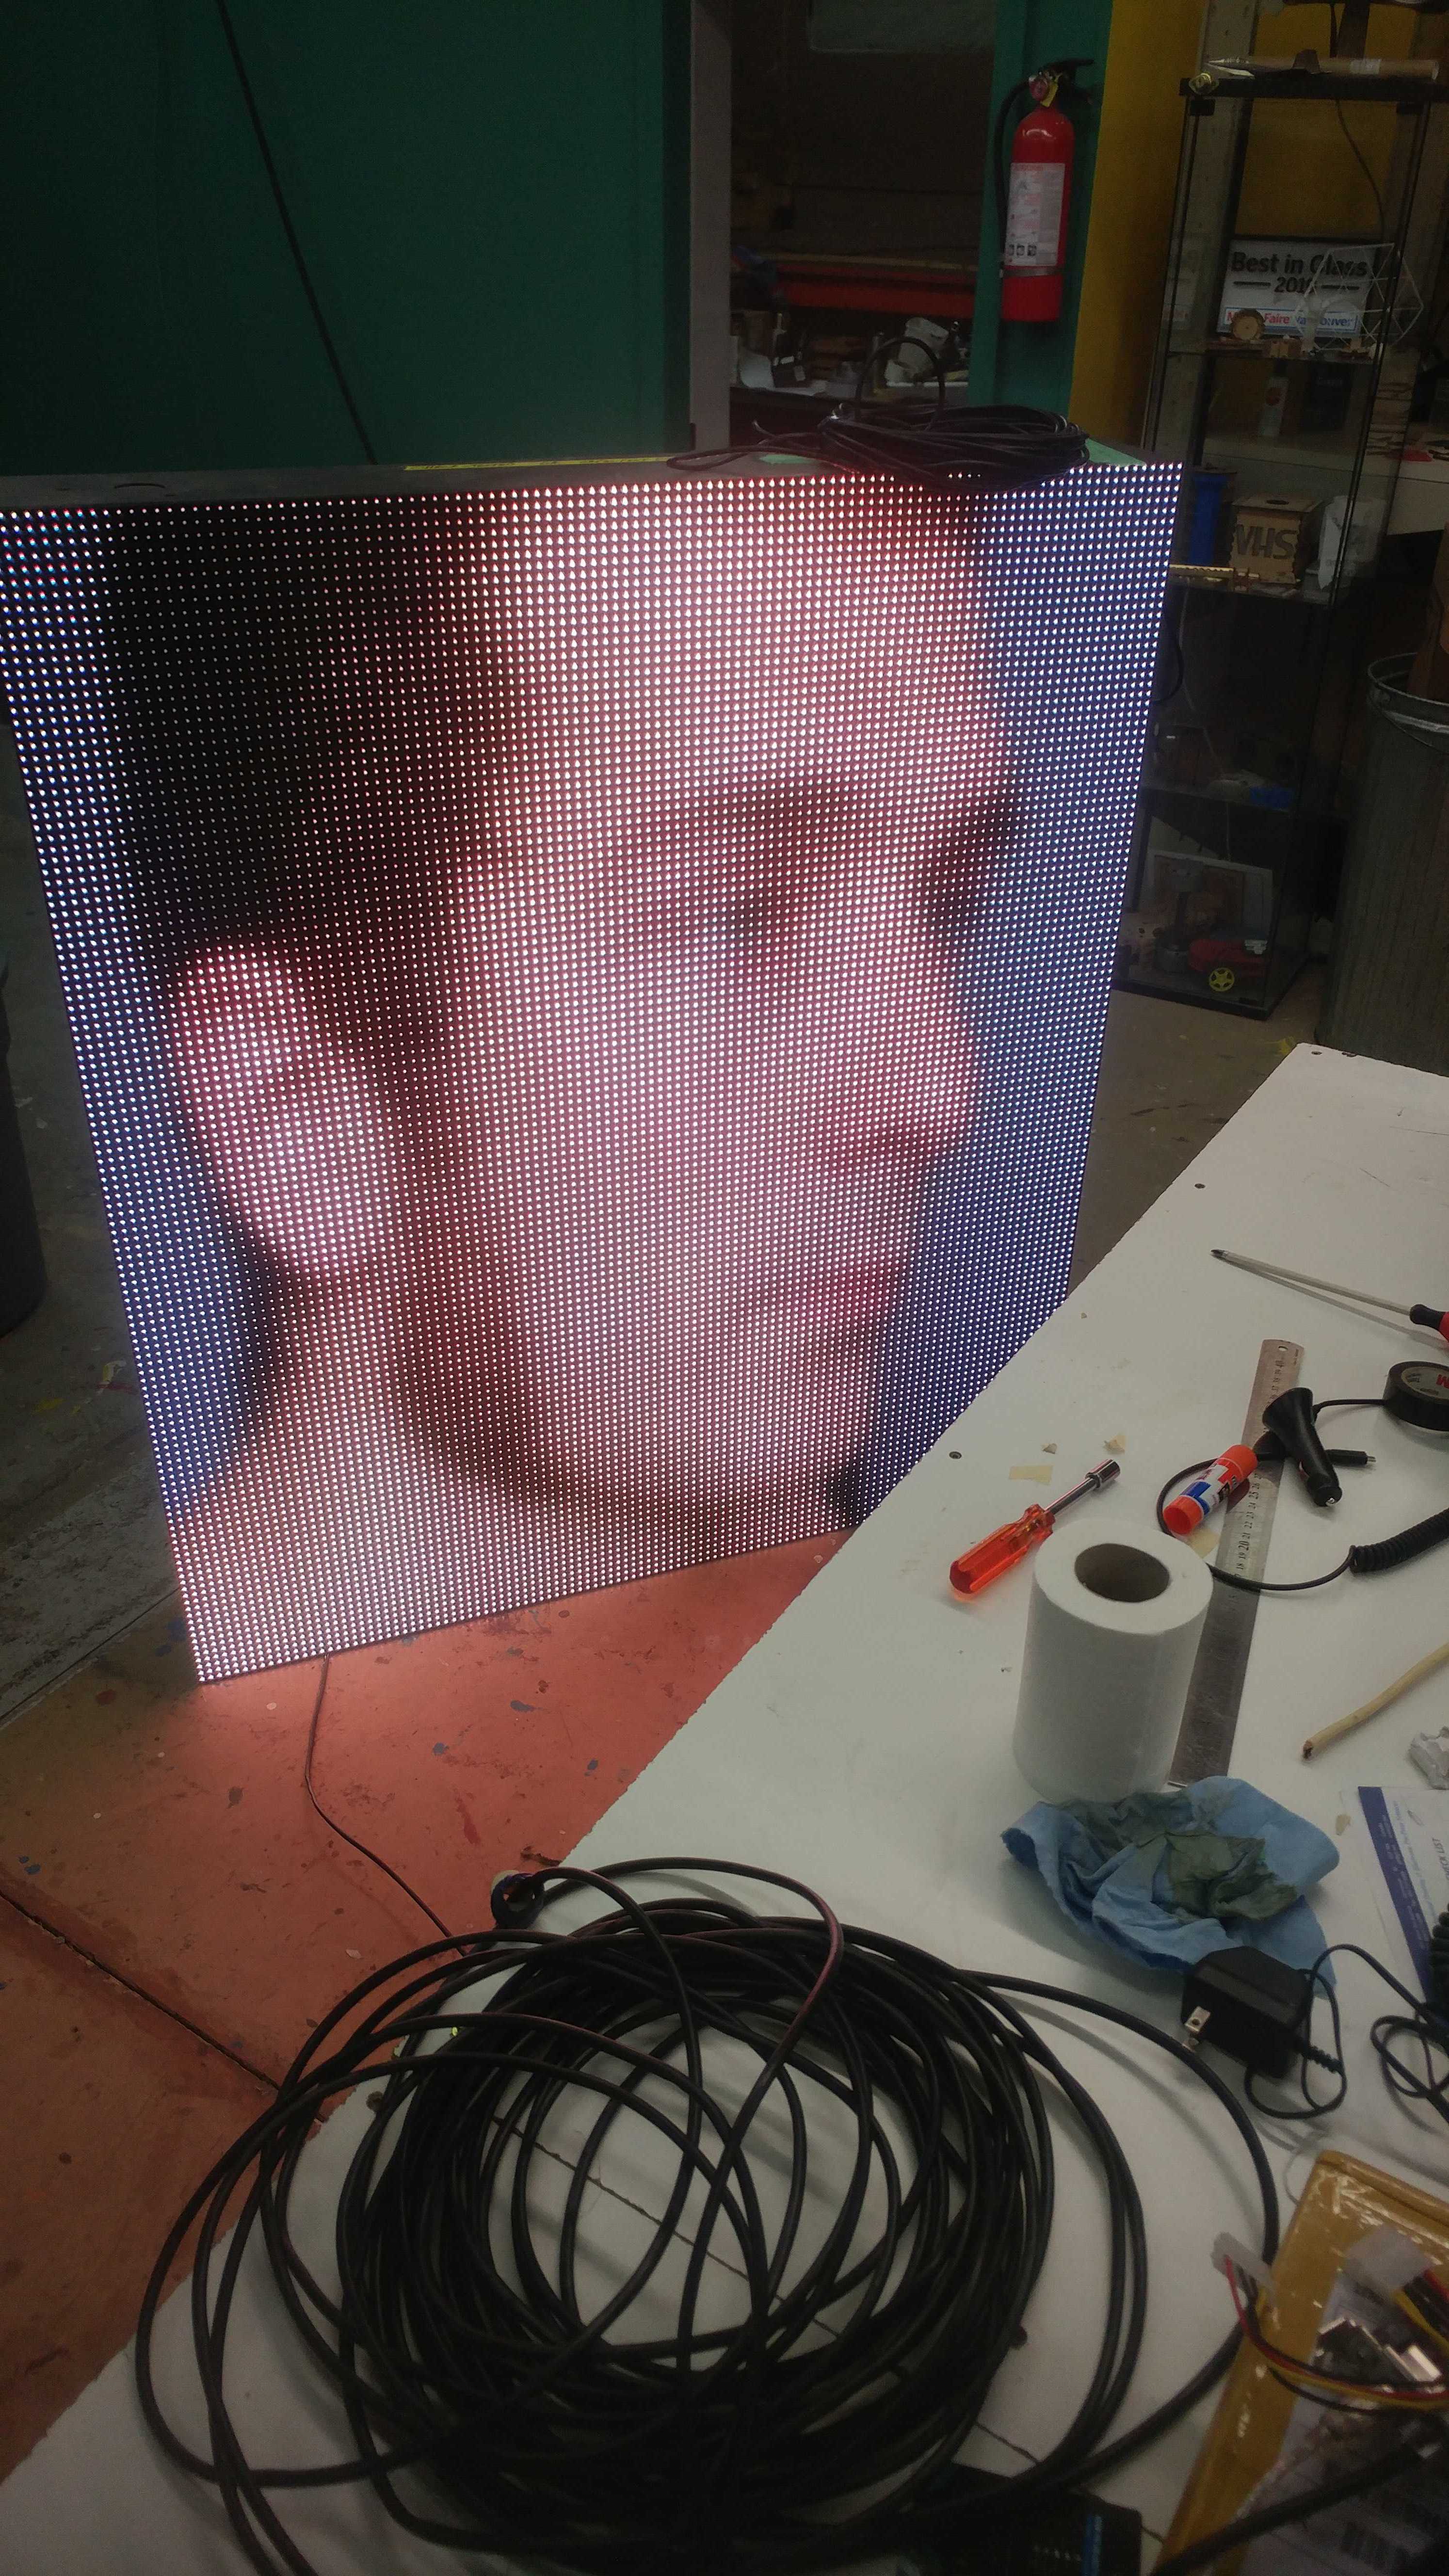
8 panels, each 44" x 50.5", and 112x128 RGB pixel resolution.
Each panel can draw as much as 8 amps of 120v ac at full white, but can be dimmed down to get the consumption below 2 amps each while still being brighter than our overhead lights
Driven by any computer that has a DVI/HDMI output, and will act like a giant low res monitor.
Mostly entirely working, we need to fix a few individual pixels on a few of the modules, and reprogram 1 receiver card ( we have 7 working ones though), and configure our sender card for whatever panel layout we chose.
The panels are reasonably heavy, approximately 80lbs/36kg each
Service access to the panels is through two hinged doors on the back of the panels, it would be good to keep this accessible so we can replace/repair modules and access the receiver card and power supplies.
Ventilation for the panels is through the back, you can’t mount them tight to a wall.
A modest proposal:
With all that in mind the hive mind that was sitting around the hackspace the other day came up with an idea to mount them behind the second couch, facing the side door but mounted on a hinged pivot, allowing them to swing through 90 degrees and face the towards the woodshop.
We could fit a 3 tall and 2 wide panel layout this way, giving us an effective resolution of 256x336 (this is basically mounting the panels sideways which the software supports).
The video wall would be 101" (2.57m) wide and 132" (3.35m) high. Our ceilings are 135" high so it will fit.
when fully swung though 90 degrees it would leave a narrow 1’6" aisle between it and the wall, but it could be easily swing back to line up with the corner of the mess room, which would give a comfortable 24" access-way.
Build would consist of a steel frame to support the panels, a pivot point secured to the floor (with landlords permission etc) and a second pivot located in the ceiling to secure the top of the display, as well as a pair of casters mounted to the frame that run along the floor. This will secure the panels, prevent them from tipping over, and allow them to be swung with minimal effort.
At full white this display could draw 12 amps at 30 out of 255 brightness, or roughly the same as a heat gun, we could dim this further if needed, or just avoid displaying a solid white wall, mounting a thermal overload breaker to the panel is another option.
Reasons for this idea:
Allows easy service access to the back of the panels and good ventilation to keep things cool.
Allows the space to get turned into party mode by rotating the display to face the large gathering area
Creates a great welcoming feature when people walk down the stairs for the first time, could be used in combination with a webcam to work like a magic mirror.
Shines a multi coloured light out the side window, illuminating our sign beside the side door
Things that would have to change:
The oak desk junkcatcher would have to be removed or placed on wheels
two fluorescent light fixtures would have to be relocated to accommodate the swing of the panels.
Would need one electrical circuit to power this thing
I hear those things are awfully loud:
They shine as softly as a cloud, well more or less, there is some fan noise, but if we are in party mode you are so not going to notice over even slight music.
I want to mount a big ole wall switch to the side of the display to turn it on and off
But what about sidewalk pong through the front windows?
This layout uses 6 of our 8 video wall panels, leaving two to be used upstairs. I personally want the two upstairs to be run off a different sender card arrangement to prevent… accidental… unfortunate displays of things that shouldn’t be displayed publicly. Yes we have some damaged modules with stuck or dead pixels, I am figuring that if we cant fix them we can put them near the floor or ceiling and say good enough.
Isn’t there more important projects at the hackspace that need doing?
Oh god yes, like the electrical, metalshop, woodshop, moldmaking and casting room, member drives, training programs, bathrooms, security system, access control system. All of those are way more important, and people should step up to help with those.
I don’t particularly have the cycles to deal with that above list, but this project excites me, is relatively low stress and I think it would be a good addition to the space if for no other reason than giant insane LED video wall.
Anyone got a better idea of where to put this?
We looked at some of the following options
Running them along the top of the wall down the side of the space. - issues with access and ventilation
Hanging them from the ceiling trusses facing downwards - painful to install and repair, slight risk of video display of Damocles
mounting them to a pivot on the mess room wall - pivot causes display to strike craft table, no access aisle.
Mounting them to the mess room wall - no access to back of panels, no ventilation.
So yeah, let me know if you have a better plan, and post it below.
Oh yeah its going to be heavy, about 480lbs for the screens, plus the steel support frame, casters etc.
Also the height will just clear the one spot, you cant move it up onto the wood deck or under a vent.
We could swap to a 2x2 grid rather than a 2x3, takes the weight down to 320lbs, and shrinks the size and resolution accordingly.
The smaller size set up for portability would have to have big support outriggers as its not tied into the ceiling and floor, and also would need more steel in its frame as its subject to more stress, could make the weight almost a wash. Plus have a way higher risk of tipping.
I admit I also really like the idea of floor to ceiling LEDs…
Okay, how about another idea…
Talking with @lukecyca the other day he suggested using the screens to build a dividing wall beside the laser, plan would be to build it 2 screens wide and 3 high with the screens mounted sideways. result would be a video wall 101" long (basically the distance from the laser to the laser material storage rack) by 132 high (almost to the ceiling).
provides a home for another 2 member shelves, adding storage for another 30 totes
still allows access to the side of the laser
allows access to the back of the screen, not ideal access for the northernmost screen as we would have to pull totes and remove shelves first, but a heck of a lot better access than mounting to a wall
still allows ventilation (beside the totes).
Screens off the laser area
can secure screen with support legs and a ceiling safety.
Cons:
partially blocks off the natural light from that beautiful new window.
im here at the space right now and as i have been walking back and forth past these units, i had the same idea. only in my head it was 2-3 wide by 2 high and set up off the floor a couple of feet.
If we ran them 3 wide it would be 132" so it would be a little tight on the existing member storage end. height would be 101" so that would give you about 3" of slop to put on the floor or ceiling.
I was planning on mounting them sideways so its 101" x 132". If we ditch one row that gets us to 88" so 2’ on the top and bottom ish. Which actually is a better aspect ratio…
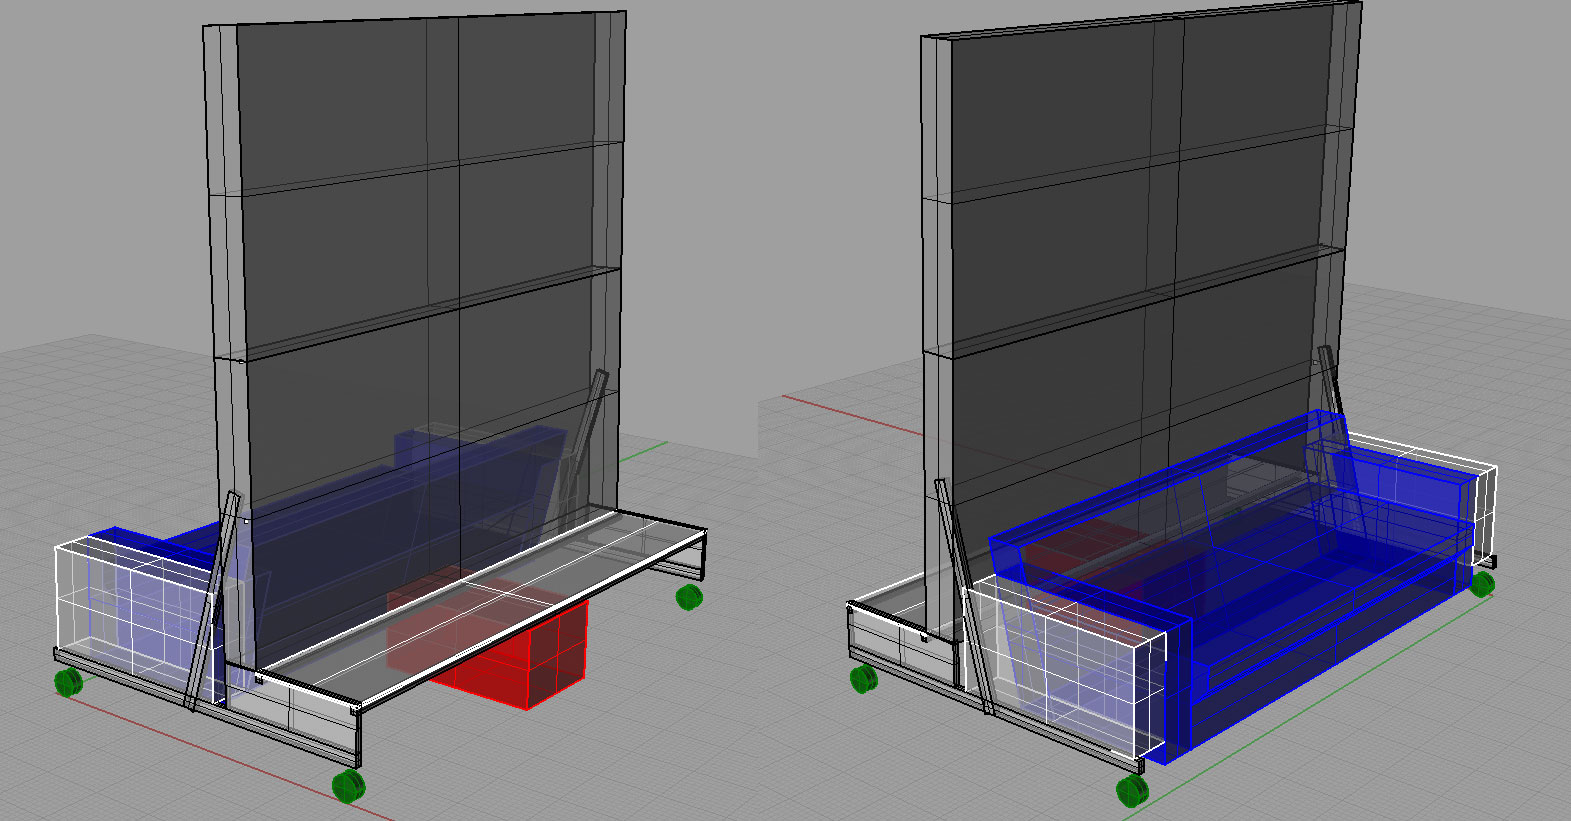
Another option would be to mount a 2x2 screen grid on wheels so we can move it around, my thoughts were to use a couch as a counterweight and tilt the screen back a bit to keep the CG in the triangle.
A permanent big screen would have support legs under it to keep it from tipping (these could be snuck under the floor boards to remove the tripping hazard) and probably a safety up to the rafters (once I hear back about the safe loading specs for those rafters).
Not sure how well this would work for presentations, the resolution is pretty damn low, but the awesome factor is pretty high.
Attached a DXF of the space (ish, some of the table sizes are wrong for the big tables and some stuff has moved). If people want to play around with layouts. space layout - jumbotron.zip (178.4 KB)
how do we get the laser cutter out if we need to? It’s on wheels and can be rolled out if necessary.
we’d be able to pull the end arlink bench out and roll the laser through - with the ventilation being very fixed, the laser is already a pain in the ass to move, this doesn’t seem like it would change that.
So its come to light that there are a few members looking at reinstalling more windows and perhaps moving members storage to take advantage of the natural light thus created for a better work space.
As a result I am now hesitant to put up a giant fixed LED sign barrier towards things getting moved and shifted and improved in the shop.
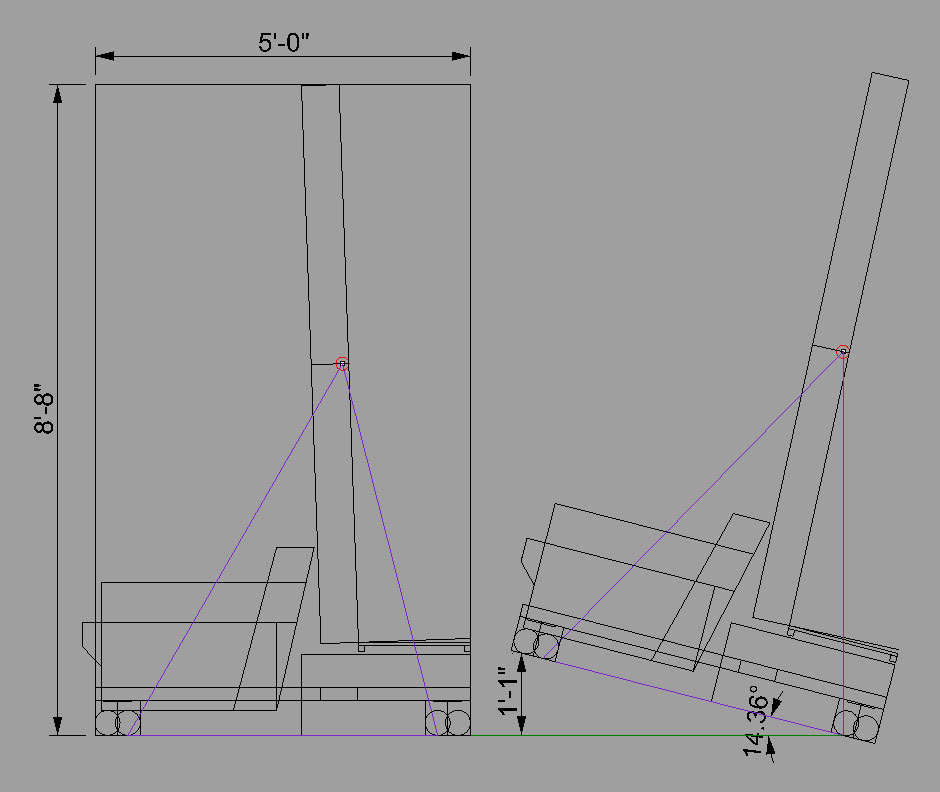
I ran the stability numbers and found that despite my earlier instincts a mobile cart can be done, it would be reasonably quick to build, stable and safe. It would consist of 4 screens, stand roughly 8’8" high (thus fitting under any pipes in the shop), sitting on a base 5’ wide. It would look something like this (bracing and details to be worked out later but yes the signs would be rigidly attached to the frame, and it wont be flimsy):
Yes that is a couch attached to it (as a side bonus, this would raise our way to low couch so the seat is level with the normal couch). The plan is for this to live roughly where that oak desk junk catcher behind the lounge lives now. And yes under the bench behind the couch (which is basically an instagram trap #VHS-Selfies) is space for another 5 or 6 valuable floor level bin storage spots.
As for stability, I assumed worst case ontario here, with the frame and the couch being essentially weightless and all the mass concentrated in the sign putting the centre of mass (CM) about 6’ up. Even with this and the casters rolled inwards you’d still have to pick up the couch side by more than a foot to get the CM outside of the base triangle. In practice, once we add more weight to the frame, plus the 100lb couch, the CM will shift down and to the left rendering this thing very hard to tip indeed.
The casters should only be carrying around 142 lbs each (320 sign, 150 steel, 100 couch ish) which the wood floor should be able to support (that softspot by 3d printing notwithstanding).
This thing is not getting attached to the structure, and will take less than 4 hours to undo with an angle grinder if everyone hates it, so barring any major reasoned objections we are going to doocracy this to get at least 4 of the signs out of the way and doing something awesome. (please suggest below what to do with the other ones… )
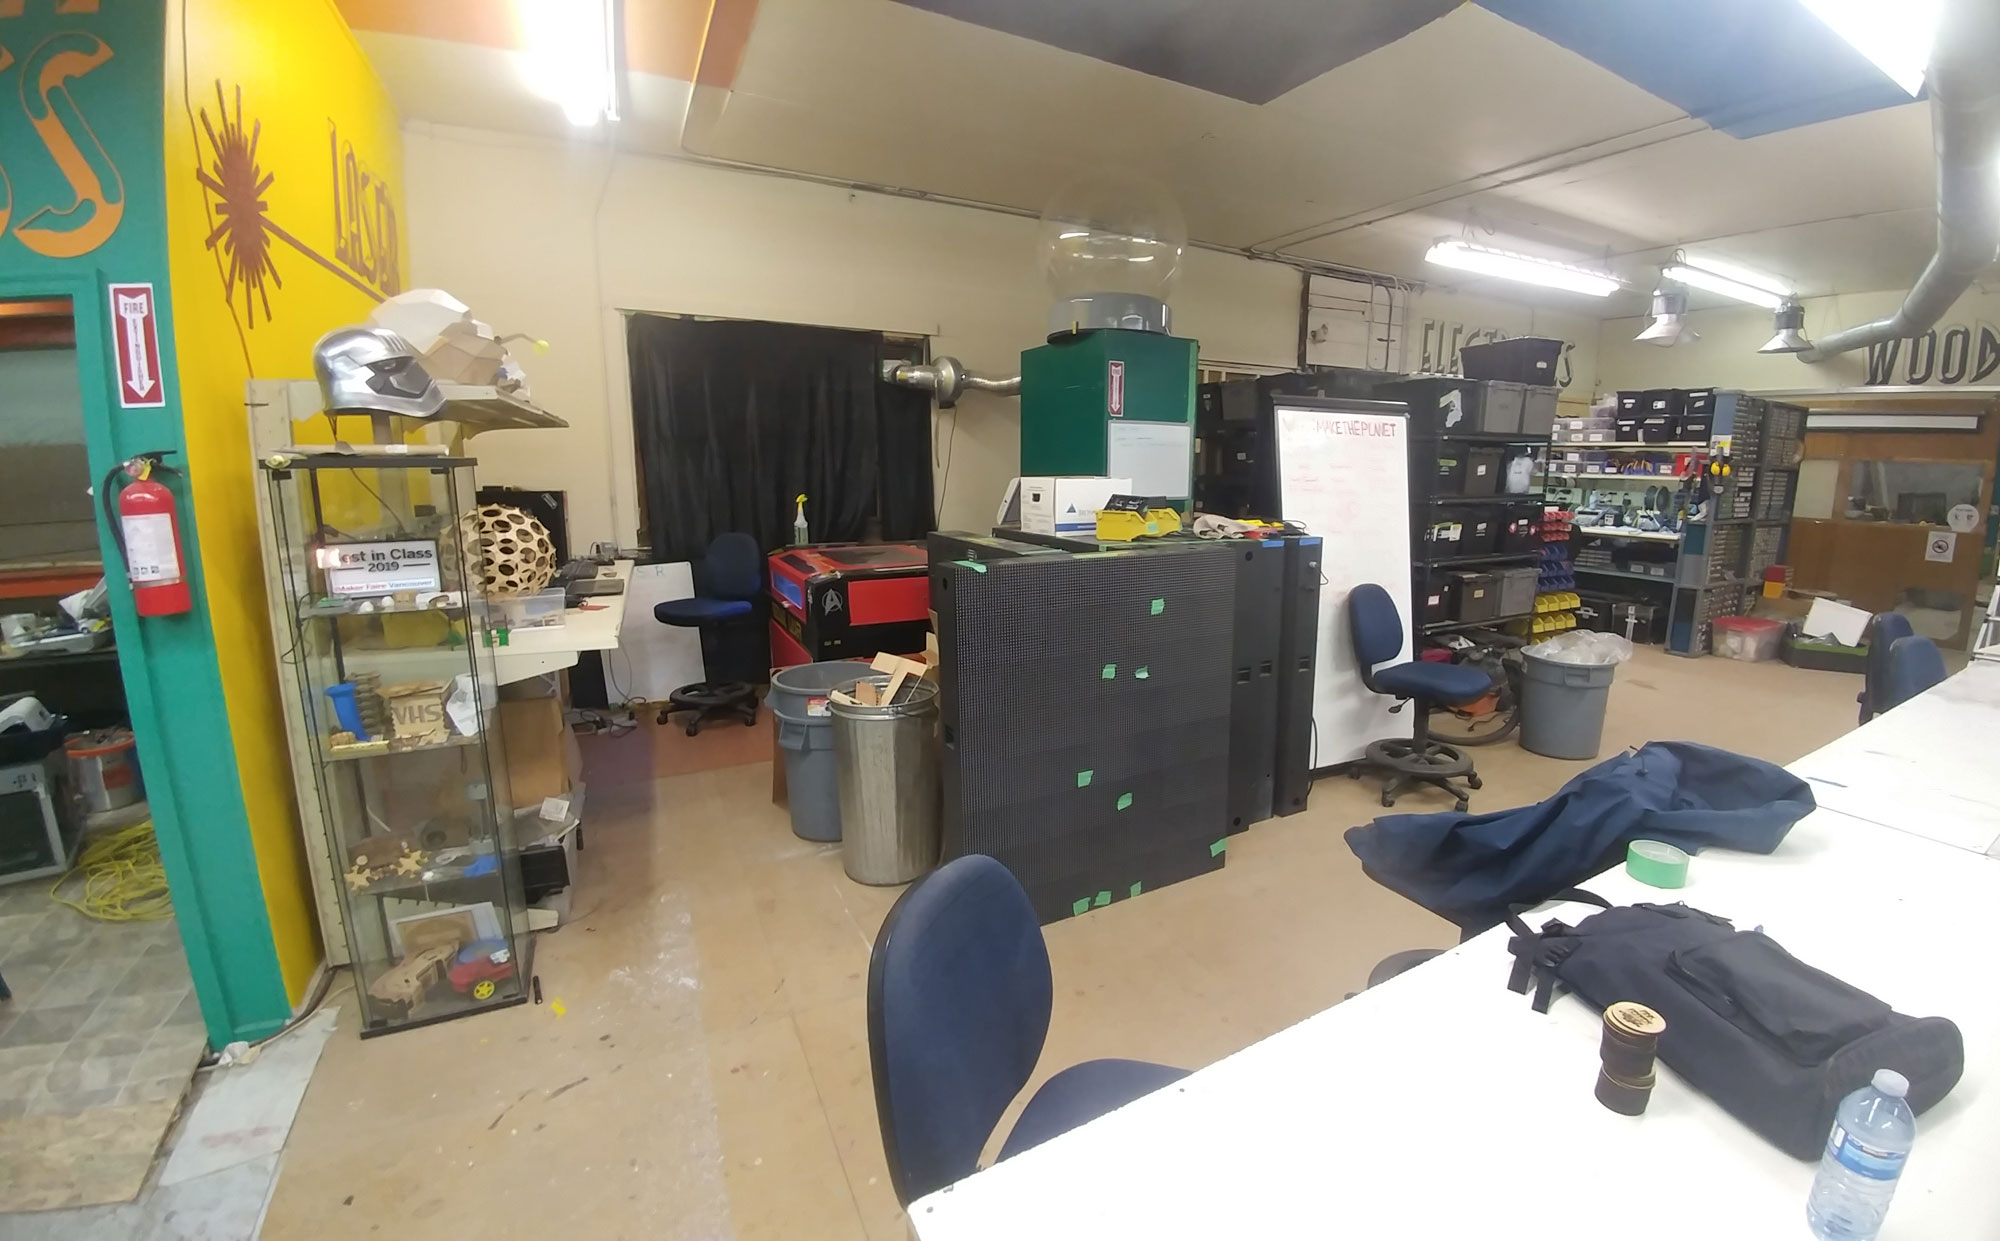
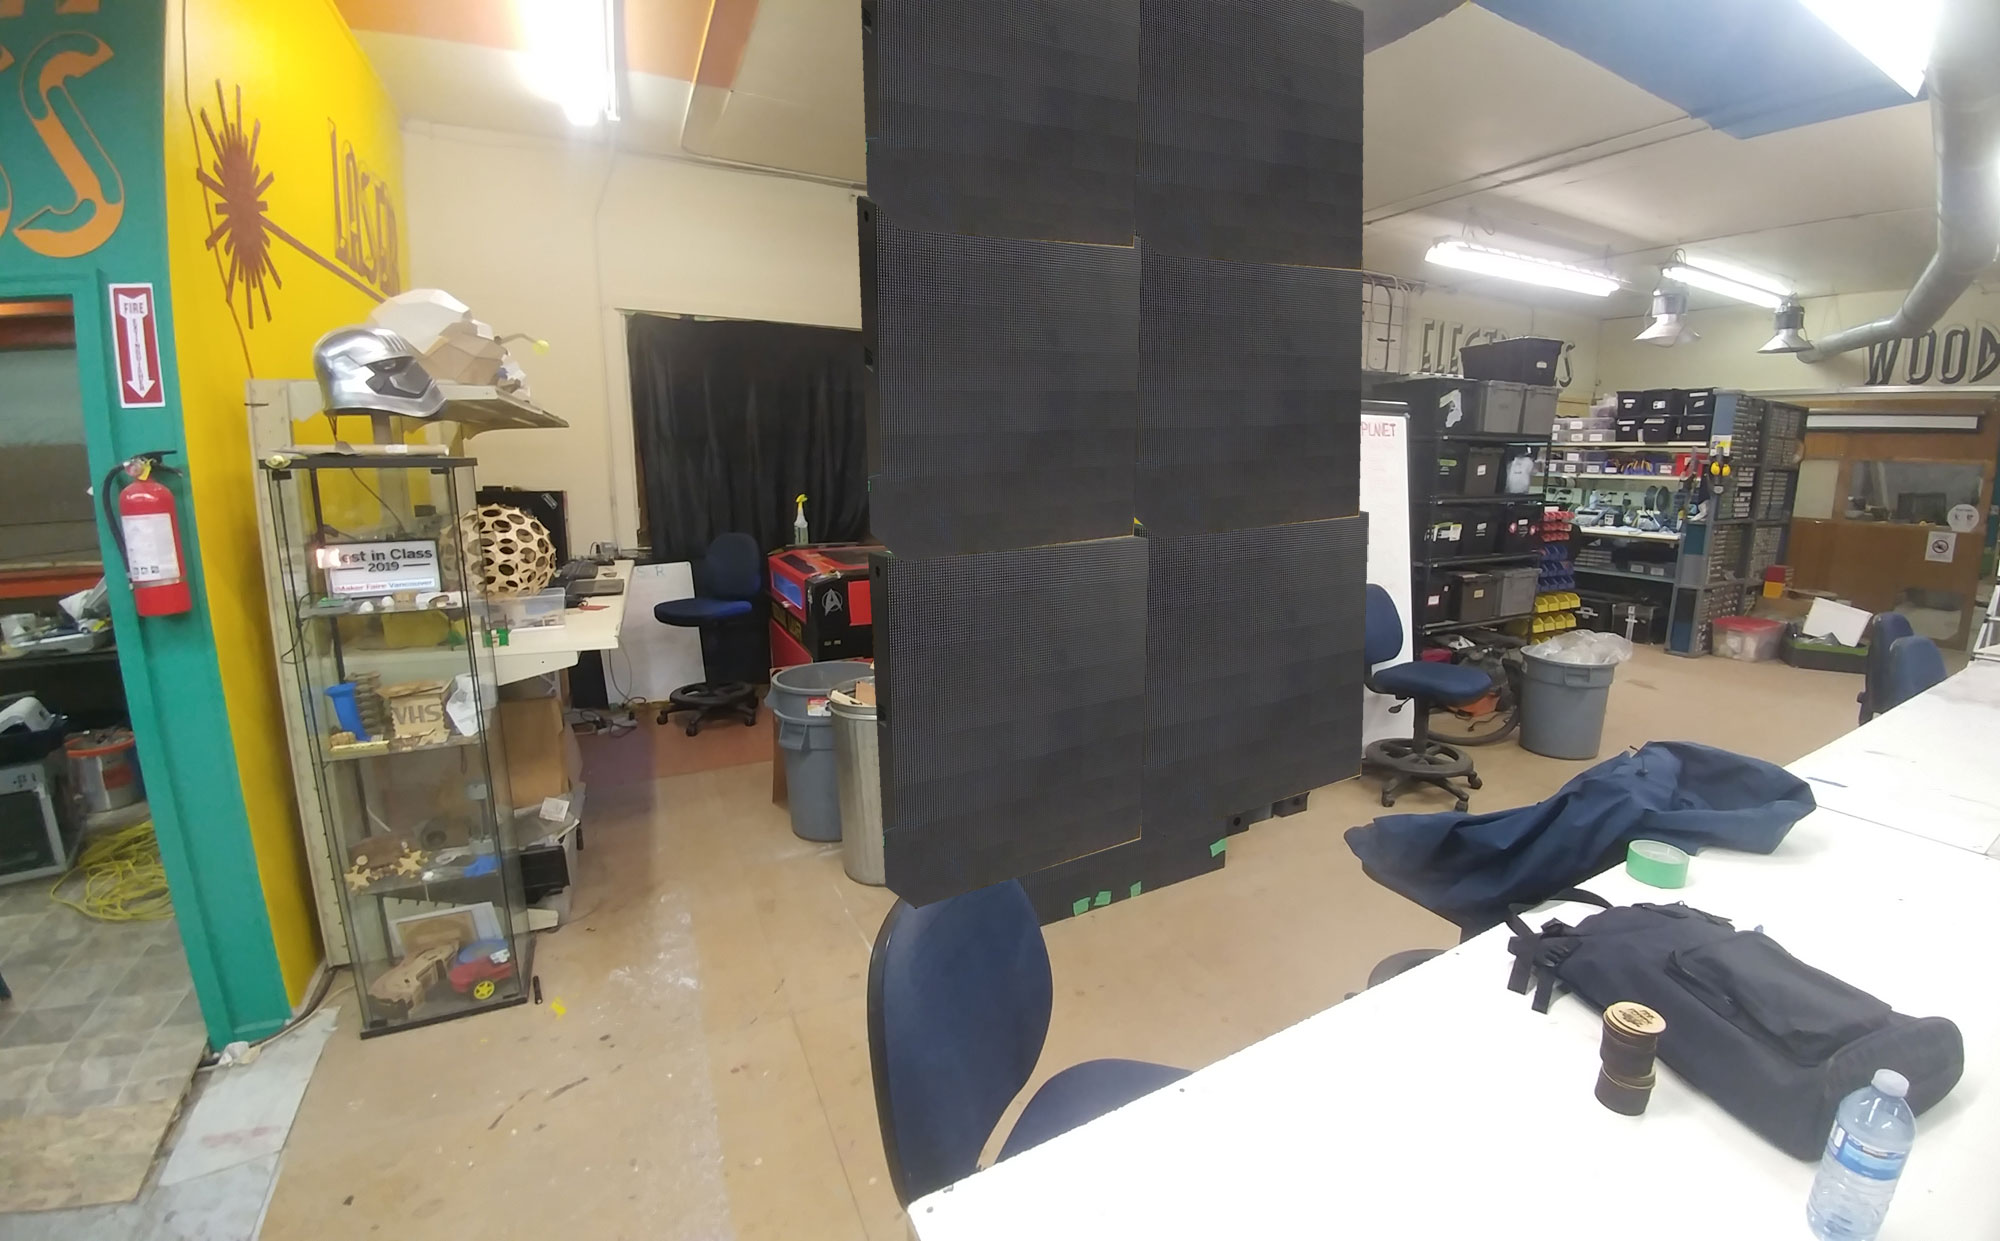
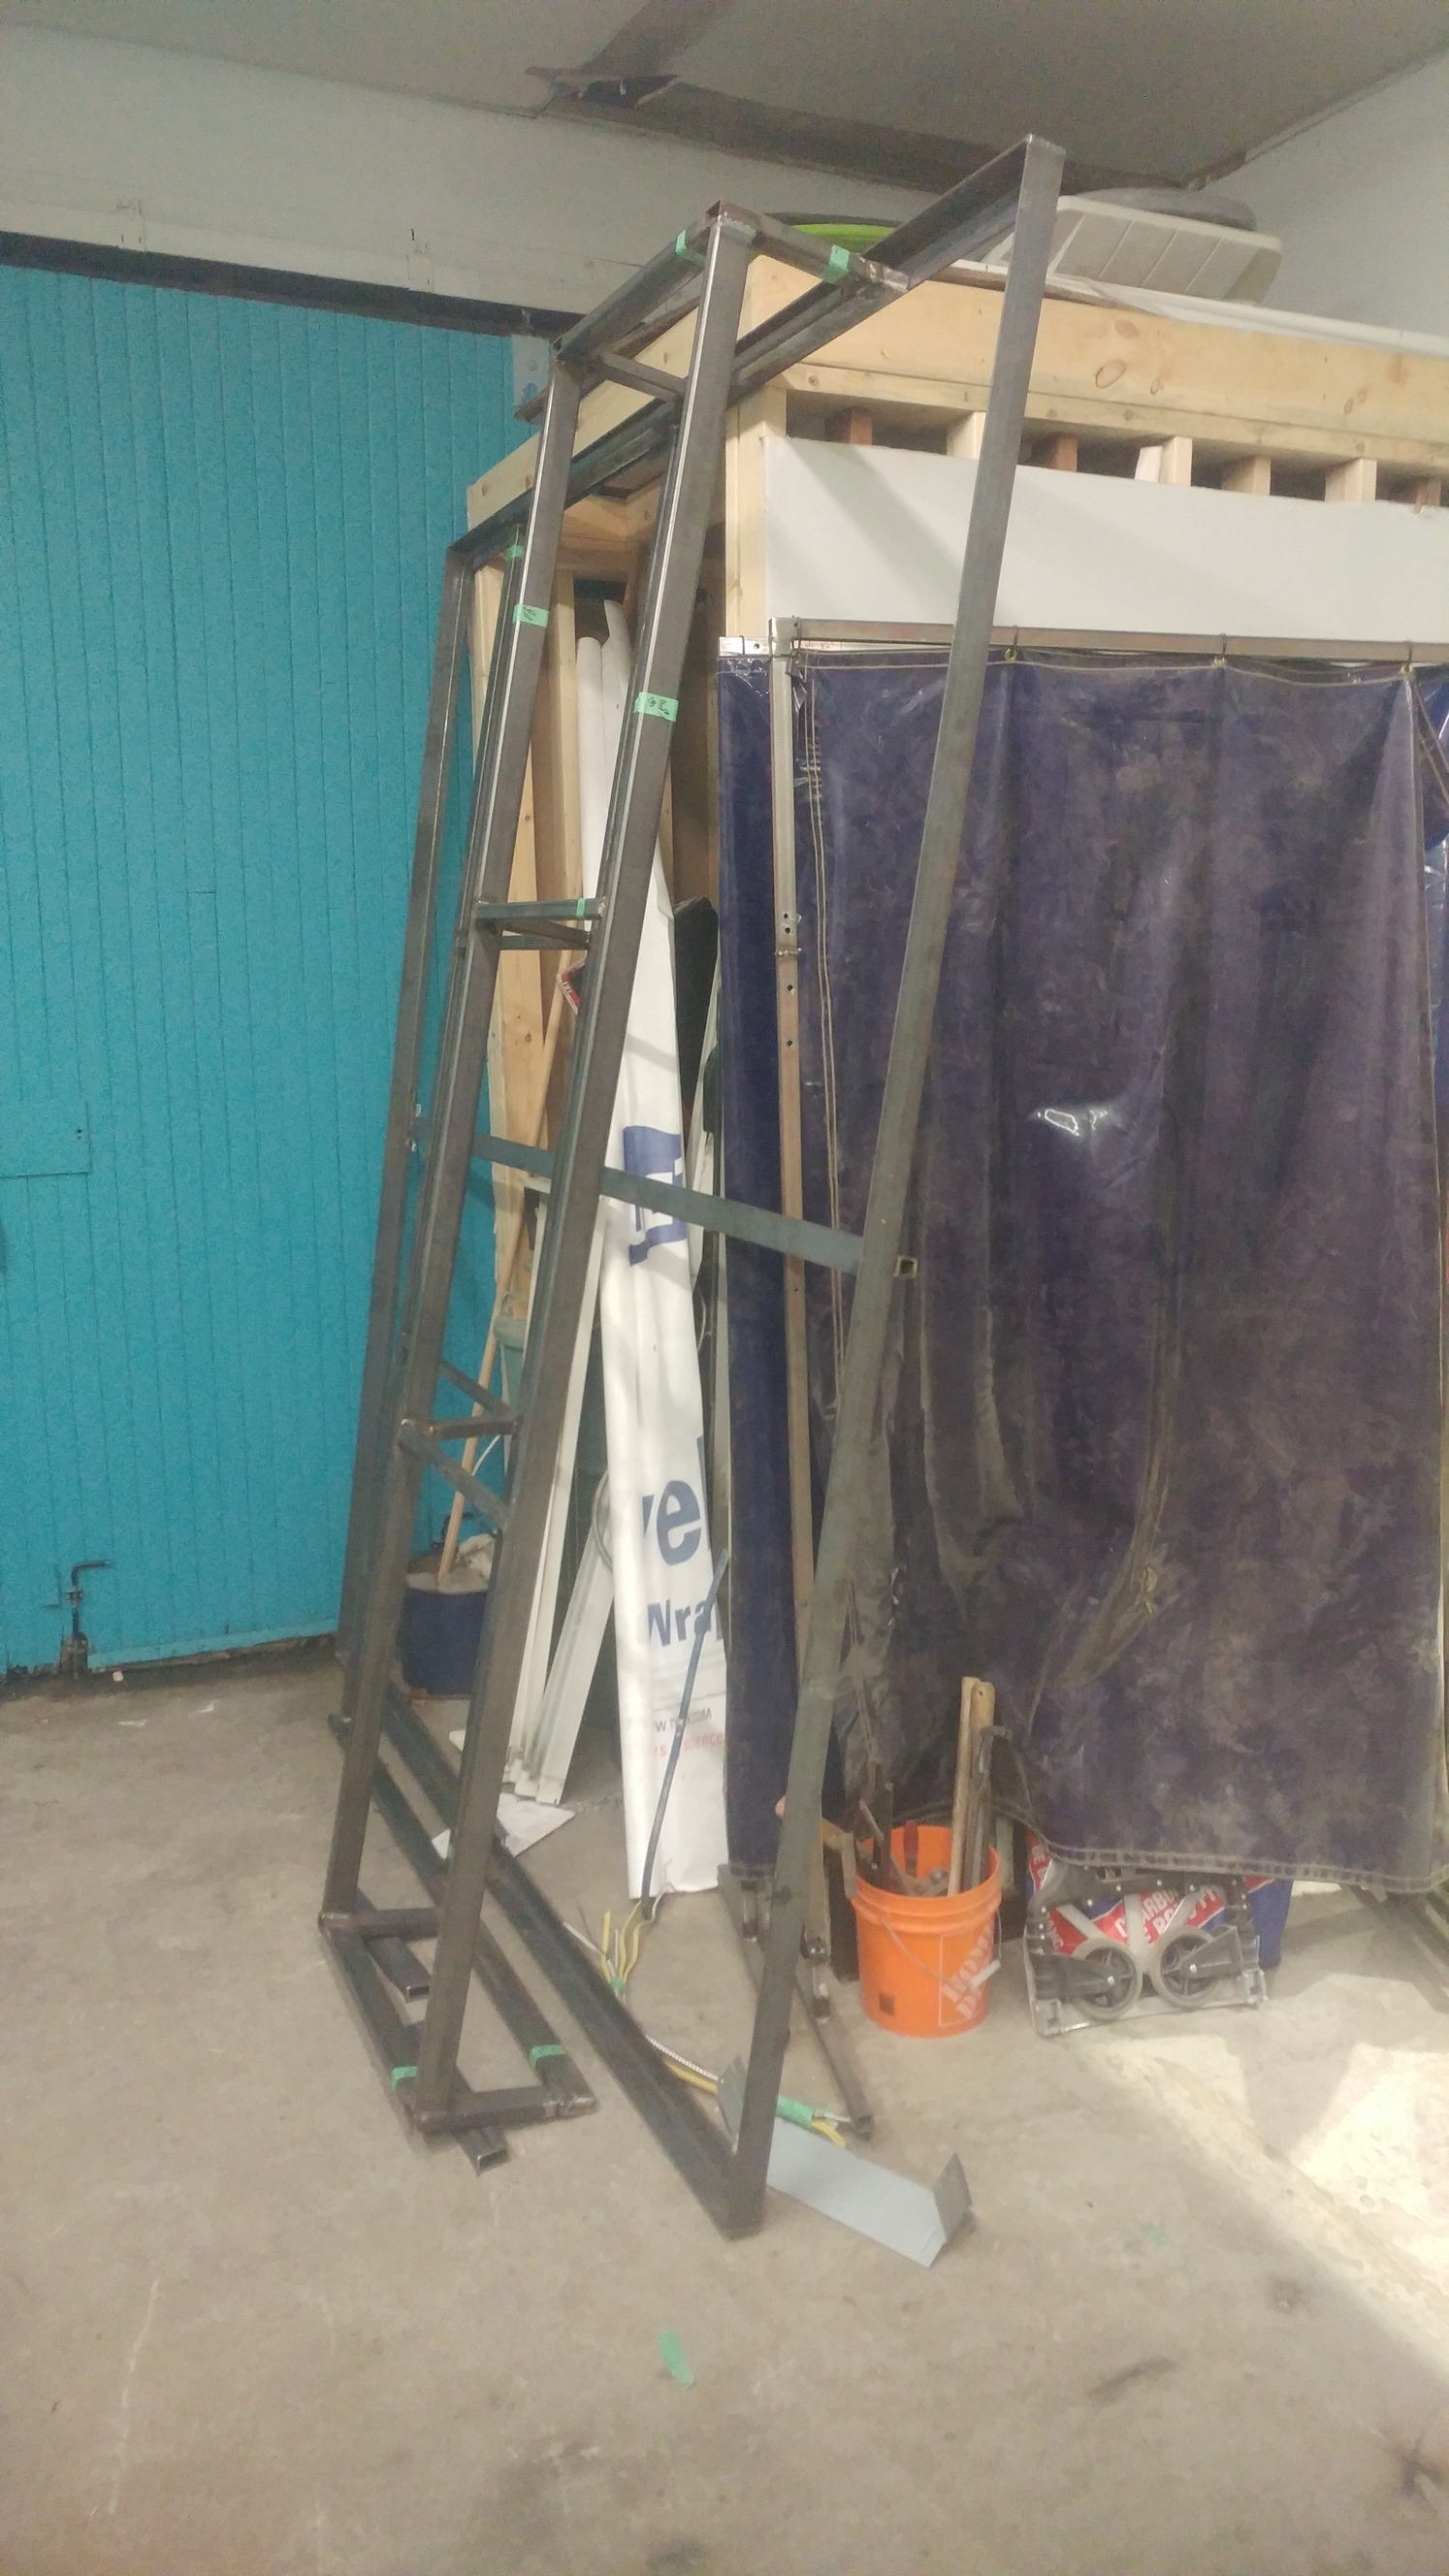
Metal Janet and I got most of the frame welded up, planning to come in Sunday to finish installing the hinges. And all the other bits. Sorry its hanging out in the dmz for a day or two as it is fricken huge and doesn’t fit anywhere else.
Update on this, we placed the lower cart frame in its postion in the lounge. We also got all the pieces cut for the side table and couch supports.
Didnt manage to get them welded in, mostly because Baby Butterscotch is a fairly needy pet - Remember kids, while pony’s may look cute, they take a lot of work and dedication to care for, even robotic ones.
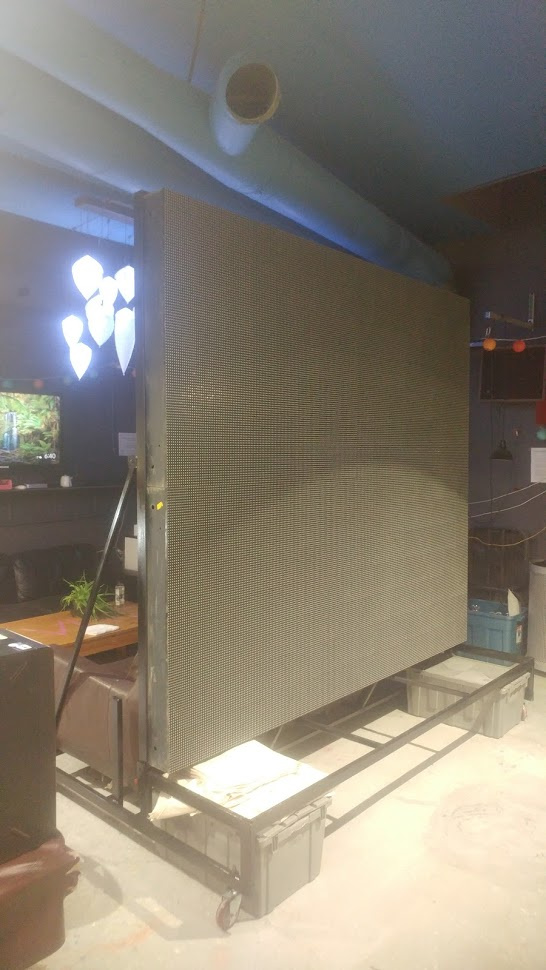
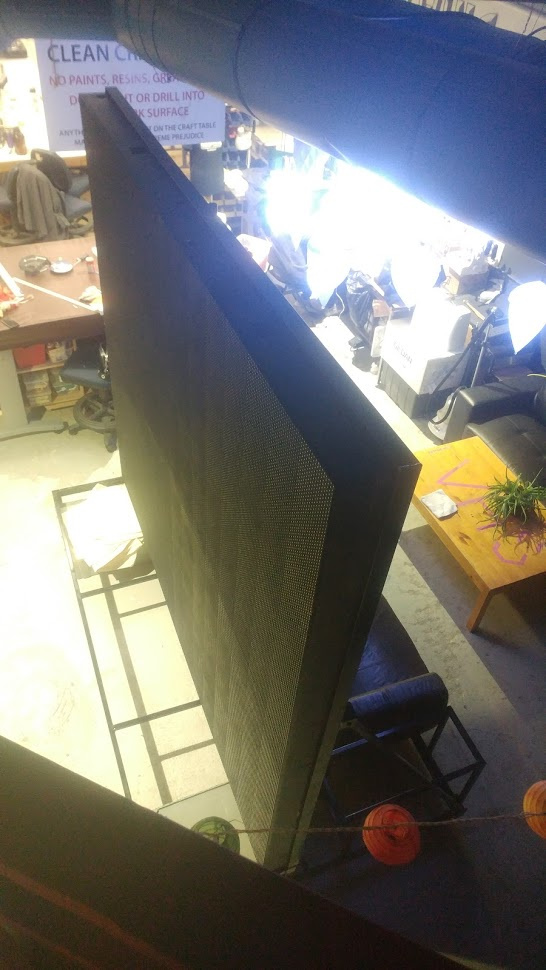
Wall is up, will do some stability testing later in the week with going up ramps and what not, but on the flat its totally solid. Thanks to @yeungx@TristanL@Metal_Janet and yeungs friend whose name I didn’t catch (my bad).
data cabling - thanks @SteveRoy for making those up
getting some wood onto the bench
installing wood onto the side table and computer stand
software configuration re the multi panels
getting a computer for this with hdmi/dvi that can run a basic nes/mame emulator, ideally windows based as the screen needs a signal from a windows program to turn on (could also fake this if someone is good with wireshark).
playing so many Nintendo games in all their full pixel resolution glory.