And an album with some photos of the electronics assembly:
It’s a fairly simple kit to assemble electronics - the soldering is all through hole, and took me an evening. I’m still having some glitches with the usb midi - optical controller - I currently suspect issues with it shorting against the metal enclosure.
The secondary coil (the coppery colored one needs to be varnished using spray on polyurethane varnish. This was time consuming, and I discovered I didn’t use enough- need to add more coats.
Soldering the connectors onto the wound thin copper wiring is also painstaking.
Here’s the 10 second test fire:
It’s still not fully performing - there was a large arc on the side away from the camera, which suggests that I need more insulating varnish.
I’ll post a video once I have it fully working. Hopefully Bob and Steven can post too?
Woot! Thanks for the photos and video update. This tiny Tesla is a thing of
beauty! Good luck with the rest of the coats. How many do you think you’ll
have to add total?
I am almost there but did run into a few problems. First I seemed to have issues soldering the USB controller board. Once it was completed it appeared to have a short in the USB connector… Fixed that and it worked once… Then I would just get USB errors when I plugged it in… Couldn’t see much in the support forums…Replaced the ATTiny with a new one (flashed correctly) but still had no luck. Noticed the ATTiny was not sitting in the socket correctly and it seemed that the socket was either full of solder or had some defect… Decided to replace it… Big mistake as I had no luck at all and finally completely damaged the PCB…
Gave up and ordered a replacement PCB kit for the USB PCB… Put it all to the side for a bit…
Got the new board… Carefully put it together and this time it seems to work (at least it powers up properly) but while it does show up as a USB device it does not show up as the correct USB device so the control app doesn’t recognize it. At least not on either of my PCs. It does seem to correctly enumerate on my MAC but there is no control app for MACs…
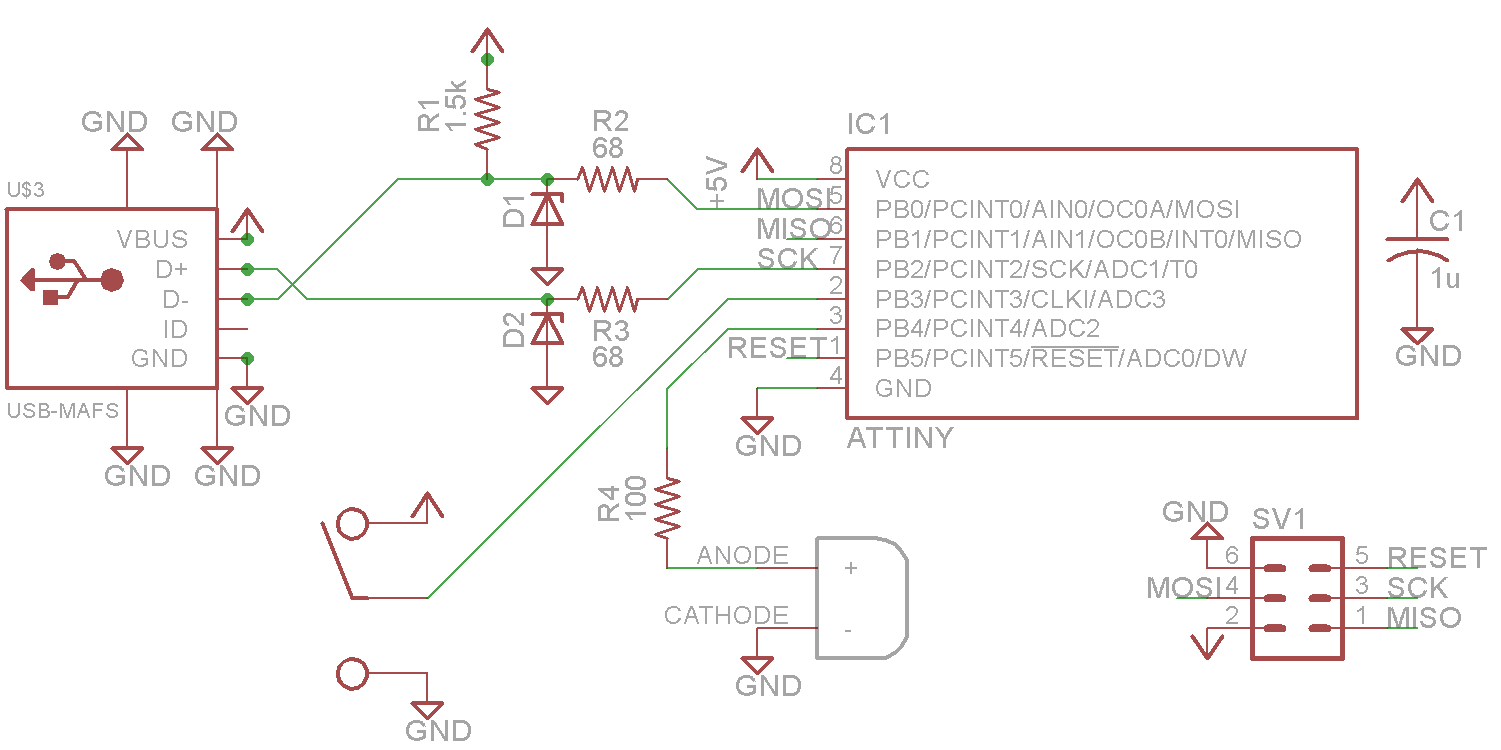
Go back to the support forum and actually register… Find out that all the support forums are hidden till you register. Turns out a few people have the same issue and may have to do with the zeners used on the ATTiny USB board (have a sudden recollection that @TomKeddie mentioned something about this a while back). Ordered some higher voltage zeners in the hope that this will make the USB controller work…
Will get the zeners soon and start back working on it. The issues about the varnish on the secondary is also a common problem. @jon - Did you remove your primary coil when you added more varnish or did you just go over it?
It does sound loud in your video… Can wait to fire mine up…
Here is what Eric of Digistump had to say when I asked him “You can leave out the USB line resistors and it will work better by some accounts. The zener is the most particular part - through hole ones tend to not work well.”
The thread at https://forums.obdev.at/viewtopic.php?t=510 seems to recommend low current ones. “We recommend the smallest types you can get, which is usually 250 mW. Thanks for posting experimental results with other power ratings!”
There are a bunch in the VHS SMD collection, might be something worth trying in there.
Interesting, sounds like my issues with the controller might be more complex than I thought! I ended up running it from my mac, using the midi control panel test tone.
I just got to this point yesterday, so haven’t added the varnish yet. I put electrical tape between the primary and secondary, so my thought was to put painters tape over the primary when I spray it.
Based on what I have read in the OneTesla support forums I am going to replace the 3.3V zeners (D1 & D2) with 3.6V ones and see if that helps… The ones I got are 500mW though not 250mW recommended in the AVR info @TomKeddie posted…
Put in the 3.6V zeners and had a short moment of joy when my laptops showed that the Tesla USB device had connected. Unfortunately by the time I got the control panel started the device had reverted to a generic USB audio device and the control panel doesn’t find it… So it seems to enumerate on the USB as a generic USB audio device instead of the Telsa device the app is looking for. Sometimes it just gives me a USB error when I connect it. This happens on both PC machines.
Gonna head back to the forums and see what else I can find. Unfortunately the packaged control app is PC only and both my PCs are older XP machines…
Bob, I can lend you a digispark to test with, it has the same zener arrangement. Actually you could just replace the controller with a digispark, they are like $8, you only need two i/o. Note that D3 is backwards for copy protection (ie. you need to be able to read the schematic and spot the error to clone the device).
Update:
While the USB controller still doesn’t work on my XP Windows laptops it does work on a newer laptop running 7 and another running 8…
Tried powering it up and blew a fuse…
Going to try again once I get some replacement fuses…
Turns out my blown fuse is due to a blown IBGT…
Replacement is a IRGB4620DPBF
May also get a replacement bridge rectifier as the forums mention they are likely to blow also…
One (of several) annoying thing is that they include a fibre link to provide electrical isolation from the USB controller but it is only 1 meter long. Since the USB controller locking up (due to EMI) is a typical cause of blown IBGTs I’m going to try extending it…
Is there a chance the EMI from the coils may damage anything in the space (3d printers, laser cutter, computers)? Would it be more prudent to conduct tests in the loading bay?
USB → Midi controller seems to work reasonably well on a mac under ableton (thanks @Lukeo!) with a bit of magic in the MIDI setup panel on connect to get it initialized.
On @hectorh’s windows laptop, the device manages to crash after about 30 seconds, hard enough to take down the driver, leaving an unkillable process for the control panel. Requires a reboot between attempts.
The first set of trials revealed that the amount of secondary coil I had had to peal back in the attempts to assemble the top piece had created gaps in the coating of the secondary, causing arcing to the primary (thanks to @hectorh for the video evidence on this one).
Frustrated with the number of coats of varnish, I gave in and put two layers of kapton tape over the secondary. Didn’t go particularly smoothly, and looks a little ugly, but it did leave the coil in what appears to be a well functioning state - with no arcing!
Next step is trying again with ableton to see if the controller is stable enough.
Removed the two zener diodes from the usb-midi device (suggested on their forum) this caused it to completely fail on my macbook (didn’t have a windows box around to try). Tried replacing them with some slightly higher voltage ones from the component drawers, and the USB-midi controller seems to be working without a glitch now!
When I fired it up, I got music, but also some arcing to the primary.
I cut a larger plastic disc to go between the toroid and the primary, but with it on I got some arcing along the coil, following kinks in the tape.
Removed the tape, and re-applied (significantly more) tape, trying to get it as tight as possible, and covering the primary, as well as the secondary.
This seems to have worked, and I’m now getting it to play pretty nicely!
unfortunately, my camera seems to have been set to auto-iso, so the video turned out poorly. I’ll shoot another one sometime soon.
The process was a bit finicky - especially adding insulation to the secondary.
It’s a bit on the fragile side - storing mine broke it in a couple places, and it would require a touch up before using it again. If you’ve got more storage space, you’d be better suited here.
Is it something I’ll be using often?
No.
But still, fun to build, and I’m sure there’ll be opportunities to pull it out.