I wanted to know if anyone could help me with the Reflow oven and if I can meet up on a Tuesday at all. My plan is to try and fix this graphics card that I got for a few dollars, but the former owner used it at work for mining and it died on him one day. I’d like to see if 8 min in the oven could possibly revive it for a while. I’ve already tested it on my computer, the fan wouldn’t t run, then took it apart and know what needs to be done, bring in some tin foil, thermal paste, and cleaning solution. I just don’t want to ruin my oven at home with fumes and cleaning so when I saw the Reflow oven, I think that it would be perfect for this. I just won’t be bringing in a PC to test it in afterward and may need to return if it doesn’t work the first time.
As the seller described, he saw no burns or damaged chips on the PCB. It just stopped working and otherwise looks fine. Taking it apart, I agree, nothing seems wrong per se. No computer shop will repair them so using the Reflow Oven is my only option.
I can share images of the board if anyone wants to look at it.
I’ve reflowed a motherboard in my home oven on super low temp. I got 6 more months out of it. I chucked it on some tinfoil and didn’t use any paste or cleaner. It was an integrated laptop GPU. I don’t usually use my home oven. I was on a deadline and needed to fix my laptop so not recommended.
how big is the graphics card? The limiting factor will be the size of the oven but absolutely if it fits in there - very worth giving reflow a try. The tricky thing will be any plastic parts on the board melting so you’ll have to remove those first.
Another option is using a heat gun to reflow parts of the board. Tough to do unless you know exactly where the bad connections are.
Edit: yes please, post a pic so we can see of the board!
Also are you looking at using that flux spray cleaner? That’s pretty nasty stuff - might be worth sticking to 99% iso alcohol. Hpoefully a few more peeps will weigh in with thoughts. We have quite a few folks who use the oven.
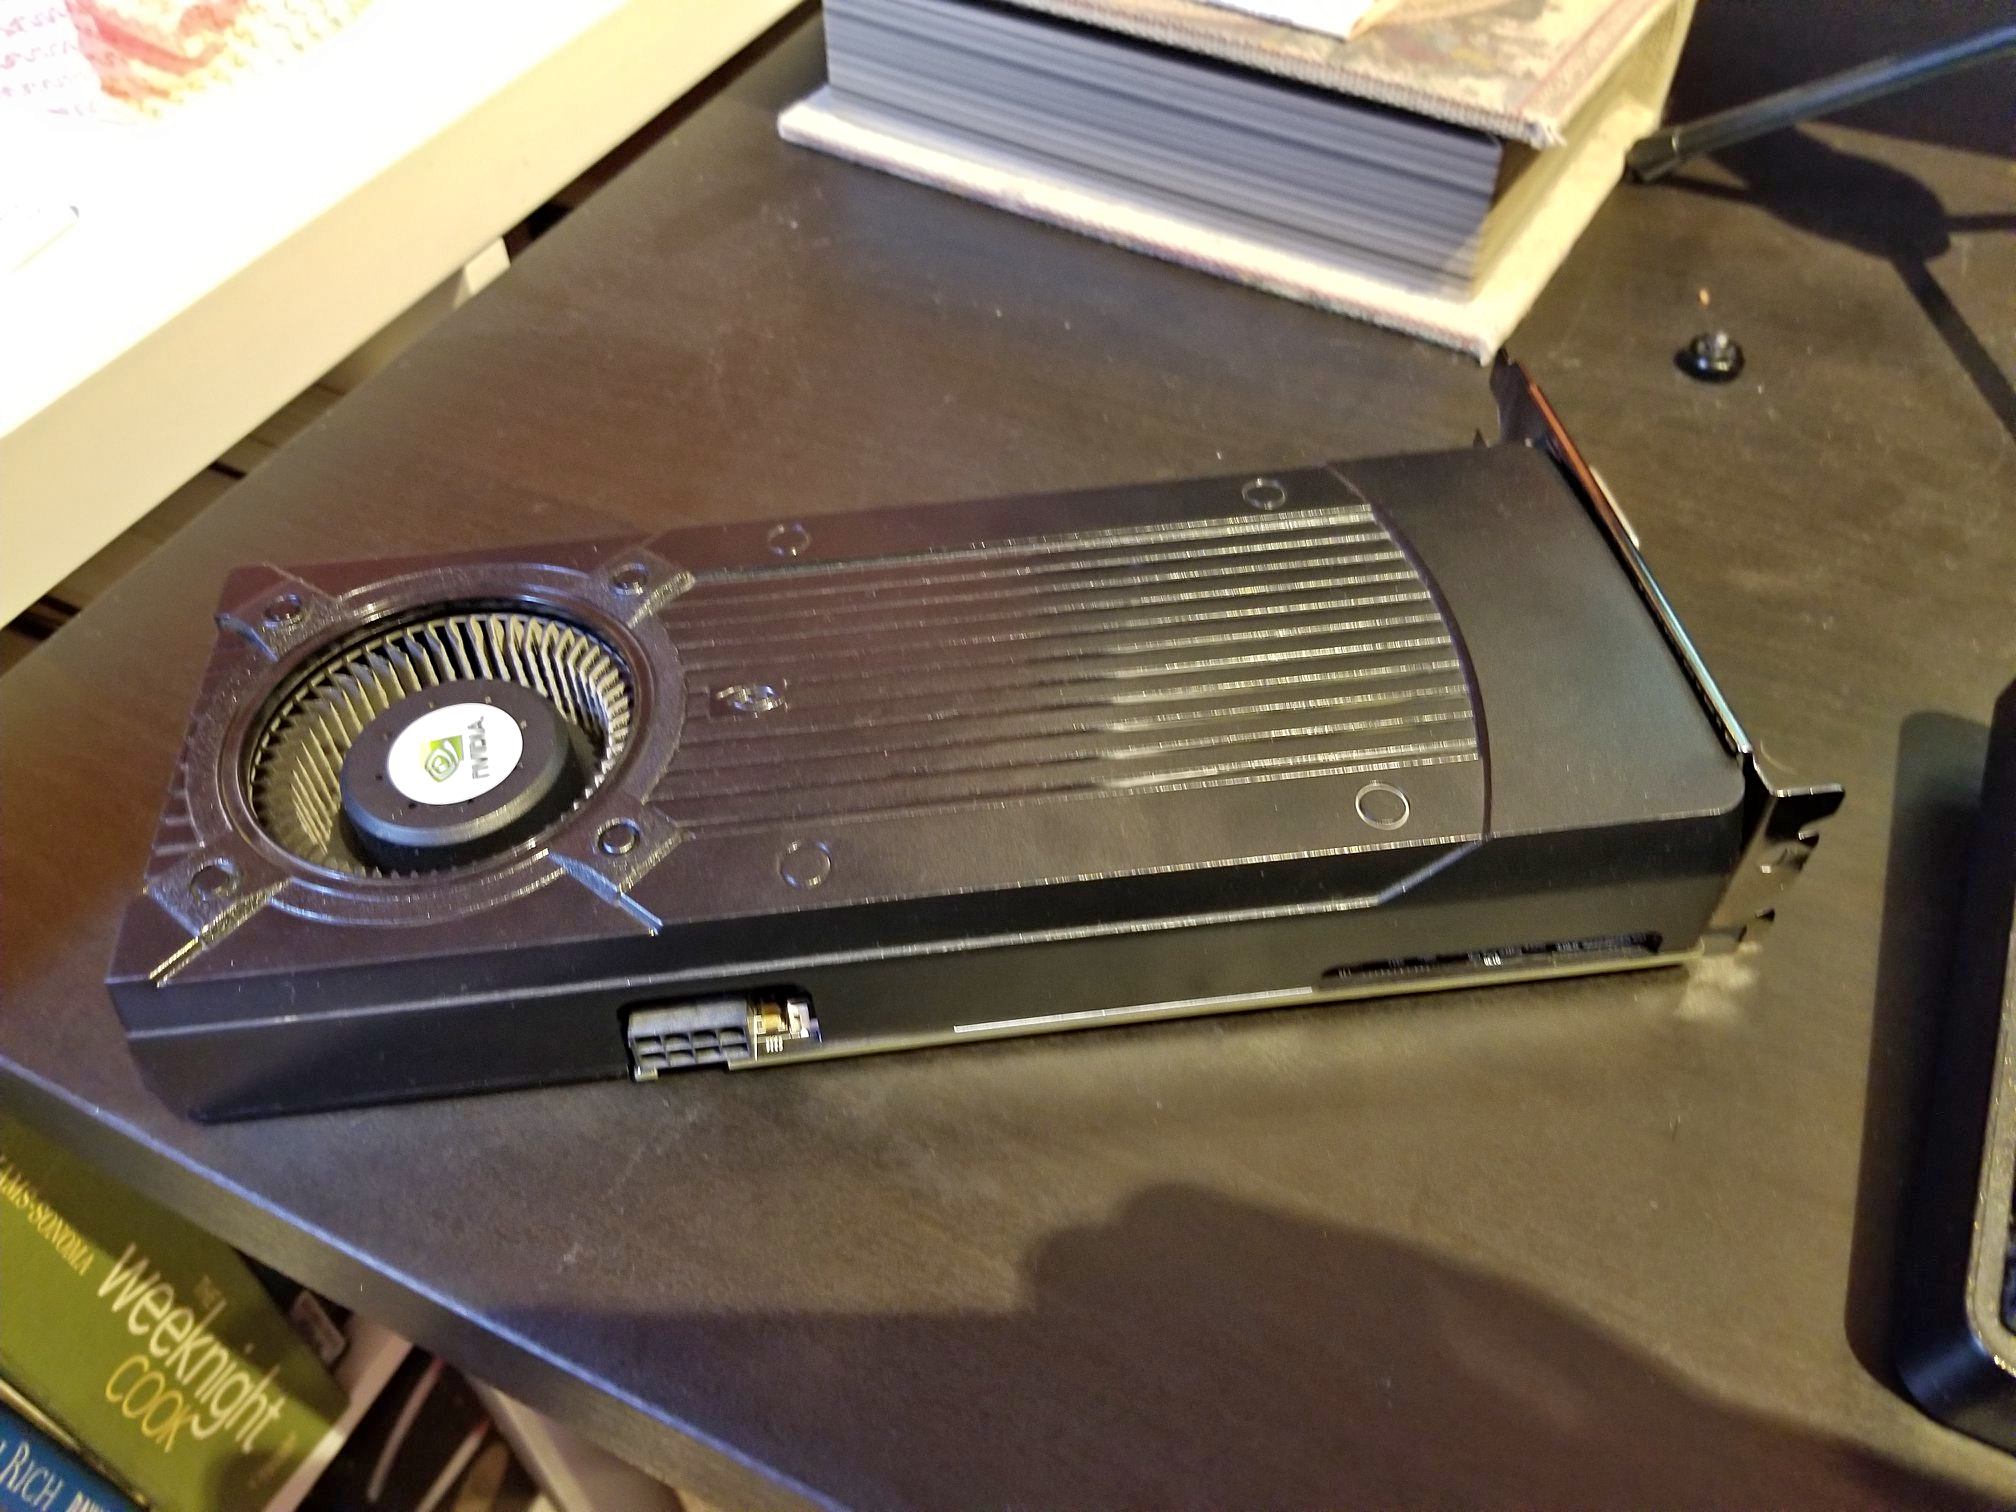
Okay to answer all your questions: The card seems big but it’s a blower-style, it’s no longer than the PCI slot when the fan is removed, you just have to remove the massive heat sinks as well.
I was going to use rubbing alcohol, it was used in a tutorial video and seemed to work fine for them. I just need a bit of paste for re-installing.
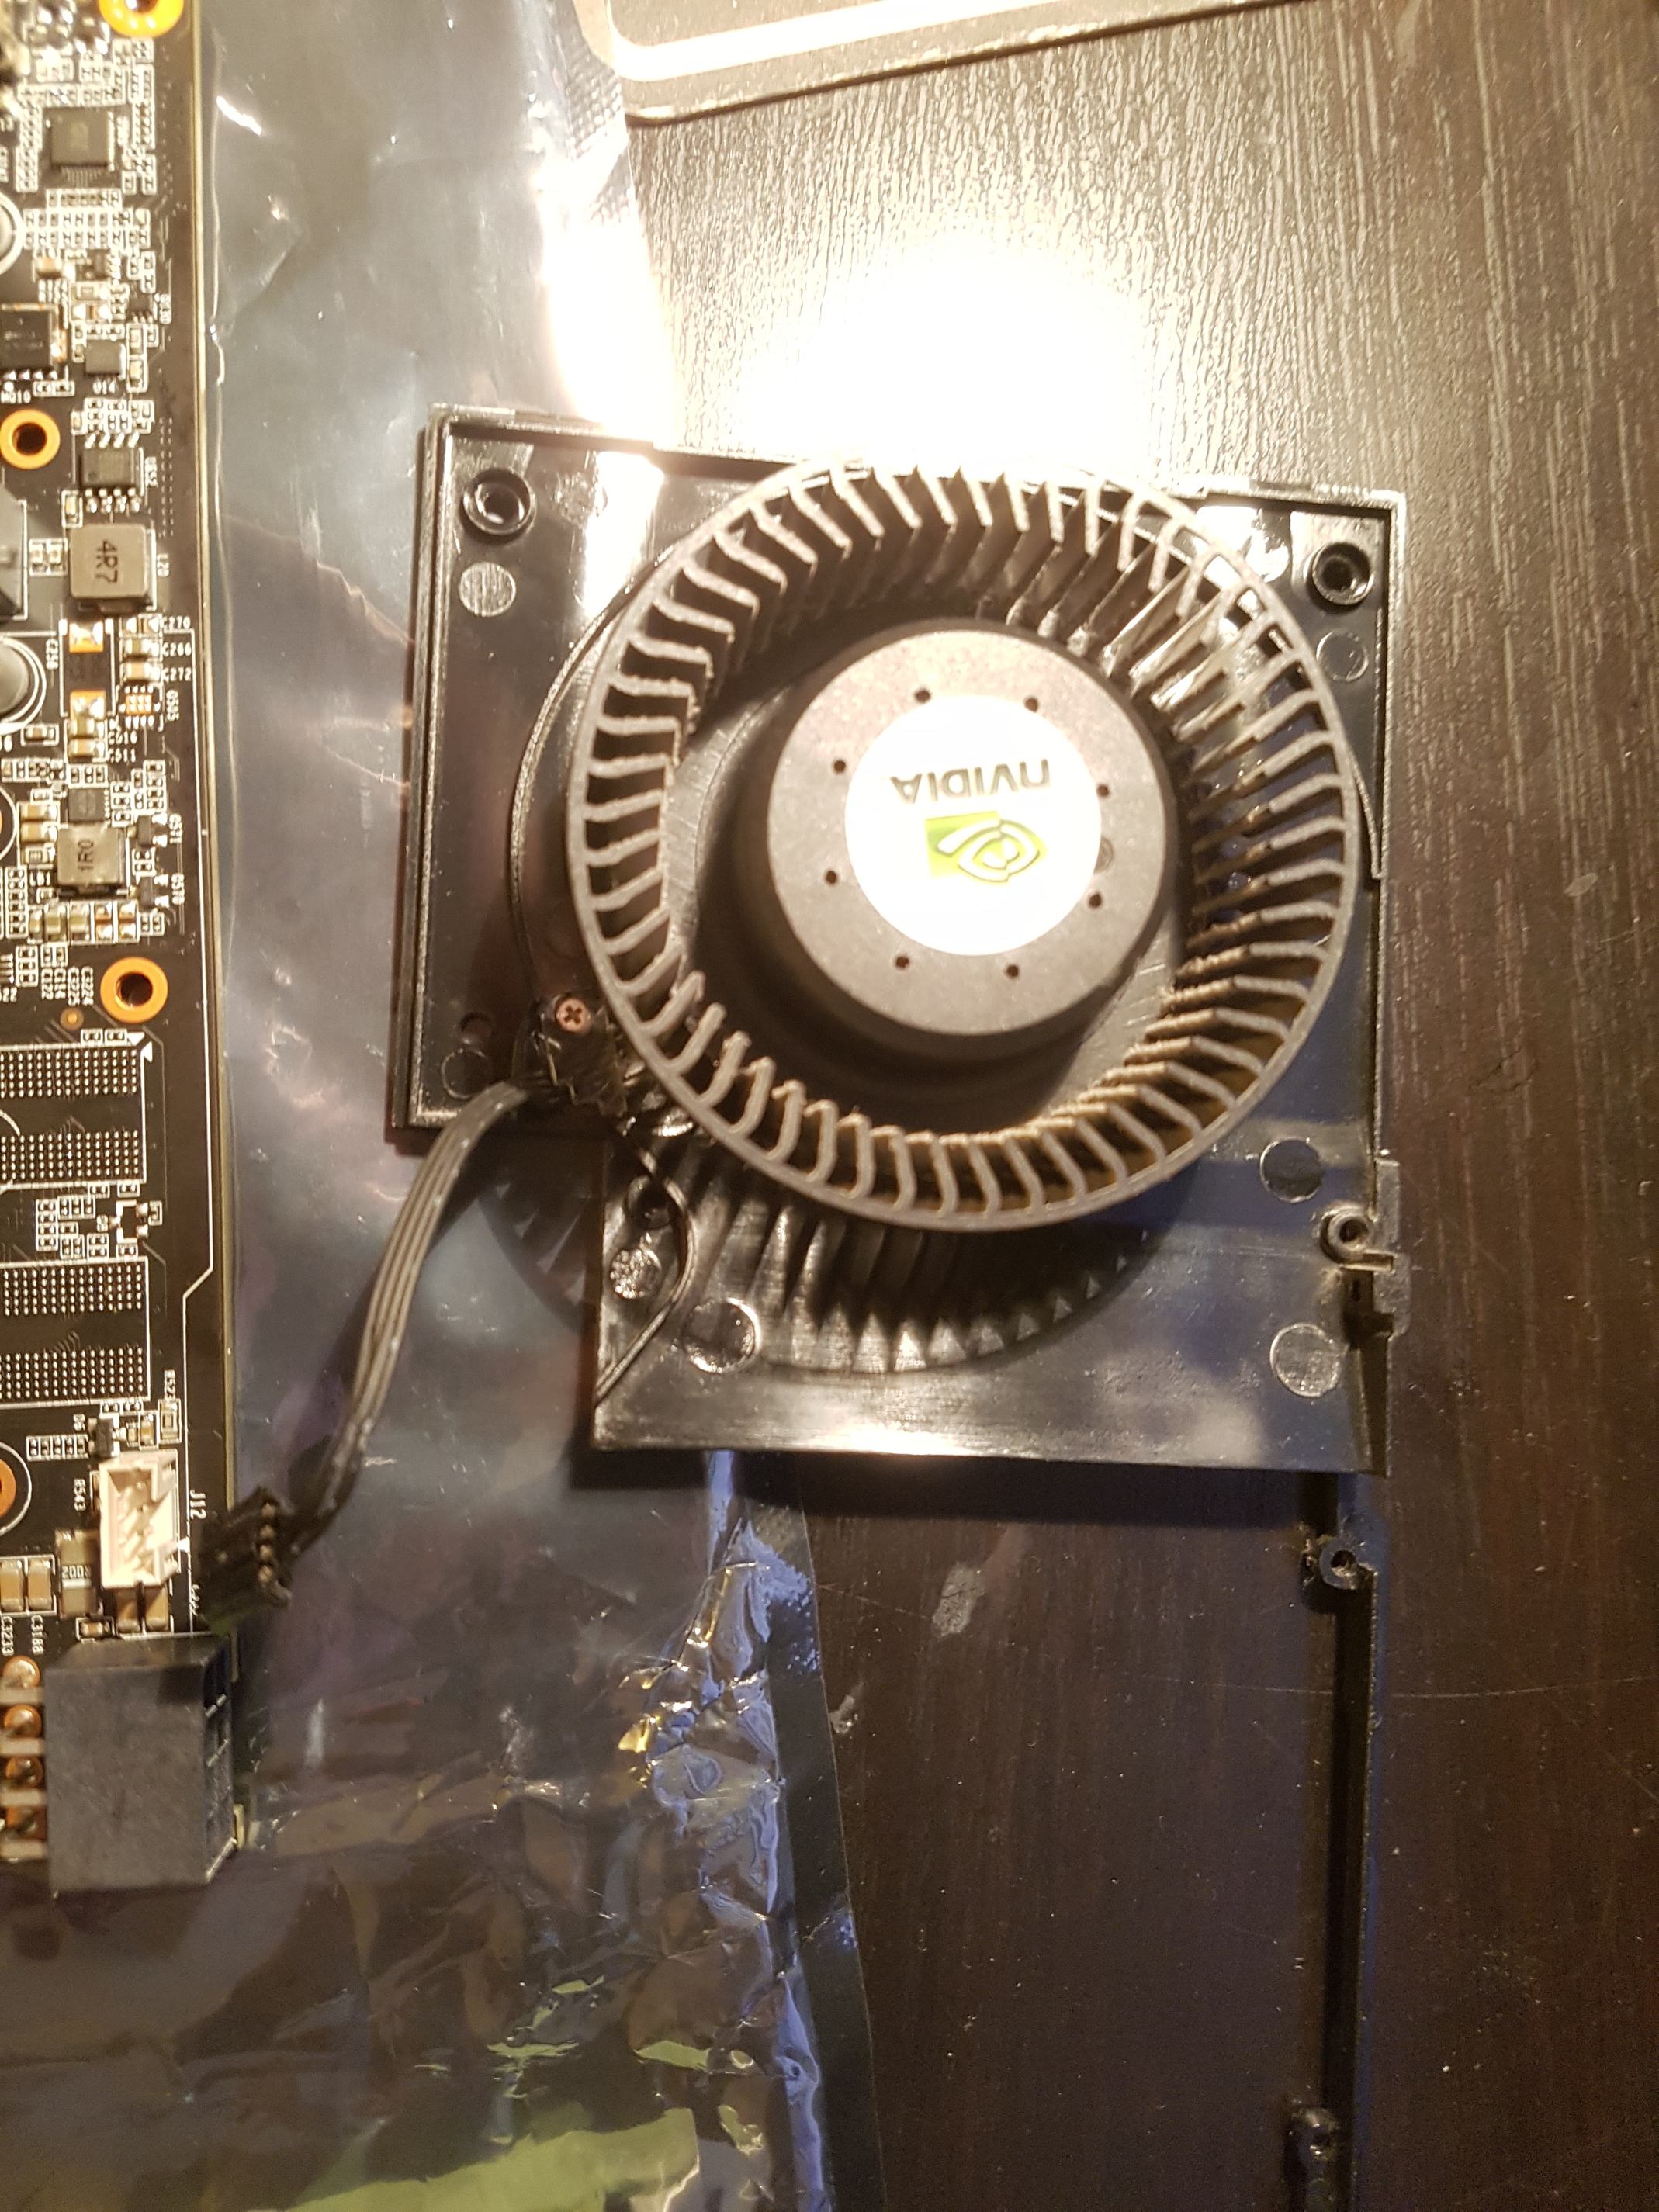
Lastly, while I removed the fan to check out the board I didn’t test it. Would a card not function if the fan isn’t connected? I assume that a card would run, just overheat without it.
I need sometime later to take more photos later, here’s one from the seller that I managed to save. The fan wasn’t moving for him as well. I was unsure if it would fit in the oven, but you can see from the photo that it comes out to the 8 pin plug and is a few inches deep due to the connections on it, but it does become very thin. I was assuming that my power supply was working, my other card needs 12 pins but all my cords should be working, it’s old but I haven’t had problems, it’s 750w PSU and this is a GTX 1060 card that requires at least a 450w PSU. My other card is a GTX 670, seems to use the same amount of power.
Ah. I’m guessing you got this from Facebook Marketplace since I saw this exact item recently and actually chatted with the guy. They’re reference NVIDIA cards.
I wonder if you might be able to measure the VRM output voltages before attempting to reflow it - sometimes it’s a problem with power supply as opposed to the connections on the back, especially if the fan isn’t turning. Is there 12V to the fan? I’m not sure if this PWM fan even HAS a “Fan Off” mode, as usually the minimum PWM is 20% and if it doesn’t receive a signal it will go full blast.
@larryqian I’m not sure how to measure that, but I have a multi meter. there’s just a small 4 pin connection to the fan on the board, I’ll show photos later.
I was basically told by a repair shop that for what they’d charge to diagnose the card, it was gonna simply be put into a machine to see if it runs, so the guy just told me to try it in a second machine, but I just have one PC.
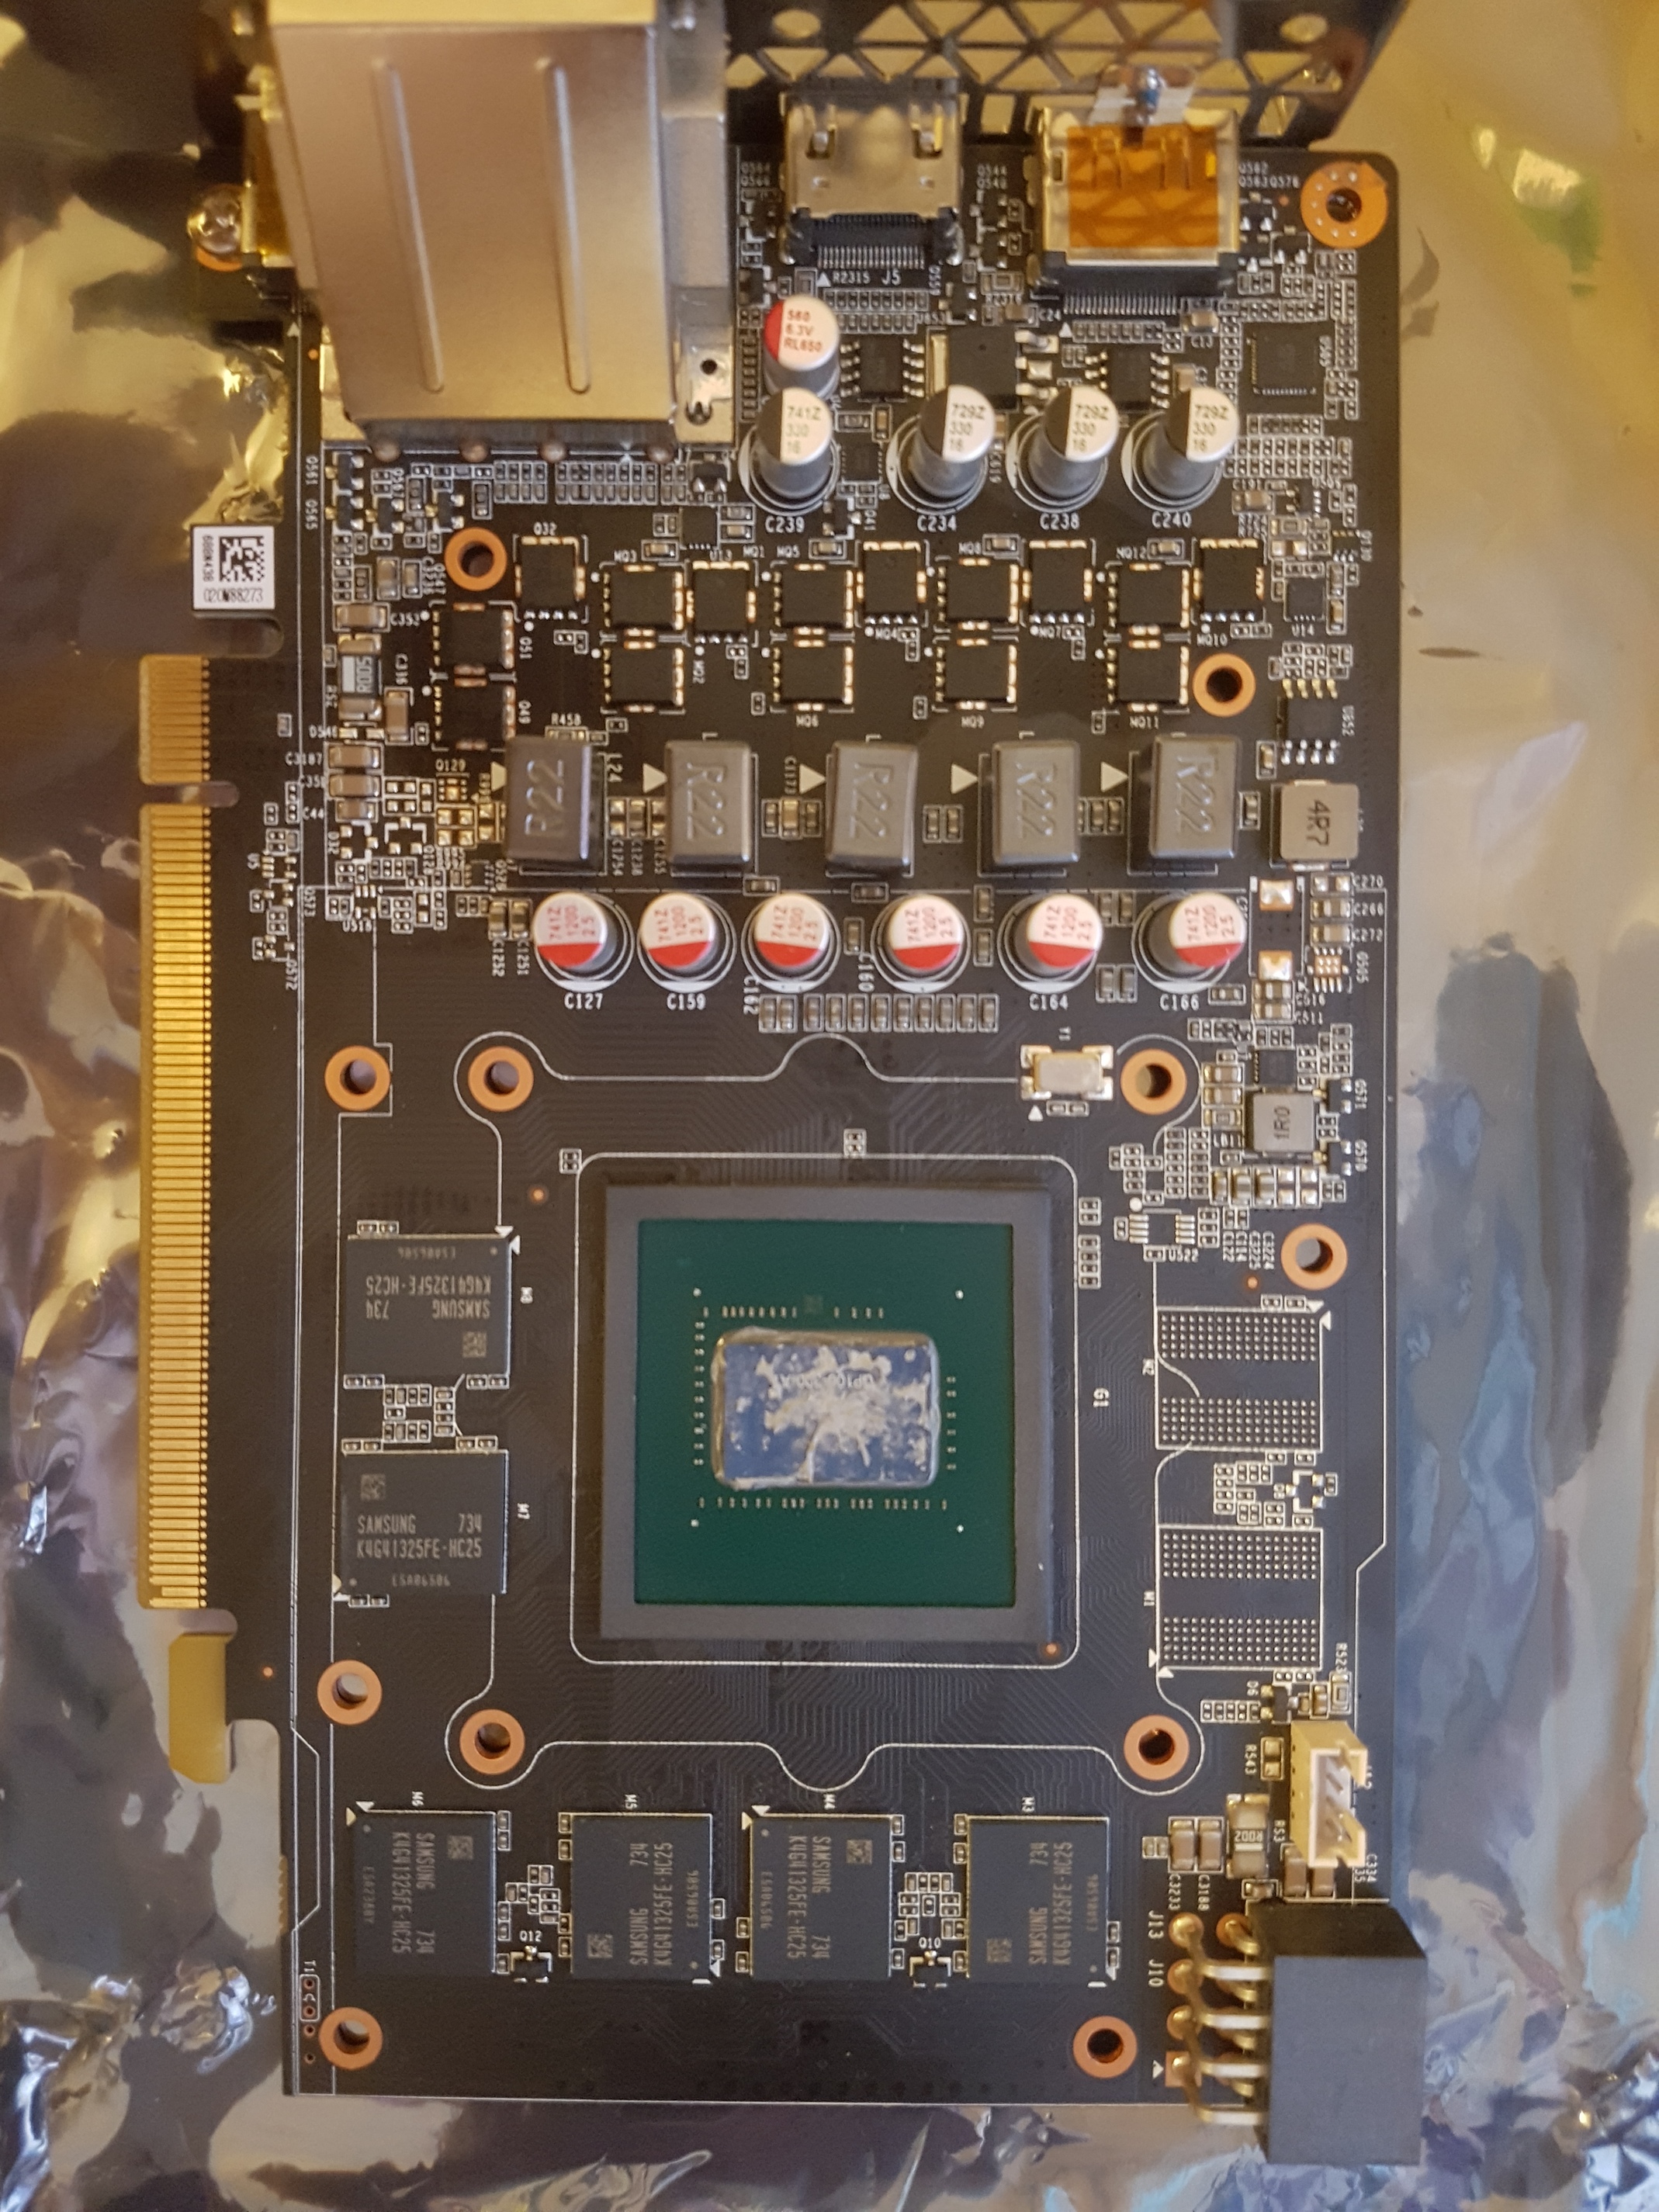
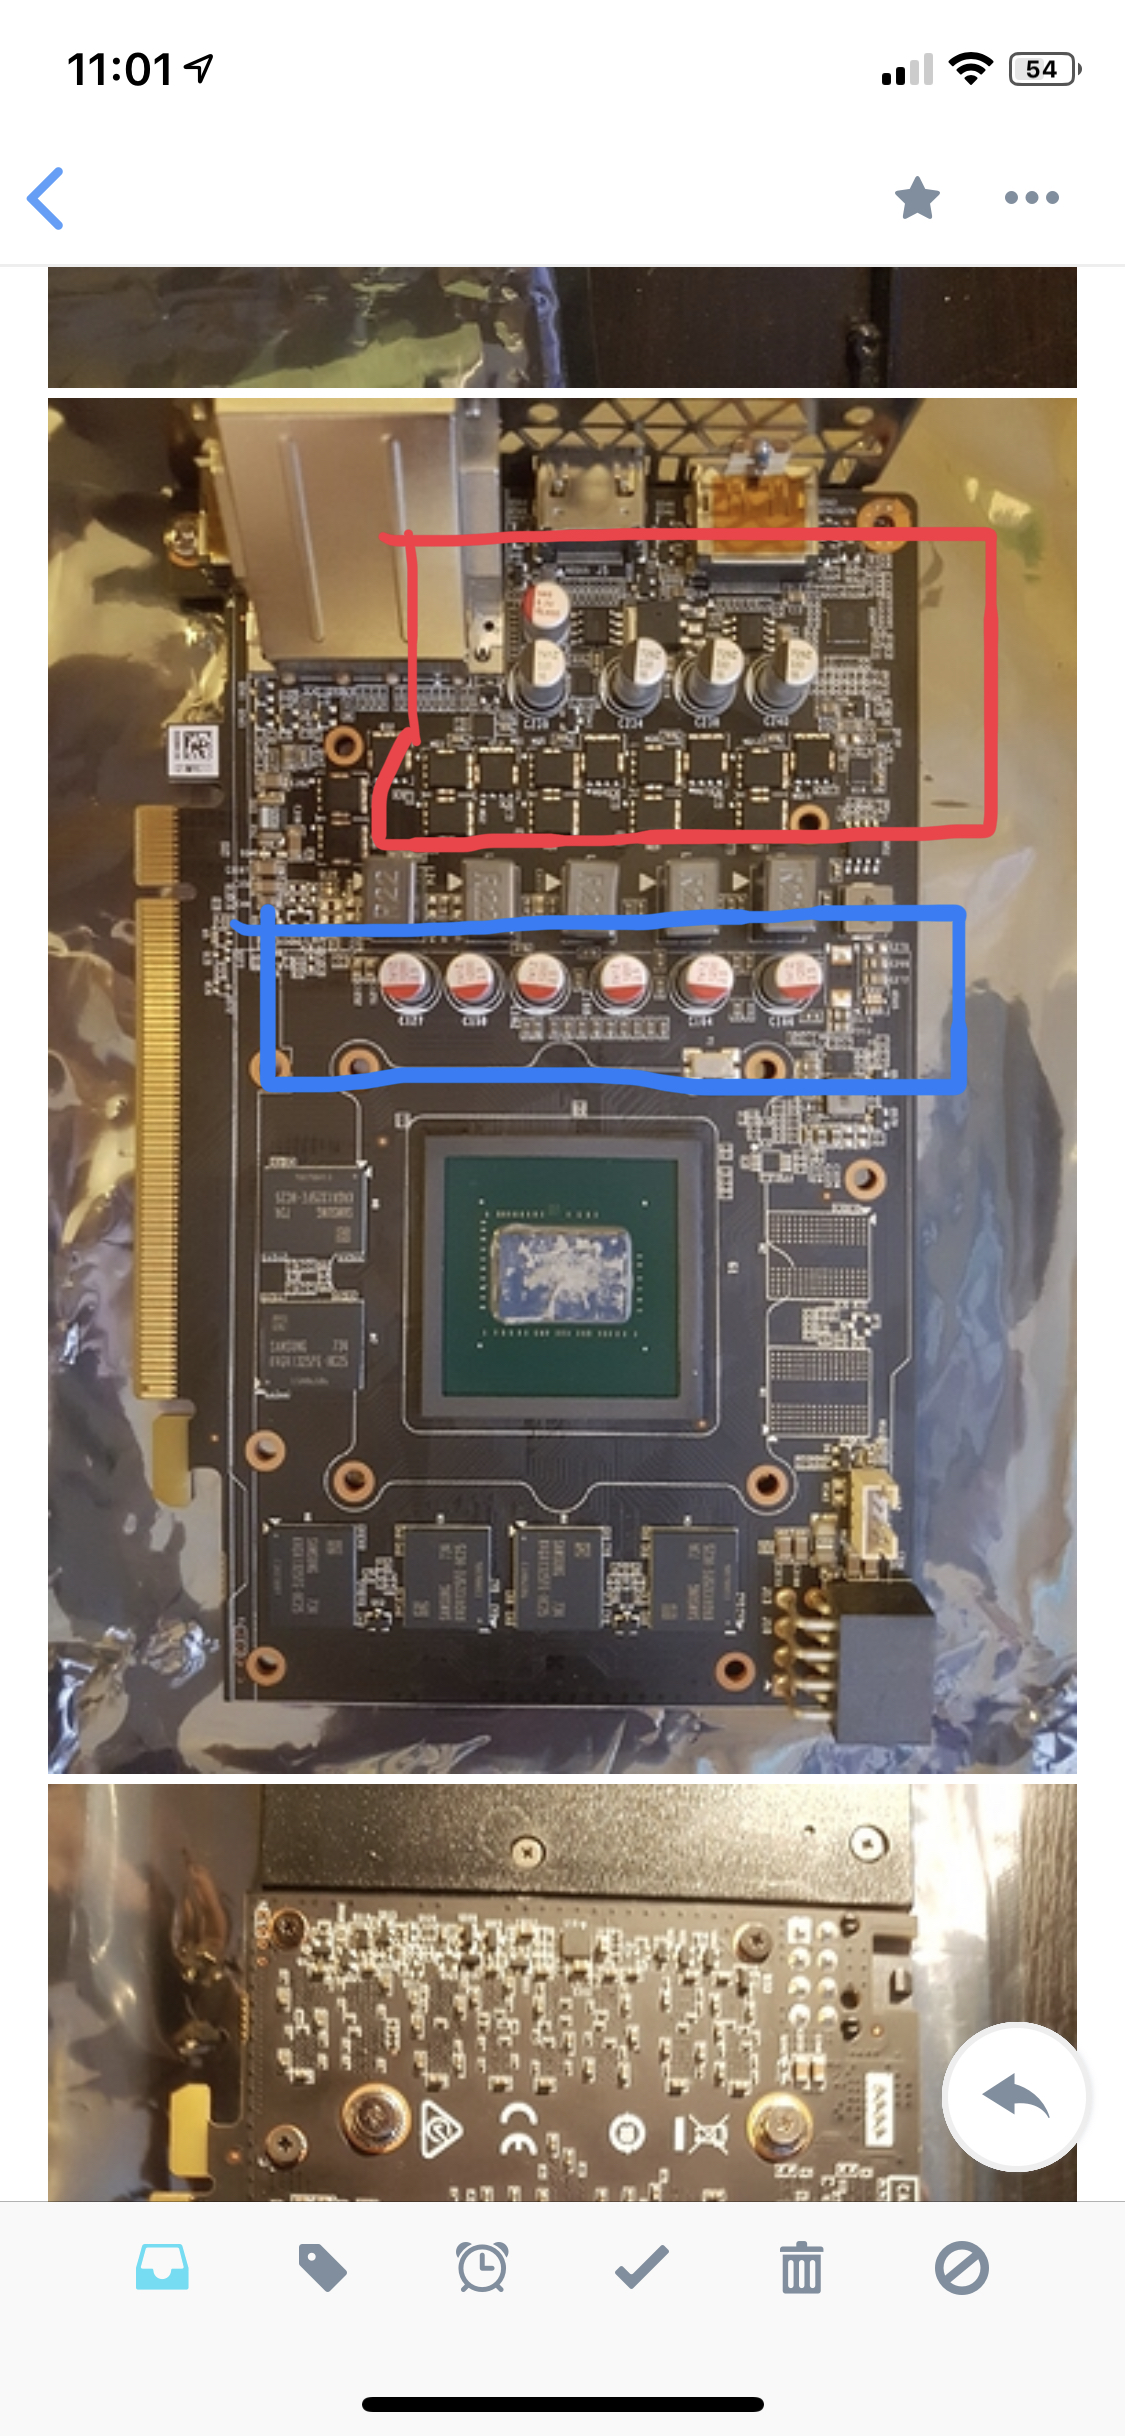
If you can take a high resolution picture of the front and back of the card, as well as the connector for the fan I may be able to circle the relevant parts.
I’ve put a red box around the capacitors (red and black top cans) for the input voltage (should be ~12V) and a blue one around the capacitors for the output voltage (should be 0.8-1.5V) of the power supply circuitry. Perhaps take some measurements of all of them with the multimeter with it installed in a PC (make sure the 8 pin cable is connected;(if it’s an 8pin you must use an 8pin supply or adapter)
Be careful not to short the board out with the multimeter. Might help to try it out before applying power to make sure. Make sure you’ve got the heat sink attached, the chip could get really hot if it receives power without a heat sink. They can pull a hundred watts or more before initialization.
Would using the beeping mode on the pins of each fuse’ pins be enough to see if one is not functioning? I only have one computer and would be a little concerned testing it powered on, but I could wear rubber gloves to be safe. I’m not sure what setting to set the multi-meter to but I’m gonna guess 1.5V?
I’m trying to fix a panini press and wanted to test capacitors on it in a similar manner.