I’ll take one please!
PS Tilt was $34 for each kit.
I’ll take one please!
PS Tilt was $34 for each kit.
A couple of other things that I have noted:
Check AS5047D Magnetic Encoder Power Management issue. It’s functioning however on this board it was not done the way it was specified in the datasheet.
And also check the A4954 PWM Motor Driver Chip Thermal Pad issue. The bottom of chip should be directly soldered to board to aid in thermal heat dissipation.
Mark
So an update on the two sided stencil and bake.
Both @Janet and myself did our boards this way.
It seems to work just fine.
The bottom layer with fewer components was done first. (Pasted, placed and baked)
Then board flipped, top solder paste stencilled, parts placed, and baked a second time
Nothing fell off the bottom and everything looks good so far.
We used a couple of blank pcbs to keep the Mechaduino boards off the bottom of the oven while cooking.
I laser cut a small jig out of 3mm birch to keep the boards off the table while working on the top layer.
Mark
It was awesome…especially the jig that Mark made. I’ll be in next week to fix a few cold joints and see if I can get the firmware on there. That reminds me…the solder paste is getting very tired/dry. I will pick up more from Lee’s next week. Can someone tell me the specs?
Lees only keep one kind afaik. BTW you can often bring it back to life by blending it with flux.
Nice! I had no idea you could do that, thanks Tom. Jarrett also mentioned that he had picked up some more.
There are four unclaimed kits:
Has anyone built and used their board successfully? I think @Majicj got the furthest. I built mine but and got it to step a motor, but couldn’t get the fancy closed-loop functionality working. I’m about to start working on it again!
I have two working kits and finishing up a third one. @Janet is working on one as well. Perhaps meet this week to finish up my board and compare notes?
Thanks. Can someone stick it in the dropbox for me?
I have two kits that I will realistically not get around to for the next while…
So if anyone still wants a kit I’ll sell them for what the parts cost which I think was $34 each…
I built mine. Just need to troubleshoot and upload firmware. Thanks Luke. Looking forward to hanging out.
Sounds like we’re going to have a group build night this Wednesday. Anytime from late afternoon to evening.
I got one of mine working pretty well, except I suspect I blew one channel of the MOSFET stepper driver, so the stepper limps on every second step. Incredibly, the software calibration works around this somewhat.
Hey @LoialOtter . I was just looking for the programmer as was thinking to program a few mechaduinos tonight. The J-Link is no longer in the locker with the kits. I gather that you have taken it back? Any chance that we could use it again in the next little while?
Mark
Mark, I have one to loan if you need it.
Sorry, ya, had to grab it back this last week.
@lukecyca
Thanks! Almost forgot that. So I just let you know the day I’m going to grab it?
We’re going to do another build night on Thursday, Dec 1. I’ll be there from 5pm onward (but have to teach a laser training at 7pm).
I have one unit built and working well, so everyone’s welcome to have a look and try it out. I’ll be building my second one.
@Jarrett and @Janet will be there.
If you have yet to build yours, or even pick up your kit. THEN YOU SHOULD COME!
If you didn’t get a kit but would like to come and see what it’s all about, you’re more than welcome.
Sweet, will be there!
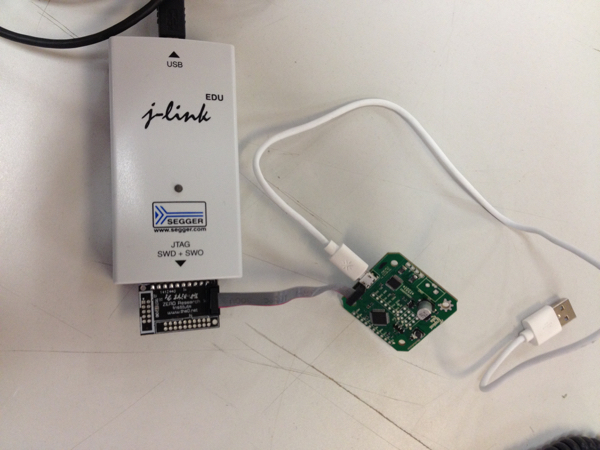
I managed to get the Mechaduino boot loader programmed with a JLink Segger and OpenOCD
Installation of OpenOCD is beyond the scope of this post. Ping me if you have any questions and I’ll do my best to help
Steps to get this working
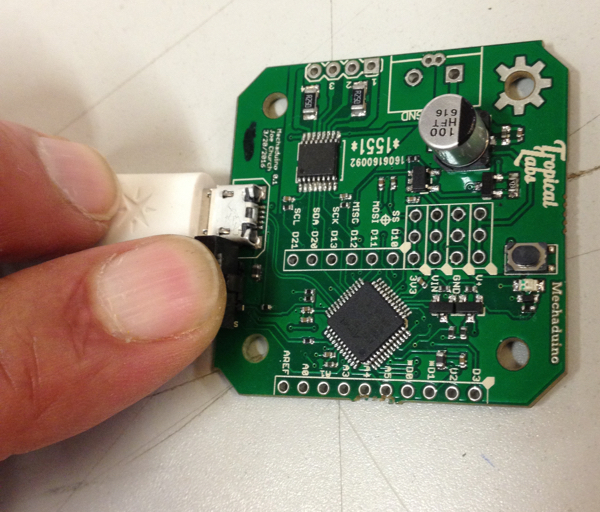
Note pin 1 is the side that is away from the micro USB connector. This Matches the red side of the cable
Connect the Micro USB cable to the Mechaduino.
Plug in the Mechaduino USB cable to your computer. The Mechaduino must be powered.
Plug in the JLink USB cable to your computer
You will need to apply a little bit of angled pressure to the connection to get good electrical contact.
I ran openocd From the command line and passed it a configuration file called mechtest.cfg
→ openocd -f mechtest.cfg
The contents of the configuration file mechtest.cfg were as follows.
source [find interface/jlink.cfg]
transport select swd
set CHIPNAME at91samd21g18
source [find target/at91samdXX.cfg]
reset_config srst_gates_jtag
adapter_nsrst_delay 100
adapter_nsrst_assert_width 100
init
targets
reset halt
at91samd chip-erase
program samd21_sam_ba.bin exit 0x00000000 verify
reset
On success you should see output resembling the folllowing
openocd -f mechtest.cfg
Open On-Chip Debugger 0.9.0 (2015-11-15-05:34)
Licensed under GNU GPL v2
For bug reports, read
OpenOCD: Bug Reporting
Info : JLink SWD mode enabled
adapter speed: 500 kHz
adapter_nsrst_delay: 100
cortex_m reset_config sysresetreq
none separate
adapter_nsrst_delay: 100
adapter_nsrst_assert_width: 100
Info : J-Link V9 compiled Jun 23 2015 10:00:59
Info : J-Link caps 0xb9ff7bbf
Info : J-Link hw version 93000
Info : J-Link hw type J-Link
Info : J-Link max mem block 70912
Info : J-Link configuration
Info : USB-Address: 0x0
Info : Kickstart power on JTAG-pin 19: 0xffffffff
Info : Vref = 3.322 TCK = 0 TDI = 0 TDO = 0 TMS = 0 SRST = 1 TRST = 1
Info : J-Link JTAG Interface ready
Info : clock speed 500 kHz
Info : SWD IDCODE 0x0bc11477
Info : at91samd21g18.cpu: hardware has 4 breakpoints, 2 watchpoints
Error: at91samd21g18.cpu – clearing lockup after double fault
Polling target at91samd21g18.cpu failed, trying to reexamine
Info : at91samd21g18.cpu: hardware has 4 breakpoints, 2 watchpoints
TargetName Type Endian TapName State
0* at91samd21g18.cpu cortex_m little at91samd21g18.cpu halted
target state: halted
target halted due to debug-request, current mode: Thread
xPSR: 0xf1000000 pc: 0xfffffffe msp: 0xfffffffc
chip erased
target state: halted
target halted due to debug-request, current mode: Thread
xPSR: 0xf1000000 pc: 0xfffffffe msp: 0xfffffffc
** Programming Started **
auto erase enabled
Info : SAMD MCU: SAMD21G18A (256KB Flash, 32KB RAM)
wrote 16384 bytes from file samd21_sam_ba.bin in 2.153932s (7.428 KiB/s)
** Programming Finished **
** Verify Started **
verified 5972 bytes in 0.511491s (11.402 KiB/s)
** Verified OK **
shutdown command invoked
There are other ways and tools to program boot loaders. I am no expert but this is what I managed to get working.
Thanks to @LoialOtter for the initial scripts and @TomKeddie for his loan of the JLink Segger for a week or so.
Tonight was great. Thanks Mark and Luke for keeping this project rolling.
I’m uploading the firmware as we speak. Wooo!